Set Commands
Overview
This tutorial is designed to help the user get familiar with using set commands to bring up and apply basic configs to their NGFW. By the end of this tutorial the user should be able to alter their firewall manually through the Command Line Interface (CLI) with set commands. All set/op commands that can be entered in the CLI manually can also be transformed into an automation playlist in the form of a skillet. This allows the user to run a series of set commands to easily configure their NGFW with just the click of a button. The configuration tutorial will create a simple configuration including:
An IP External Dynamic List (EDL) object
A tag object
Security rules (Inbound and Outbound) referencing the EDL and tag objects
This Basic Config with Set Commands tutorial will show the user how to:
Access and configure the Next Generation Firewall (NGFW) through the web UI and CLI
Capture configuration differences made on the NGFW into set commands and automation skillets
Learn how to use Panhandler tooling
Learn how to use the Skillet Line Interface (SLI) tool on the CLI
Learn the basics of using GitHub and repositories
The video below provides an end-to-end perspective for building a configuration skillet through PanHandler and can be used as a complement to the documentation content.
The video below provides an end-to-end perspective for getting a configuration difference in set command format, saving the config diff to a file and then using the SLI utility tool to load it into an NGFW.
Prerequisites
Before moving forward with the tutorial, please ensure the following prerequisites have been fulfilled.
Have an up and running NGFW Virtual Machine (VM)
Familiarity with the core elements of the SkilletBuilder page
A GitHub account with access permissions to edit repository content. Please refer to the following page for guidance on setting up GitHub for this tutorial
Docker installed, active and running on your local machine
Ability to access the NGFW device via the GUI and SSH/CLI
For users wishing to work through the command line have SLI set up and ready to go. Please refer to and follow the steps in the linked SLI page to get started with using SLI within the context of this tutorial
For users wishing to work through the browser UI log into PanHandler and be able to import/run Skillets. For more assistance on using PanHandler tooling within the context of this tutorial please refer to the following page
This tutorial can either be done by reading the document or by watching the tutorial videos. There is a video tutorial for achieving the intended results via use of the PanHandler UI tool and the SLI command line interface tool.
Building Skillets with Set Commands
Create the Configuration in the NGFW
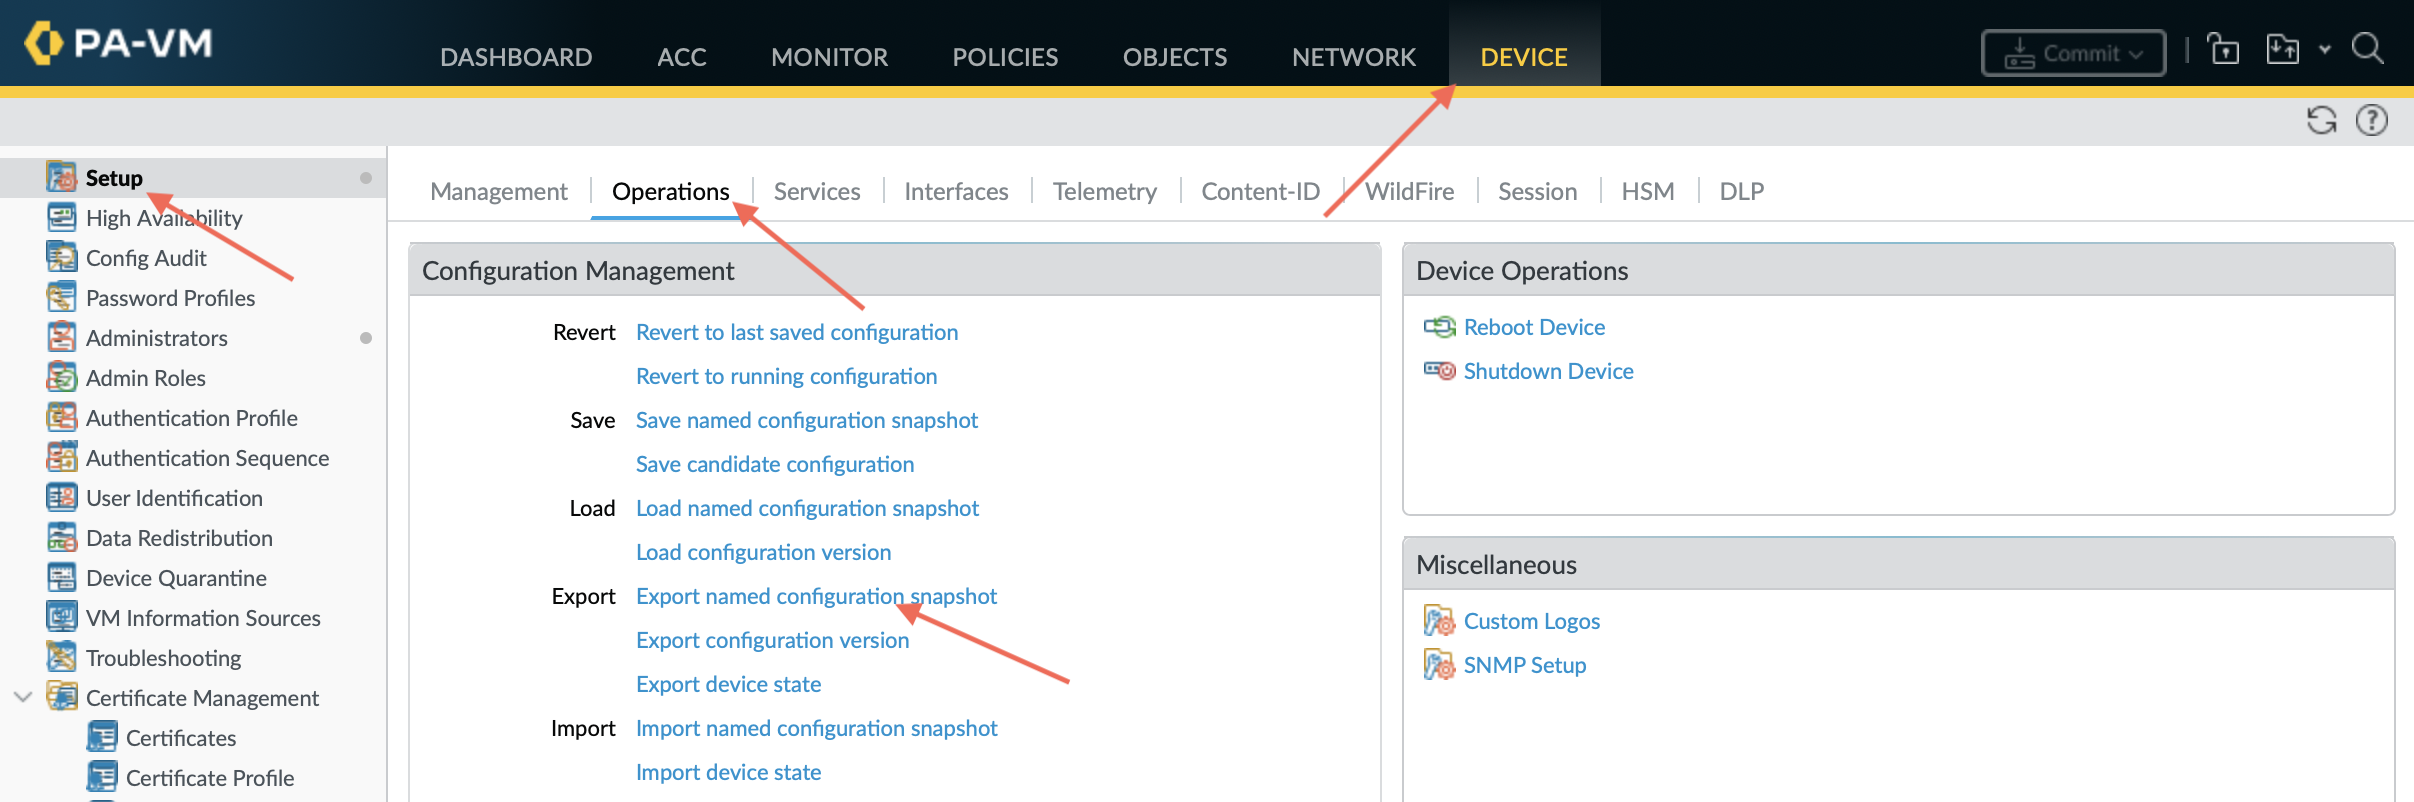
Before modifying the configuration, ensure you have a snapshot of the before/baseline configuration of your NGFW saved, we will use this saved snapshot to perform an offline configuration difference later. To do this navigate through Device > Setup > Operations > Save named configuration snapshot to save the current NGFW config.

The tutorial examples use the GUI to create the external dynamic list (EDL), tag, and security rules. Before starting these steps, make sure you commit the most recent changes made to the NGFW, to do this click on the Commit button located at the top-right of the NGFW GUI.
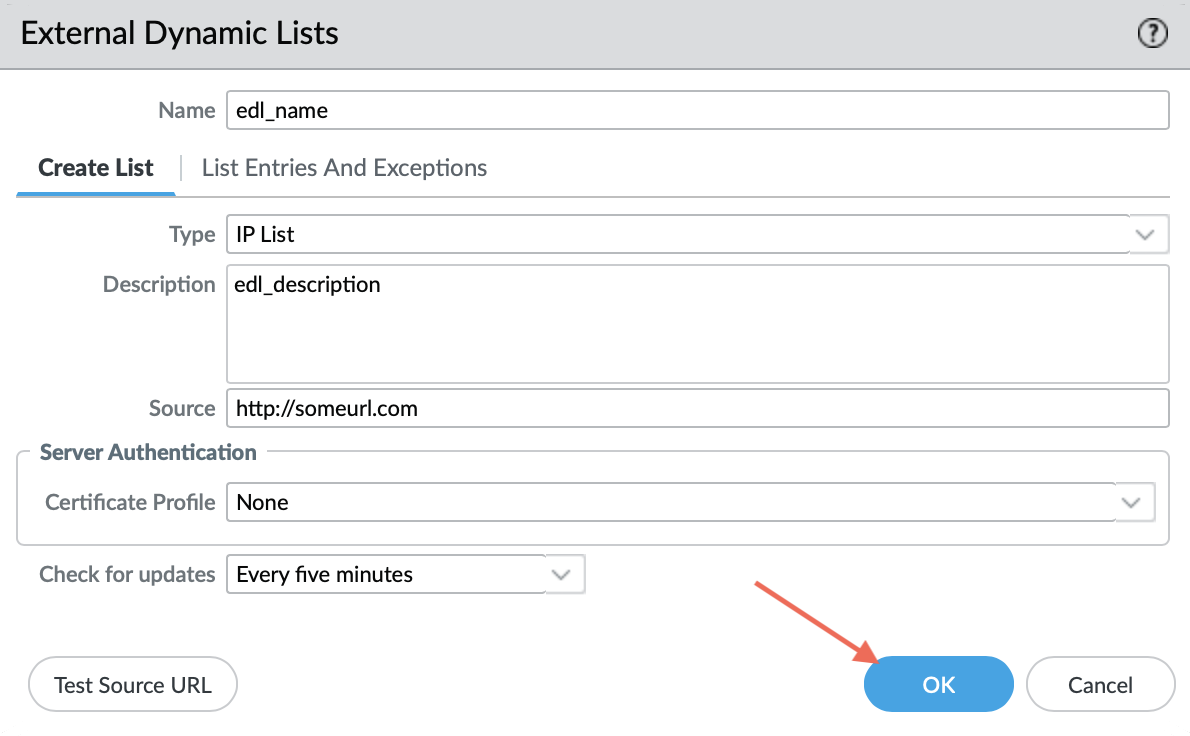
Now after committing we want to start making changes to our NGFW. First we want to configure the external-list object with a name, description, and source URL. To get to the External Dynamic List section on your NGFW navigate through the following, Objects > External Dynamic Lists > Add.
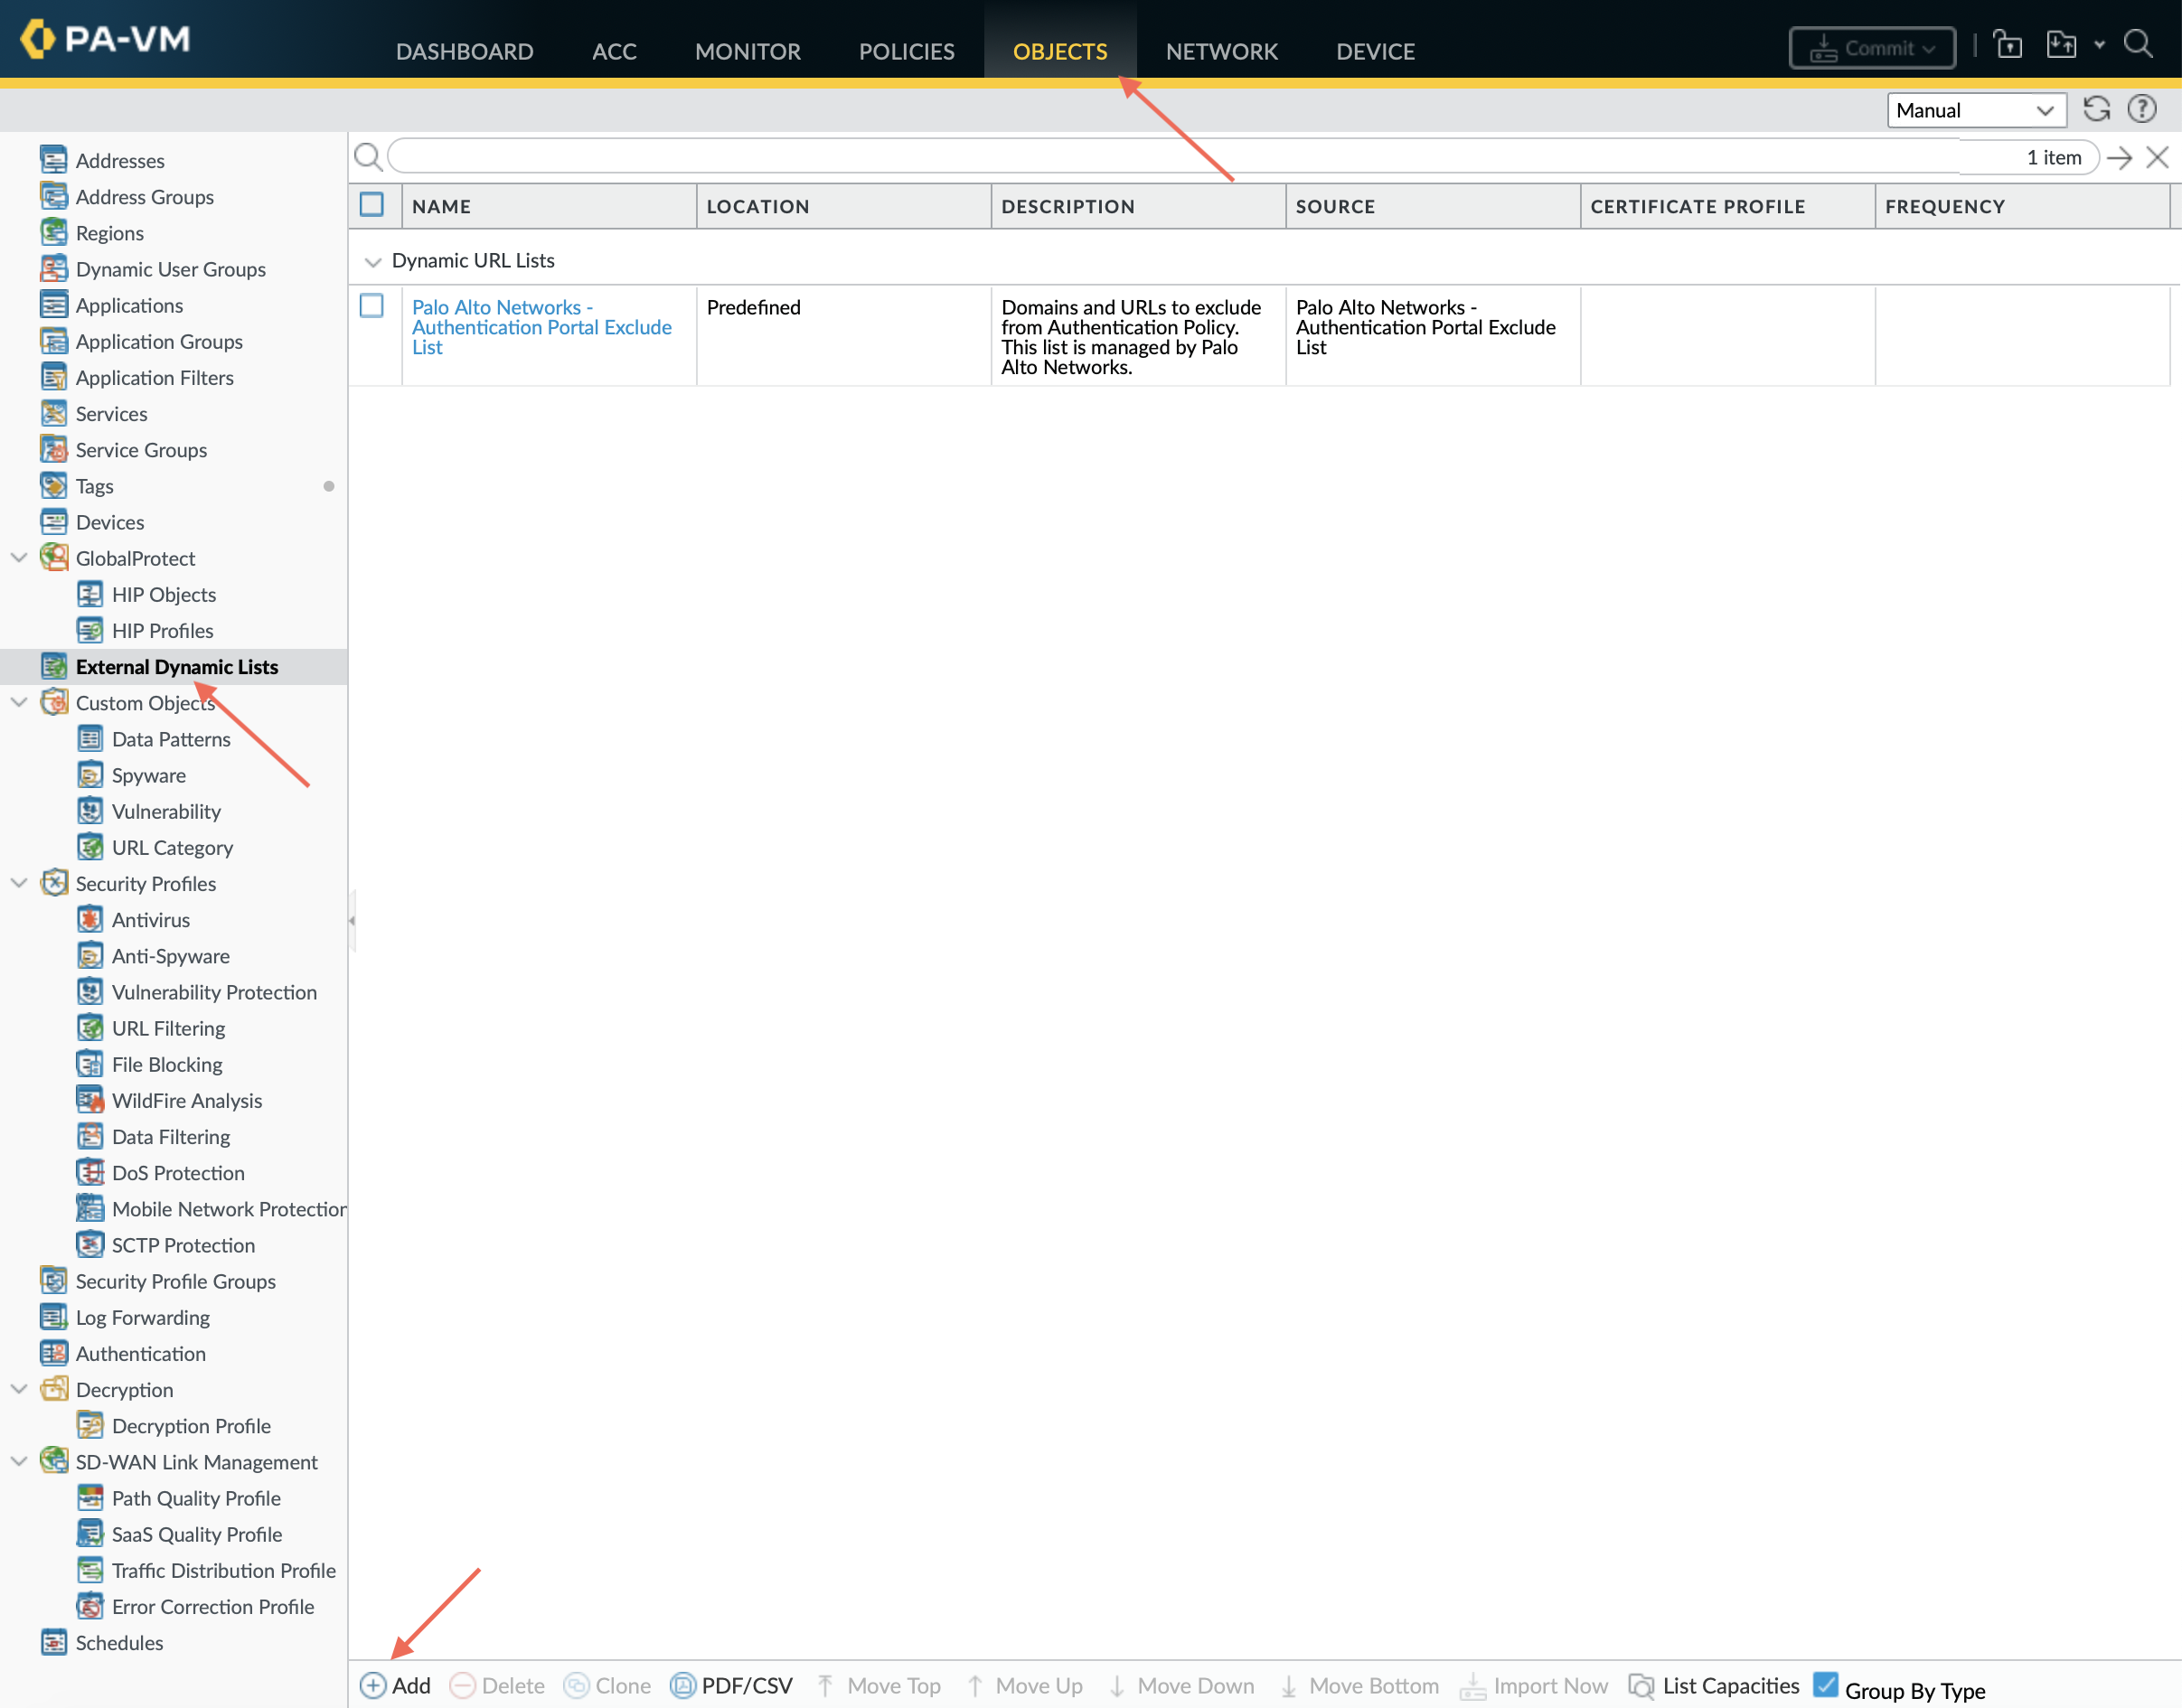
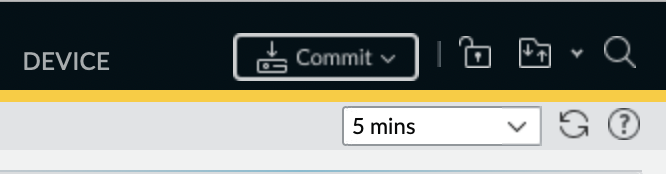
Once in the correct place make the necessary changes as seen below. Click the OK button to save the changes.
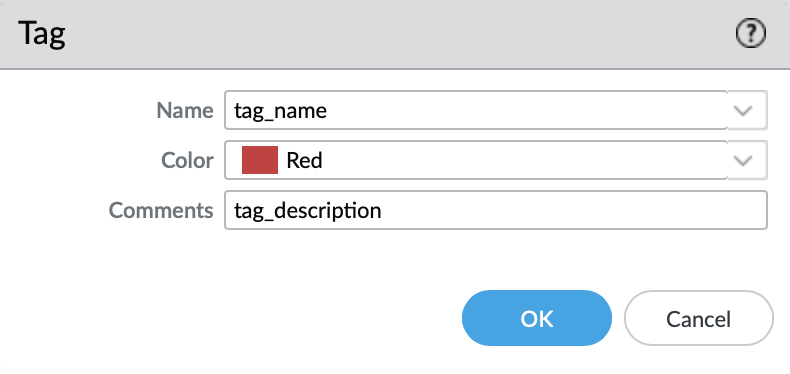
Next we need to configure the tag object with a name, color, and comments (description) and then click the OK button. Tag objects are found by clicking through the following, Objects > Tags > Add.
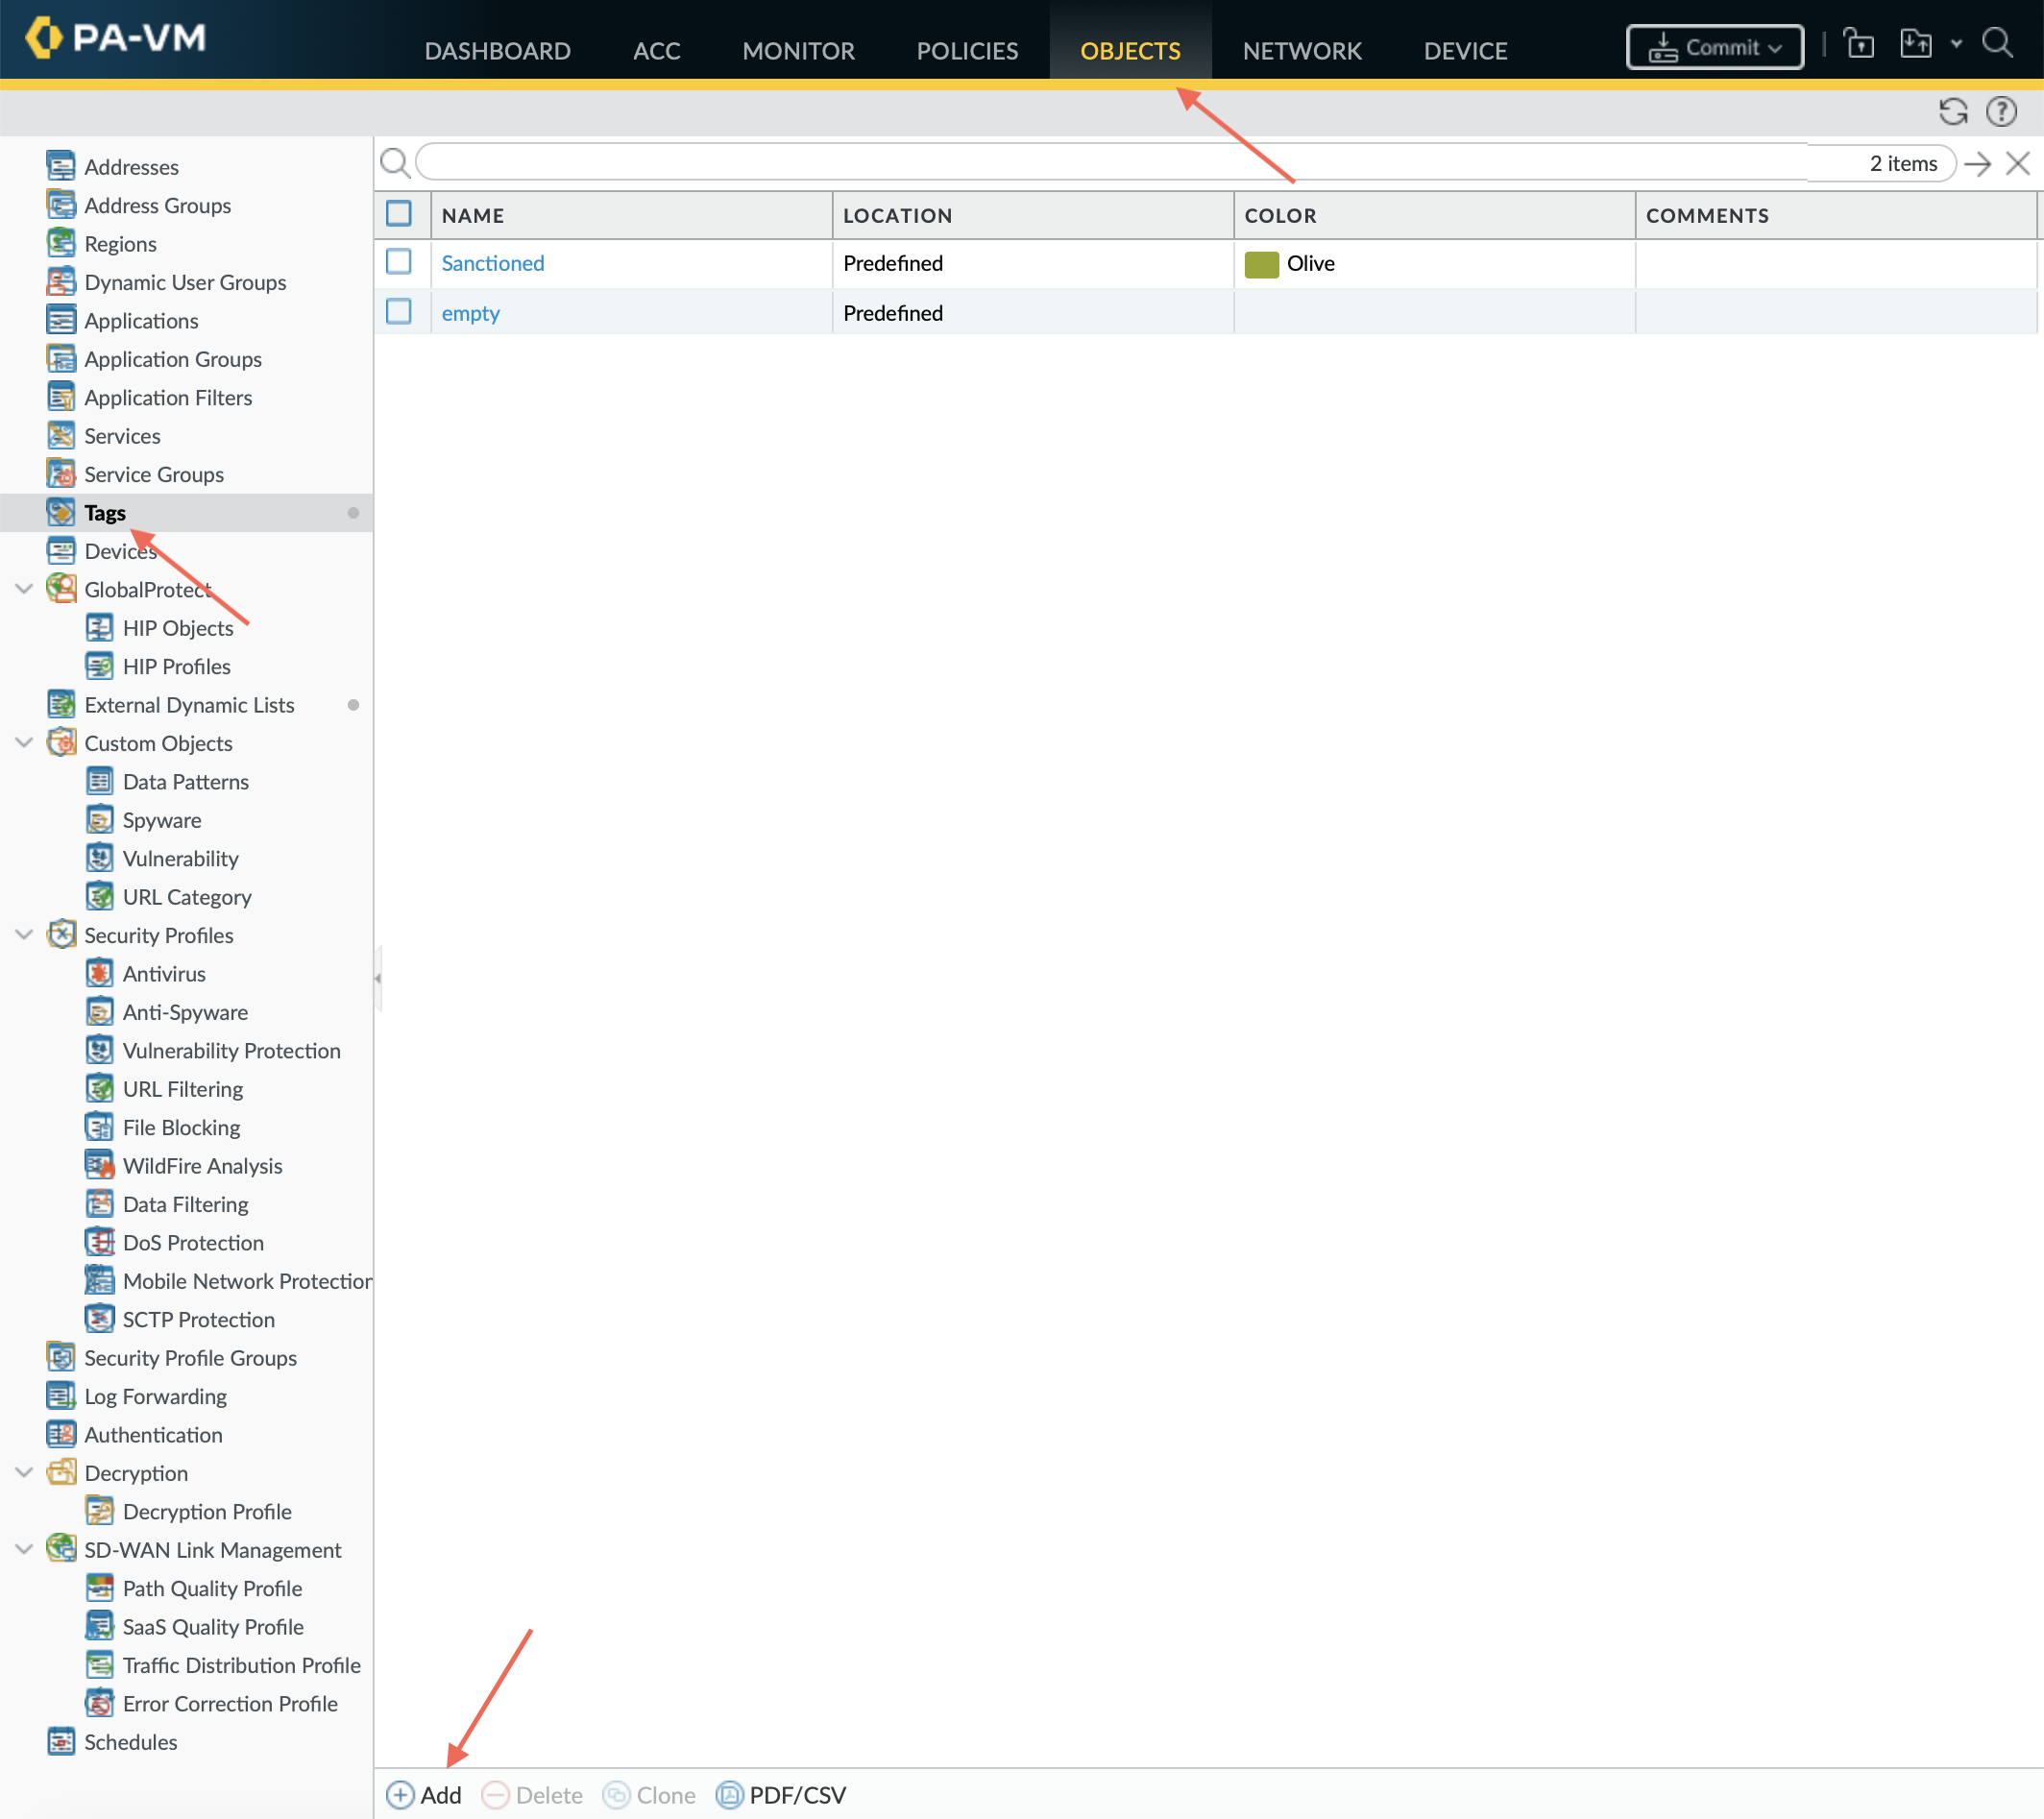
Once you have hit the add button make necessary changes as seen below and click the OK button.
Tip
The skillet will only add a single tag to the configuration. However, the GUI shows a color name while the set command is based on a color number. The use of multiple tag entries is used to extract the color values. So note that in some cases the GUI and set commands can use different values and we can use sample configs like this to discover those values.
Finally, configure inbound and outbound security rules referencing the tag and external-list. In order to add security rules please navigate through the following, Policy > Security > Add. Note that the rule names are prepended with the EDL name. In later steps variables are used in the rule names to map the EDL and ensure rule names are unique.

Once you have hit the add button make necessary changes as seen below, please make sure you have all the configurations shown below copied into your security policy.

If you want to be able to generate your set commands skillet in offline mode later in the tutorial, don’t forget to commit and save a modified configuration snapshot of your NGFW here. With your baseline and modified configurations saved you can export the files to your local machine for later use! You can do this by navigating to, Devices > Setup > Operations > Export named configuration snapshot.
Generate the Set Commands Skillet
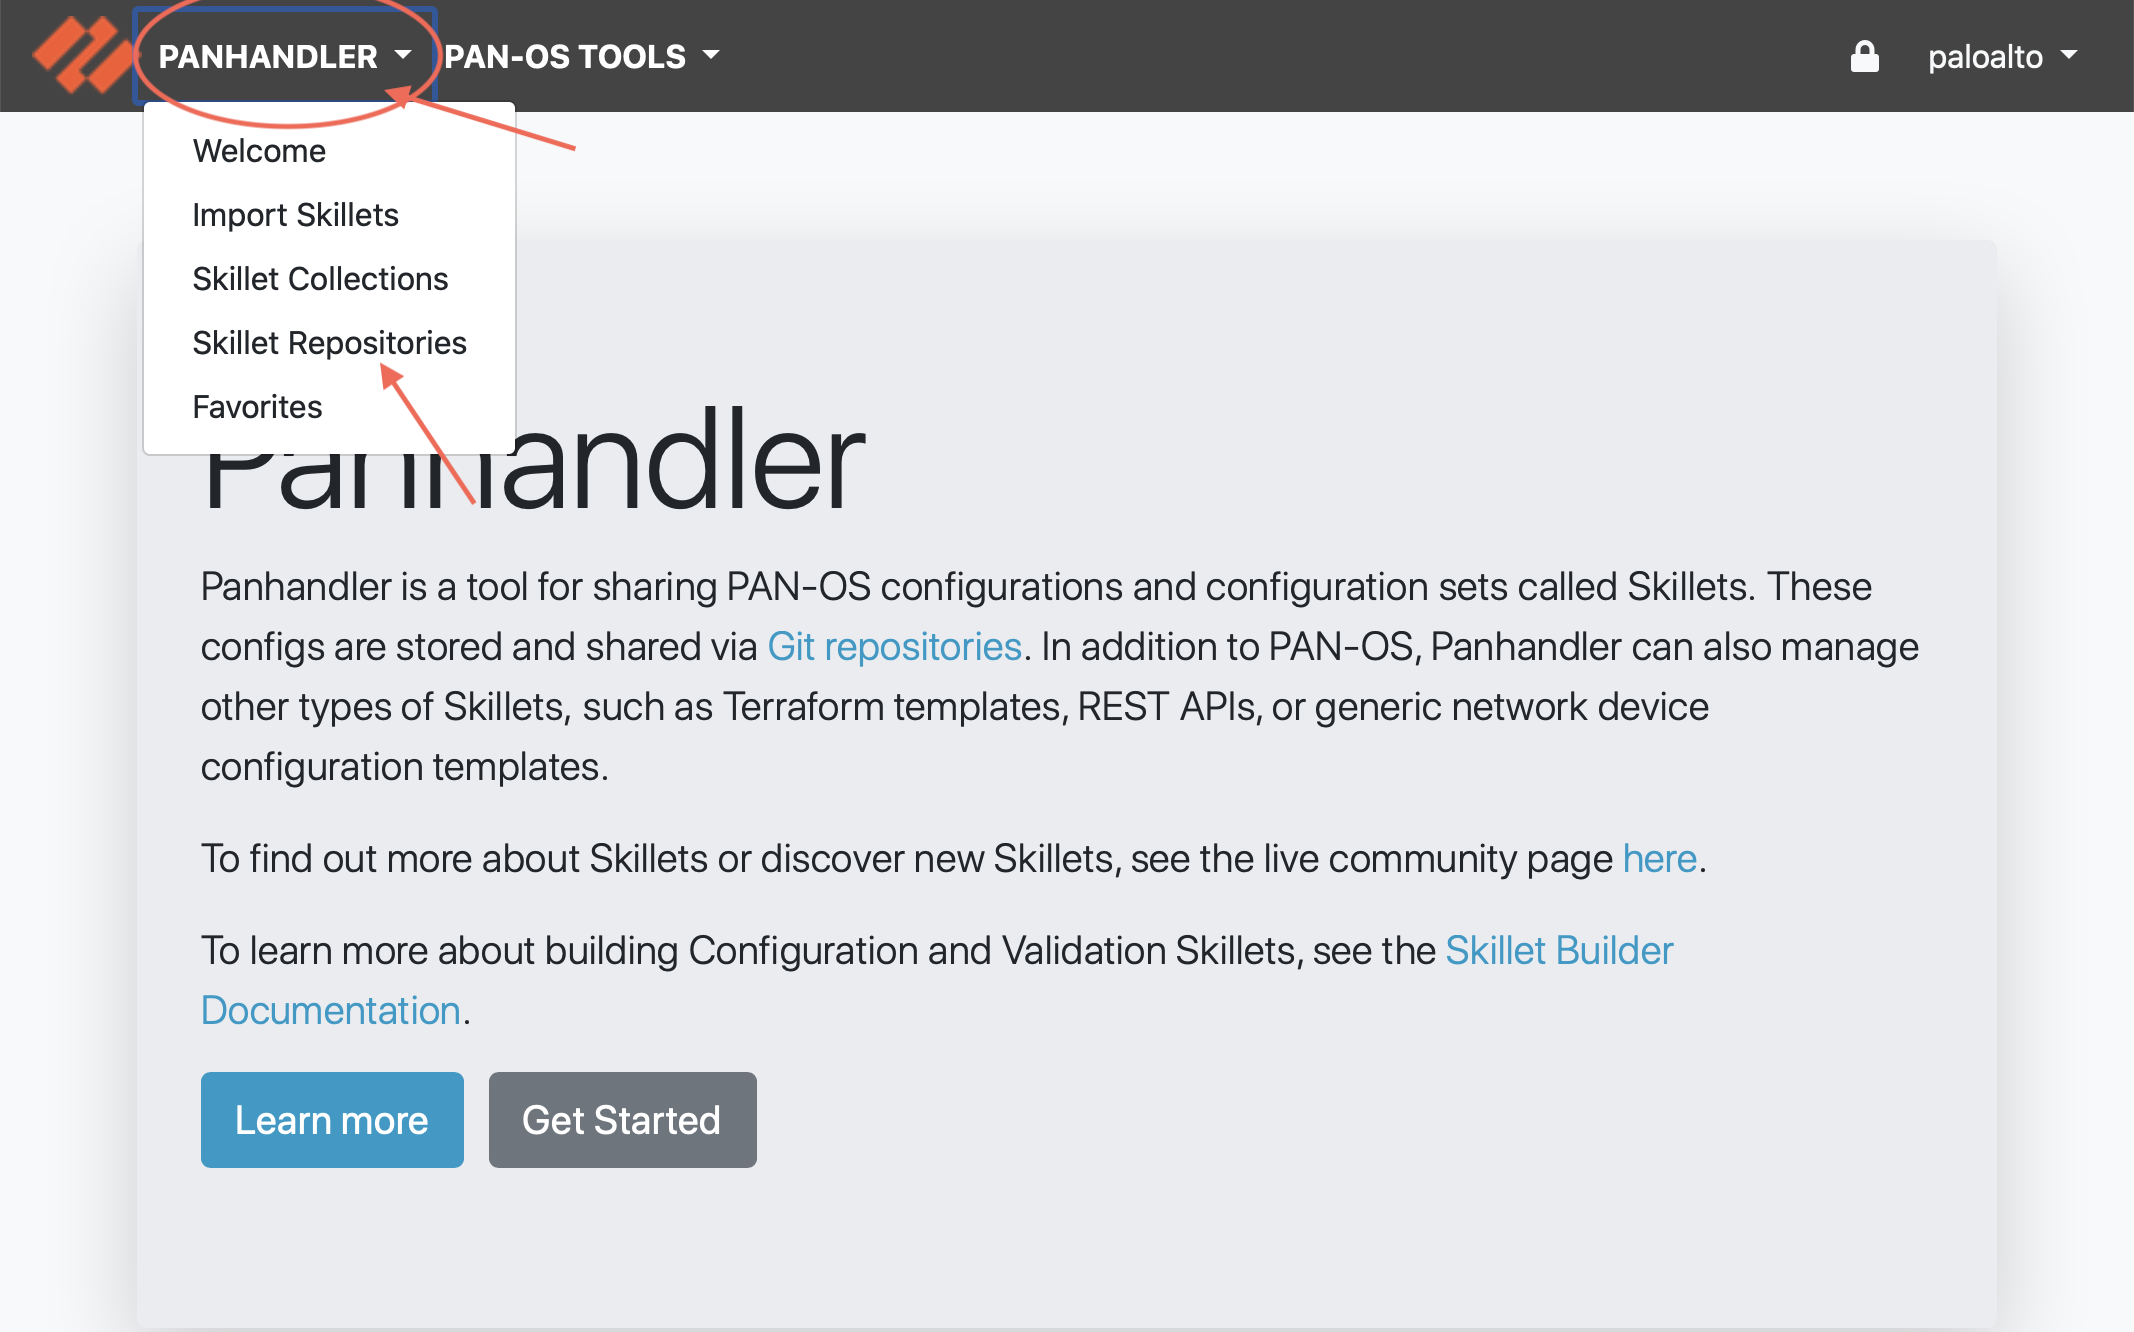
In this section of the tutorial we are going to use the PanHandler utility and our NGFW to create a set commands skillet. To begin, start up PanHandler by clicking on the PanHandler tab at the top and then clicking on Skillet Repositories.
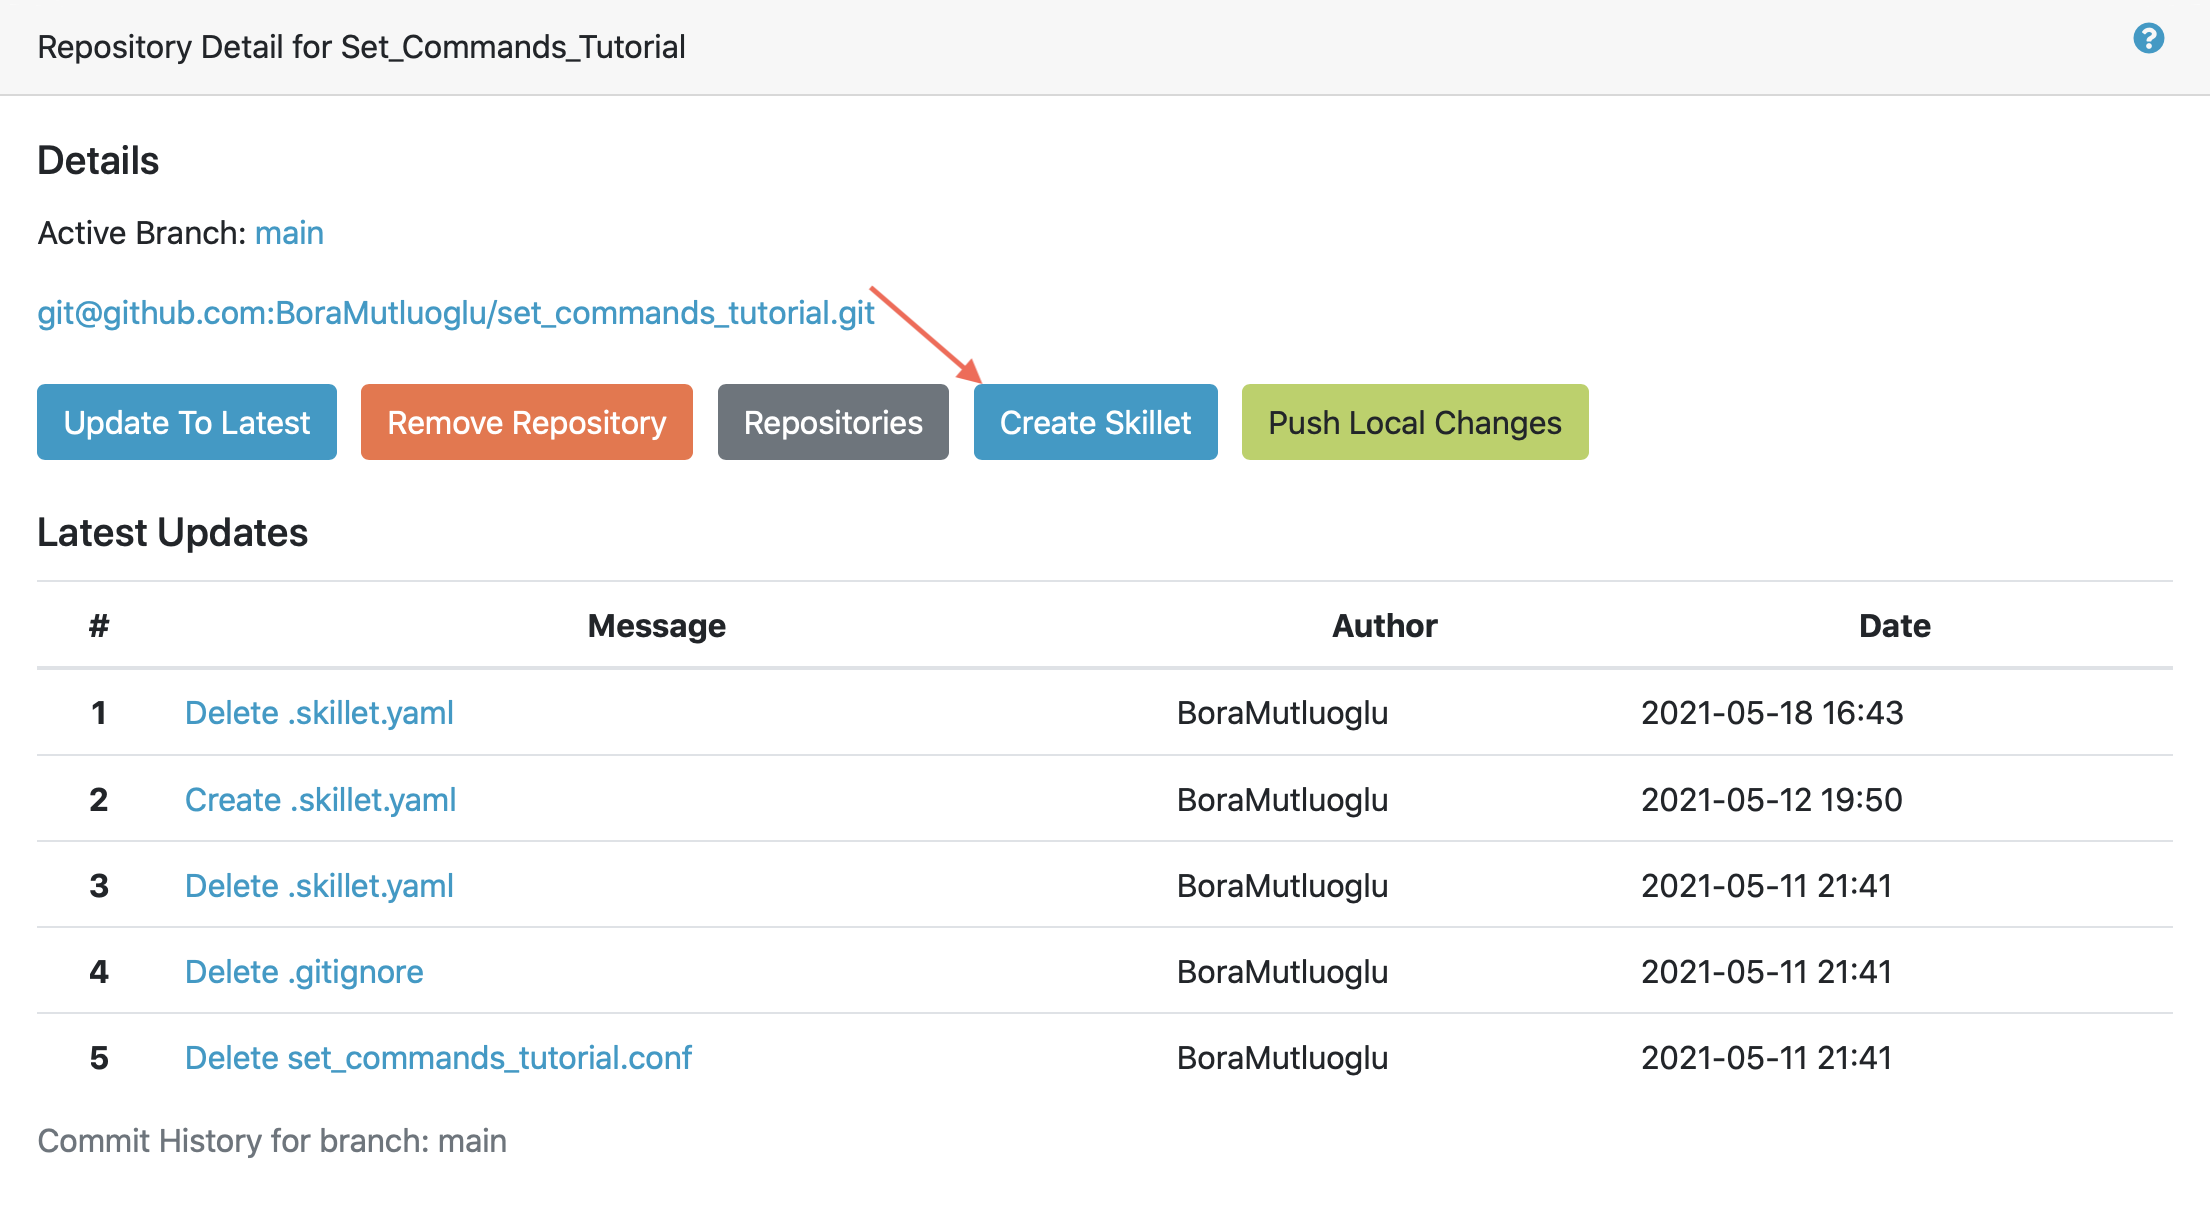
Scroll down until you find your cloned repository name, in this case the Set_Commands_Tutorial repository and then click on the Details button.

Here you want to locate and click on the Create Skillet button.
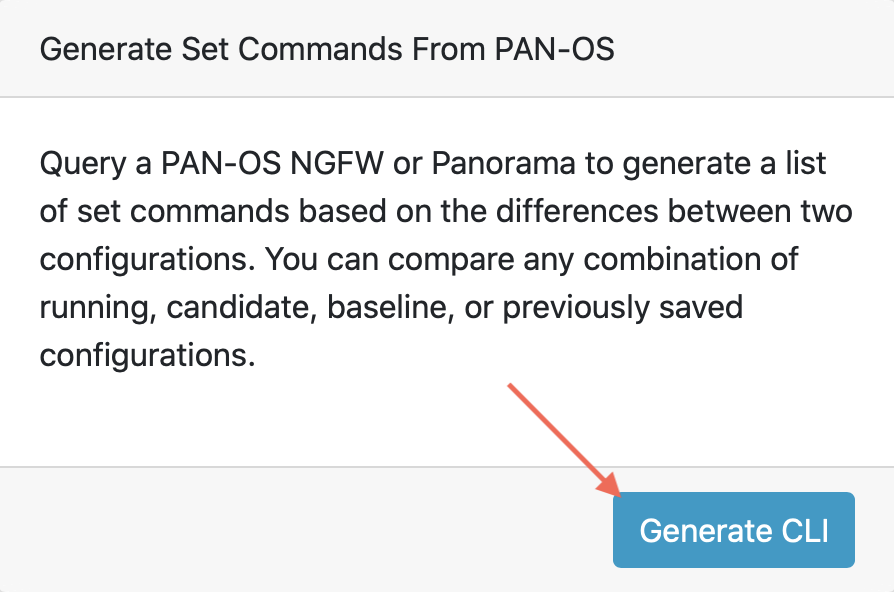
Now we want to extract the difference between the baseline and modified NGFW configurations as set commands. To do this directly from your connected NGFW find the box on this page that says Generate Set Commands From PAN-OS and then click on Generate CLI.
Note
There is also an option to upload previously saved NGFW XML files manually to the PanHandler SkilletBuilder utility from your local machine. To do this you would have to find the box titled Generate Set Commands From Uploaded Files from the previous step and click on the blue Upload button. On the resulting page titled Skillet Generator you can upload your previously saved NGFW configuration files under the Pre-Configuration and Post-Configuration sections.
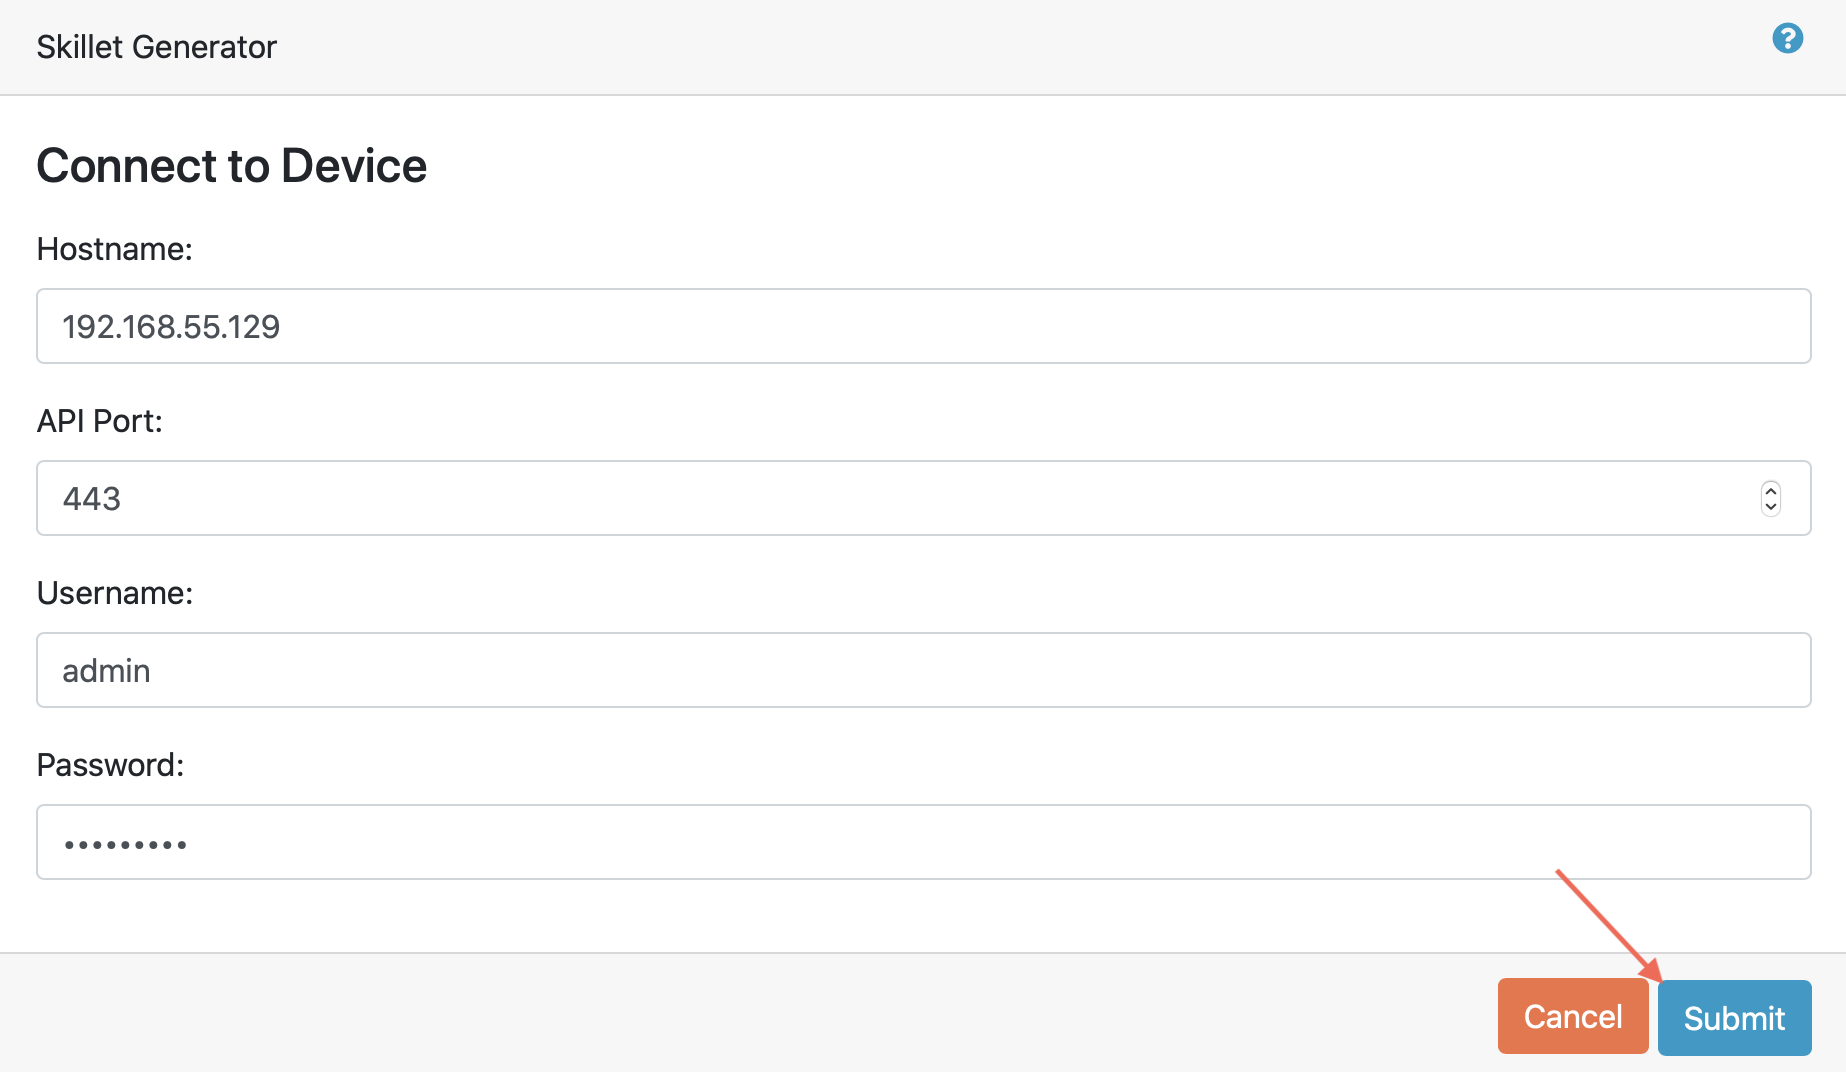
Once at the Skillet Generator page fill in your NGFW information and click Submit.
You will then end up at another Skillet Generator page where you will need to choose some NGFW configuration options to pull from in a couple of drop-down menus. Under the Pre-Configuration Source menu, choose the baseline configuration. Under the Post Configuration Source menu choose your modified configuration that you want to get the config difference between. After the correct NGFW commit versions are chosen hit Submit.

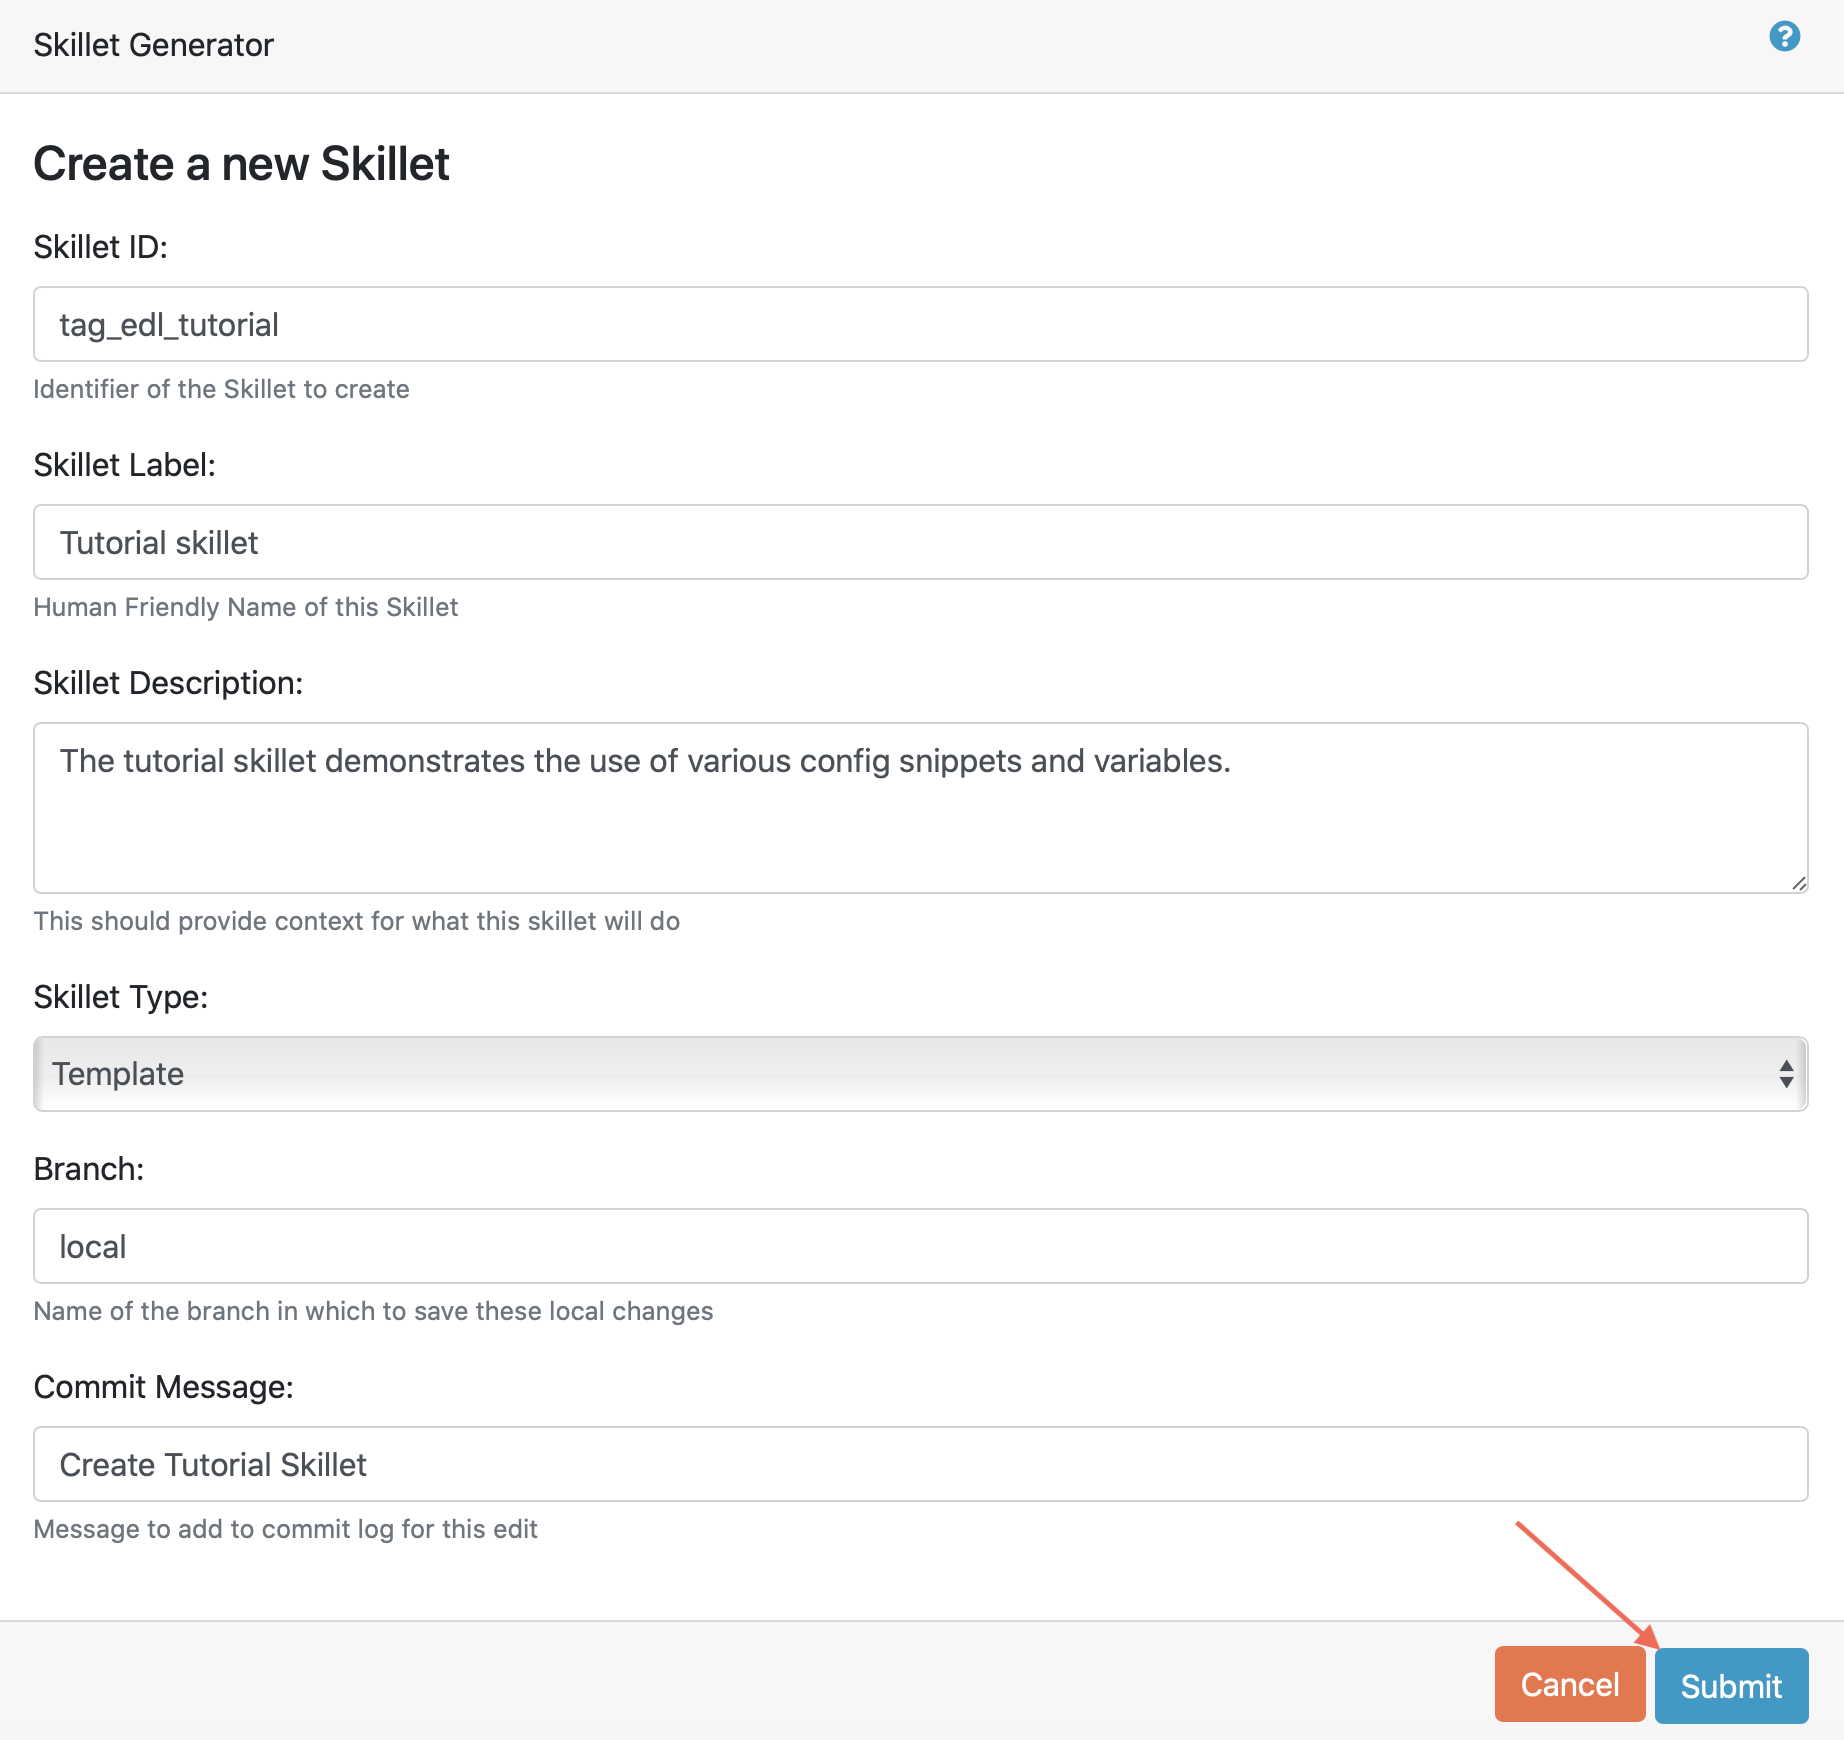
After the files are added and submitted, the next stage of the workflow is a web form for the YAML file preamble attributes. Suggested tutorial inputs for this section are as follows:
Skillet ID: tag_edl_tutorial
Skillet Label: Tutorial skillet
Skillet description: The tutorial skillet demonstrates the use of various config snippets and variables
Skillet type:
TemplateBranch: Local
Commit Message: Create Tutorial Skillet
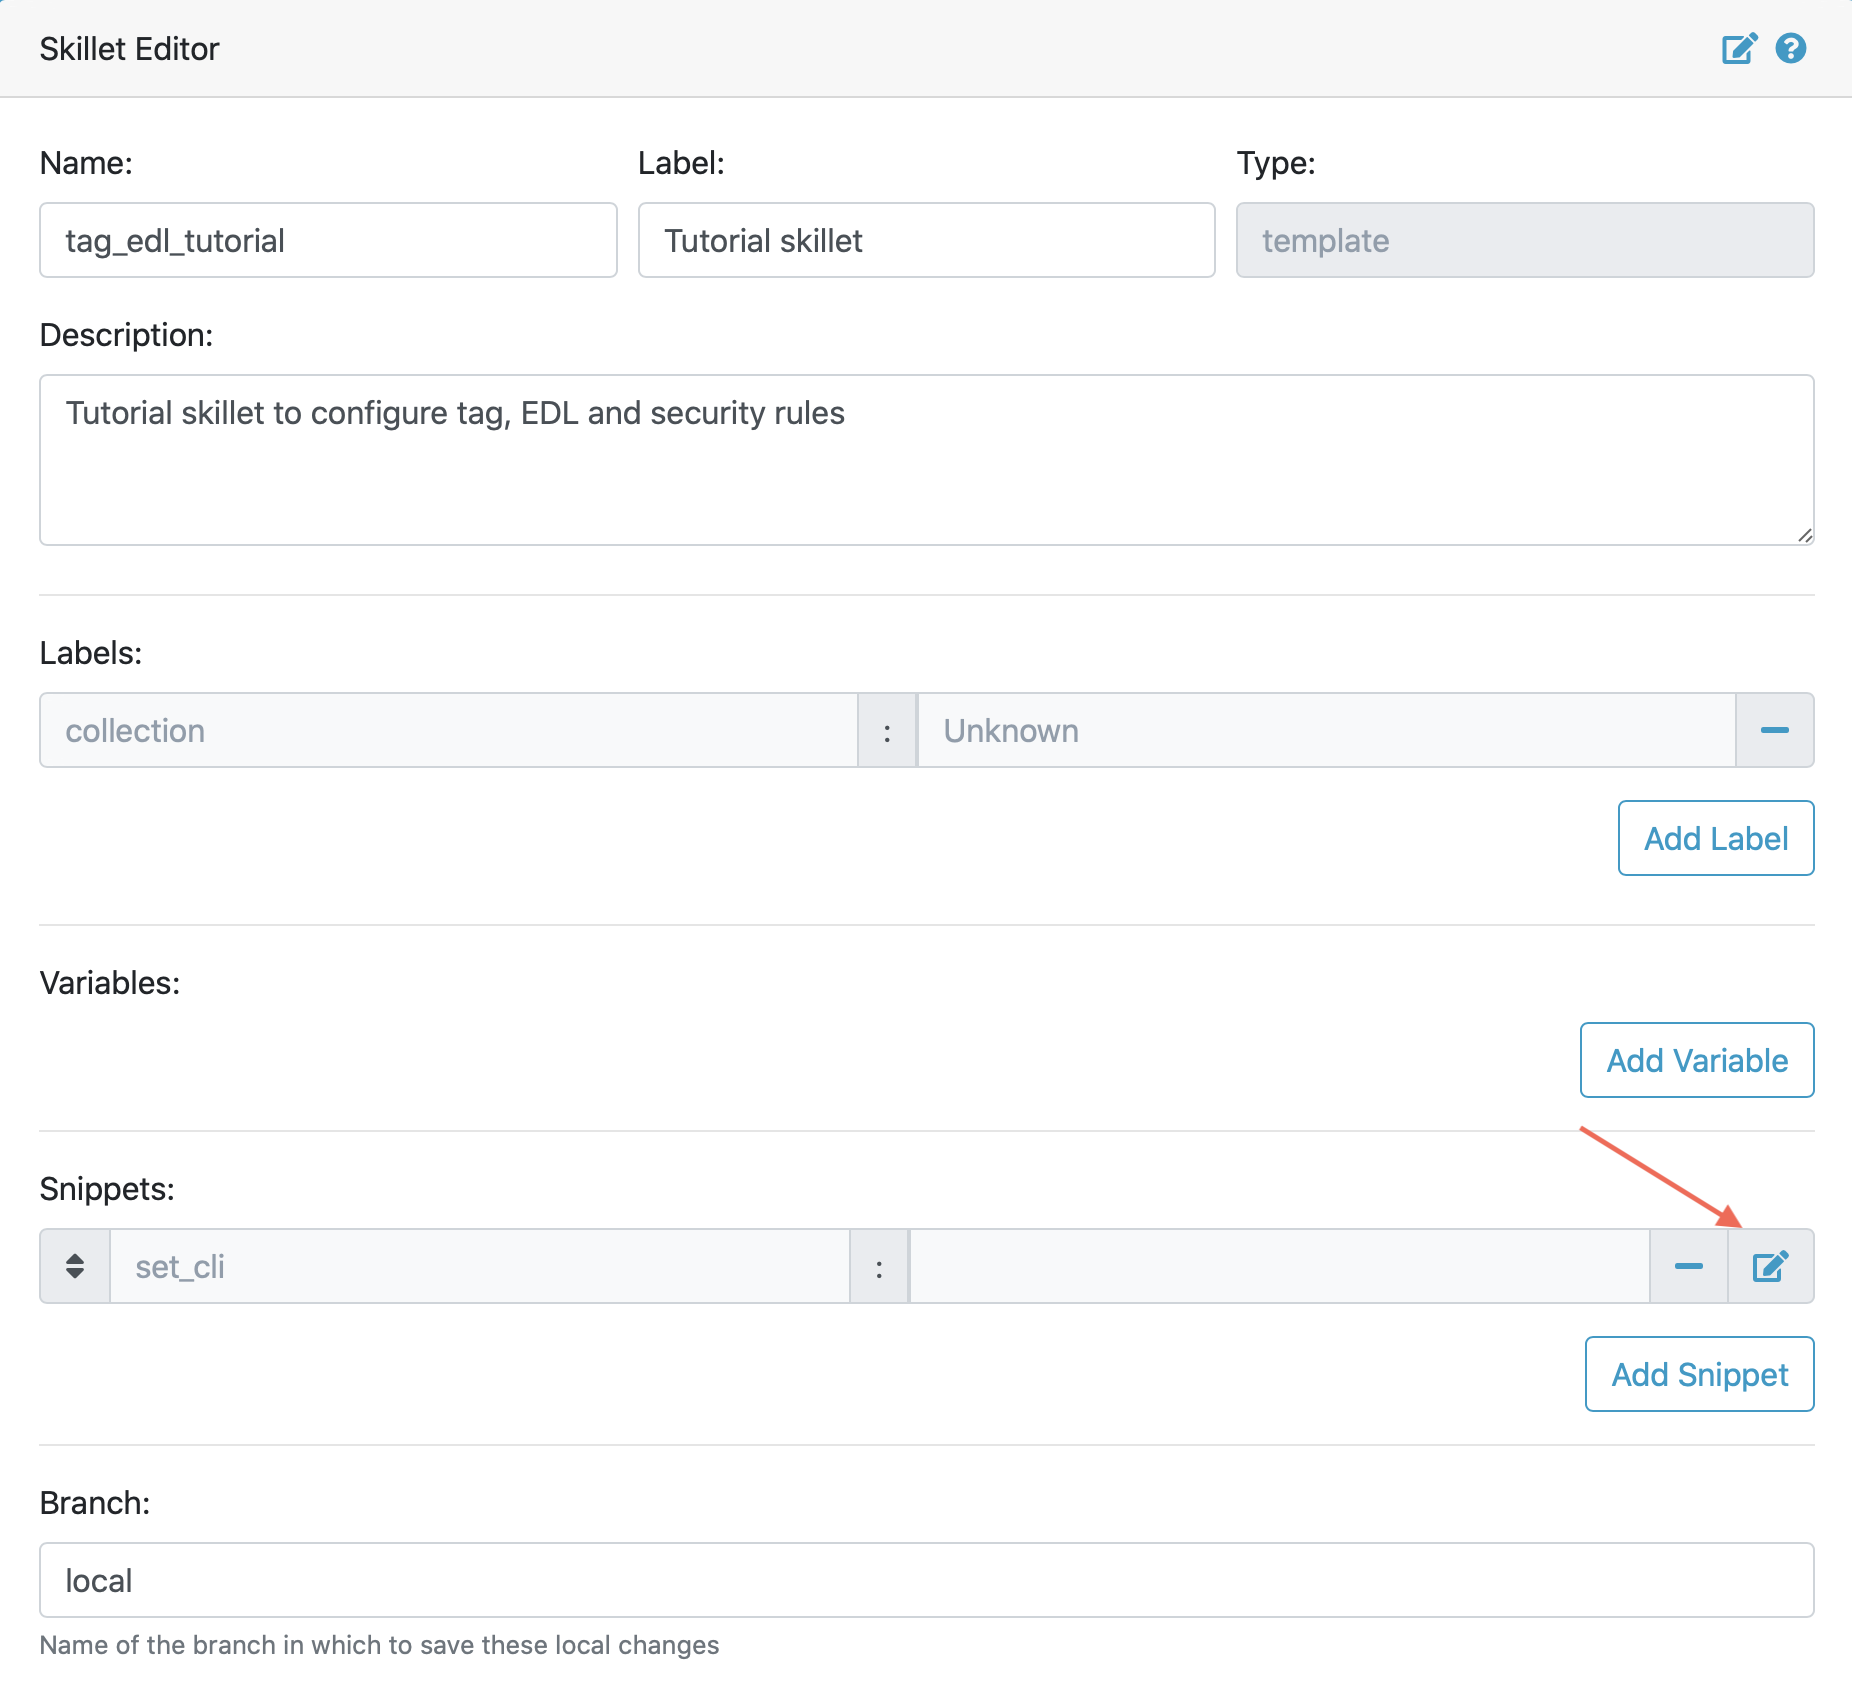
Once everything has been entered, clicking on the blue Submit button results in a screen titled Skillet Editor. This page will showcase parts of the skillet that you just created as well as a snippets section containing all of your set commands from the config diff.
The rendered YAML file contains:
Preamble populated with the web form values
Placeholder variables section
Snippets section with set command entries where each diff is found
Working with Snippets and Variables
In this section we will be editing the snippets and variables sections that were just rendered in the YAML file.
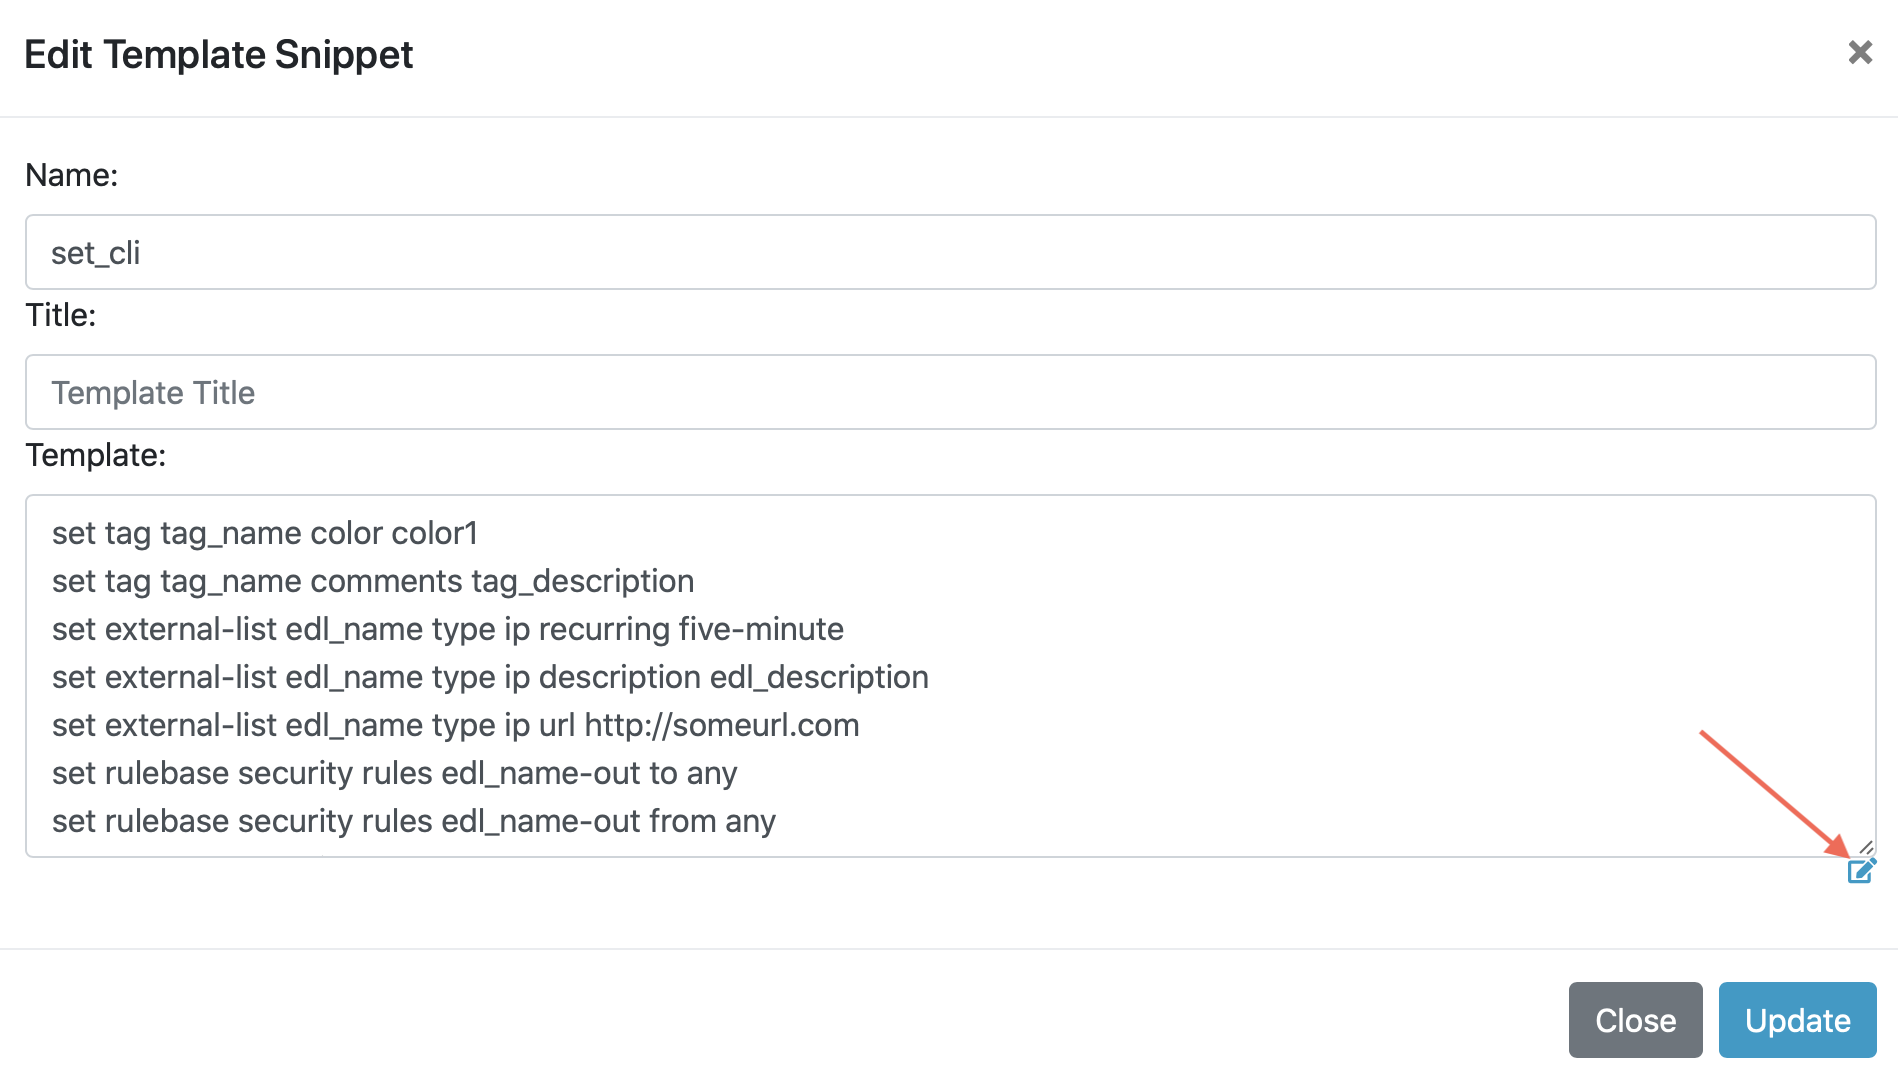
To access the set commands found within the snippets you want to view the snippets in edit mode by clicking the blue Edit button all the way on the right of the snippets section.
Upon clicking the edit button you will land at an Edit template snippet page showcasing all the set commands retrieved from the config diff. Here is where we can get into working with a cool templating language called Jinja, to allow for user inputted value substitution within the variables in our skillets. Thankfully with this skillet editor tool there is a very simple and easy way to transform plain text within our set commands into Jinja variables. Click into the small blue Edit button near the bottom right of the screen again.
Note
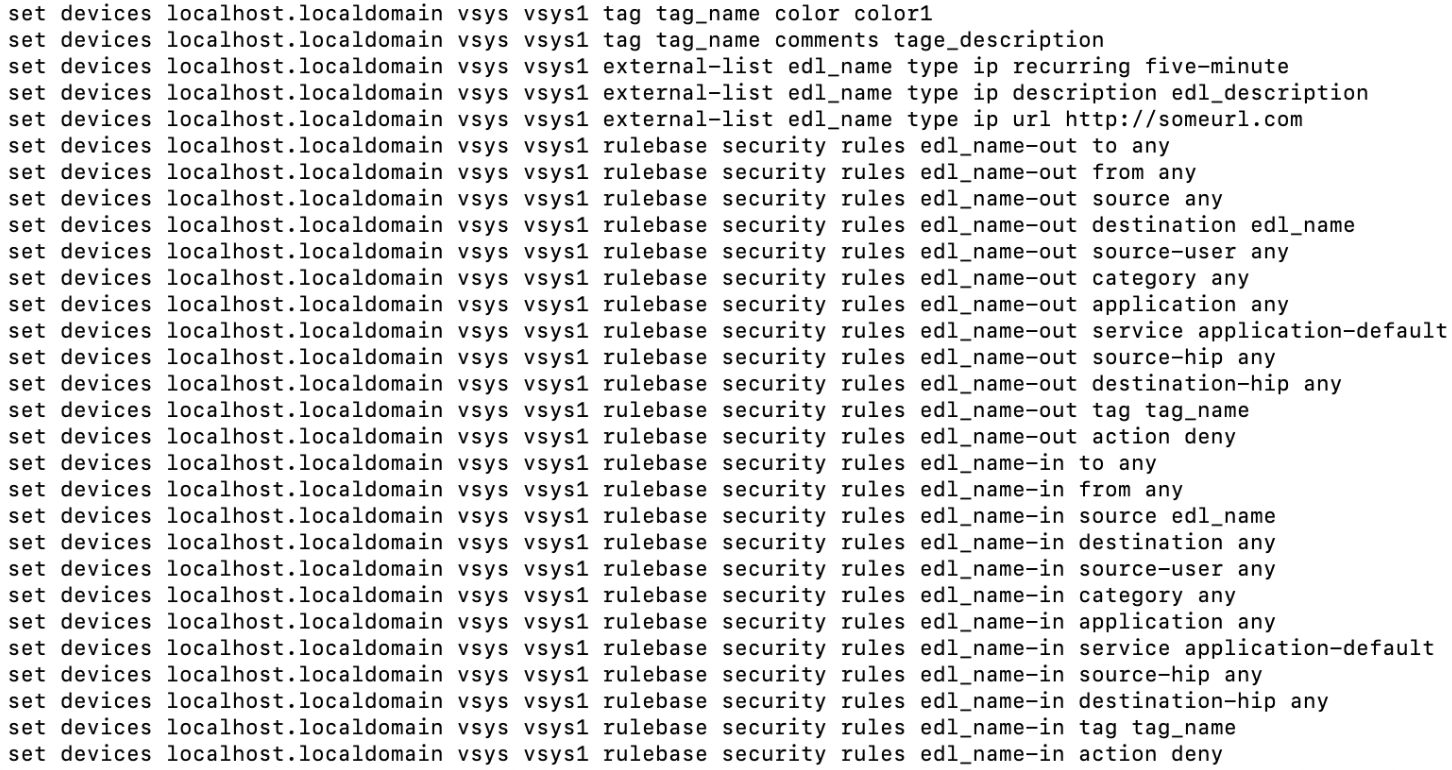
Order matters with set commands! The Generate Set CLI Commands skillet won’t always output set commands in the right order. For example it may output the commands in such a way that it will try to load in a security policy before the EDL is created, an example of this is shown in the screenshot below. As you can see the set rulebase security rules set commands are appearing before the set commands that create the edl. This would fail if you input it into the NGFW CLI since the EDL doesn’t exist yet.
Set Commands Out of Order Example

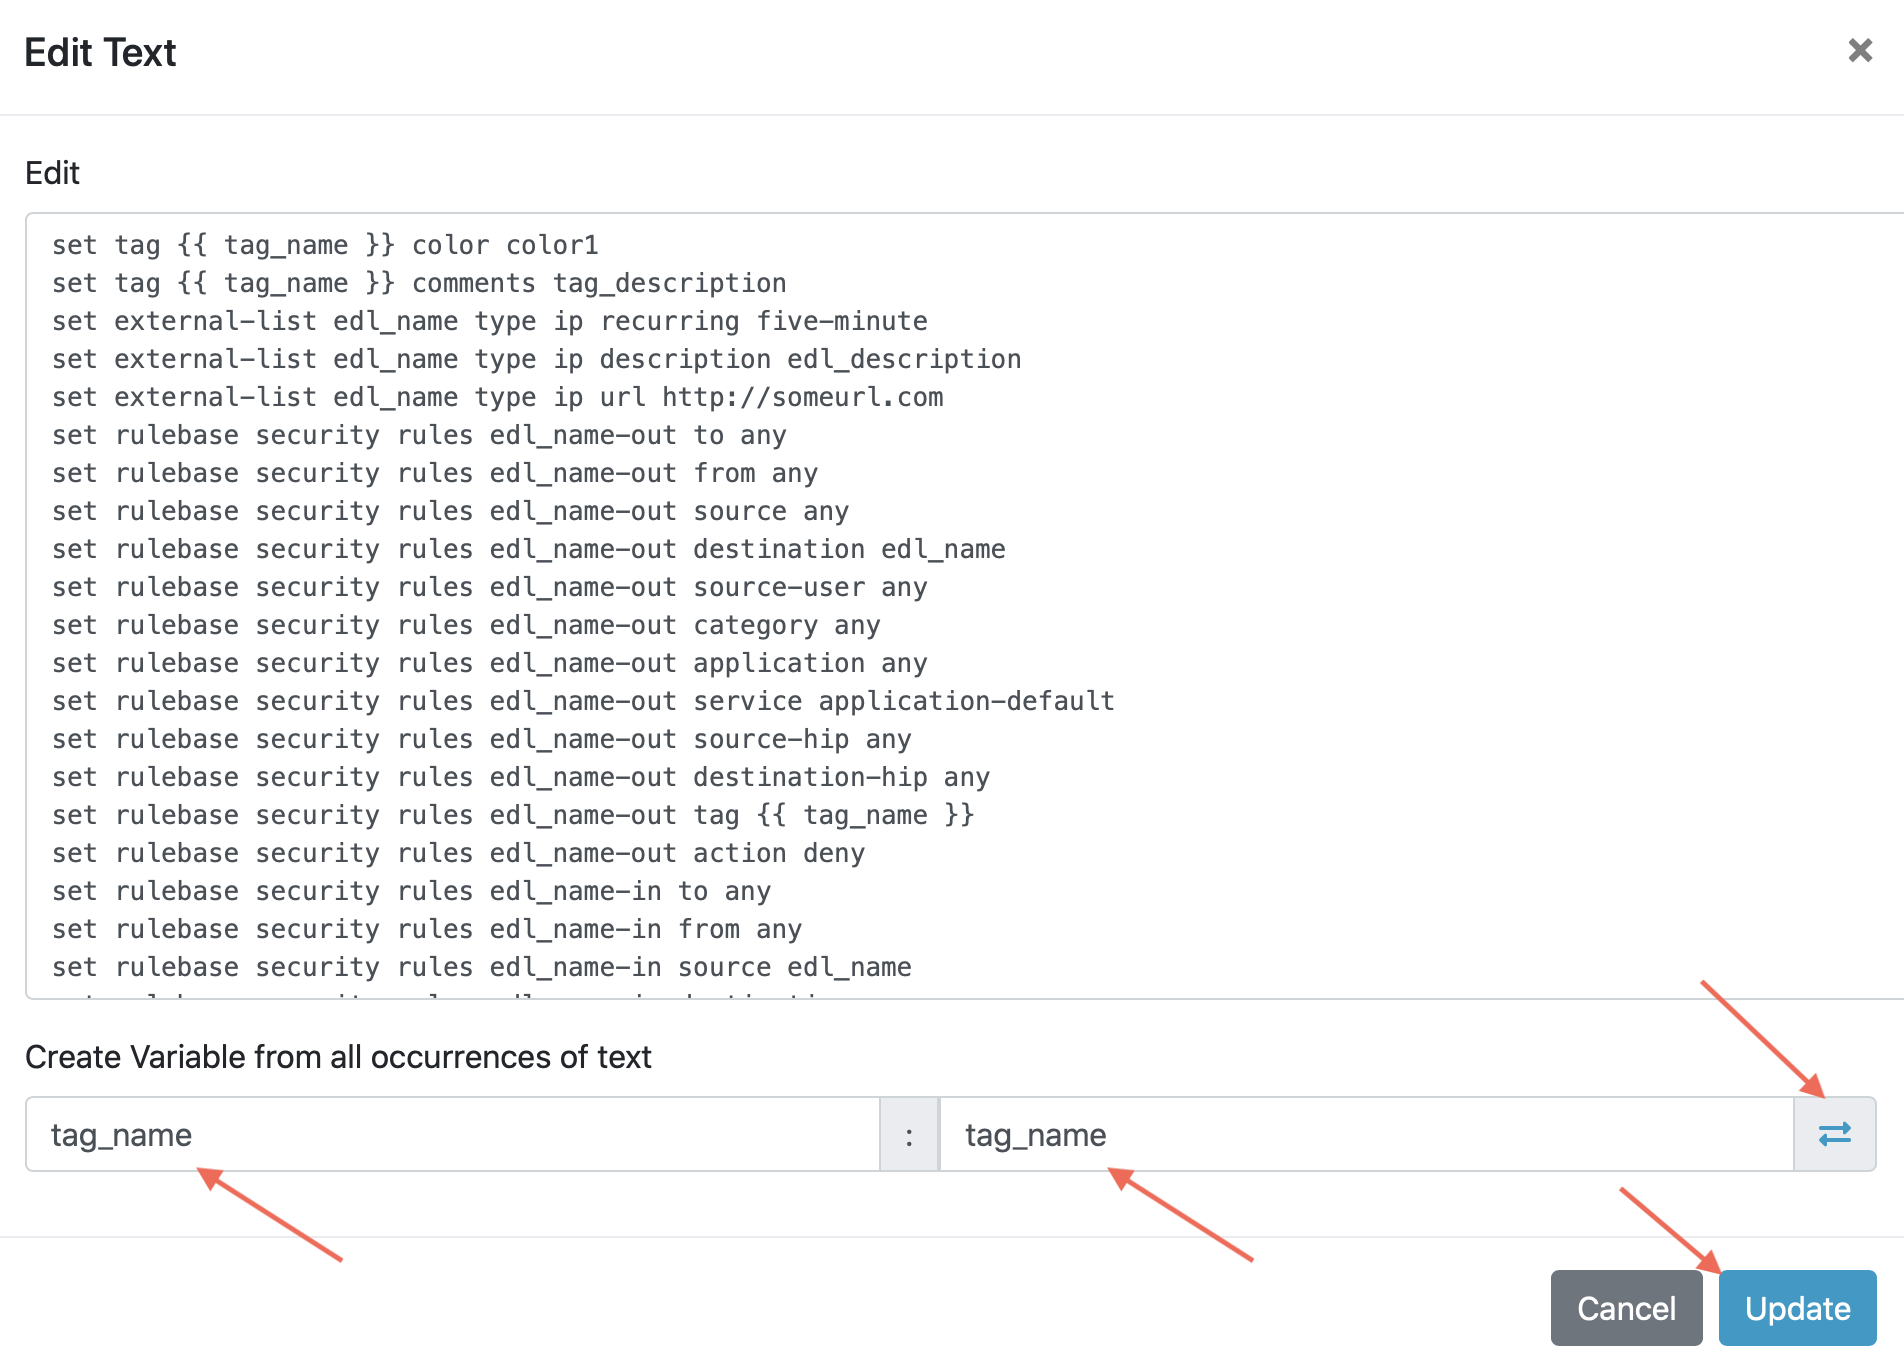
This will take us to a page titled Edit Text, this is where we can make text substitutions for variables. For example if we wanted to change all instances of the text “tag_name” into a jinja variable you would enter in “tag_name” to the left box and then whatever you wanted the variable to be called in the right box. It is best practice to name your variables something identifiable and descriptive. Next hit the Replace button containing 2 arrows pointing in opposite directions to create your variables! Dont forget to click Update twice to confirm and save your changes!
Note
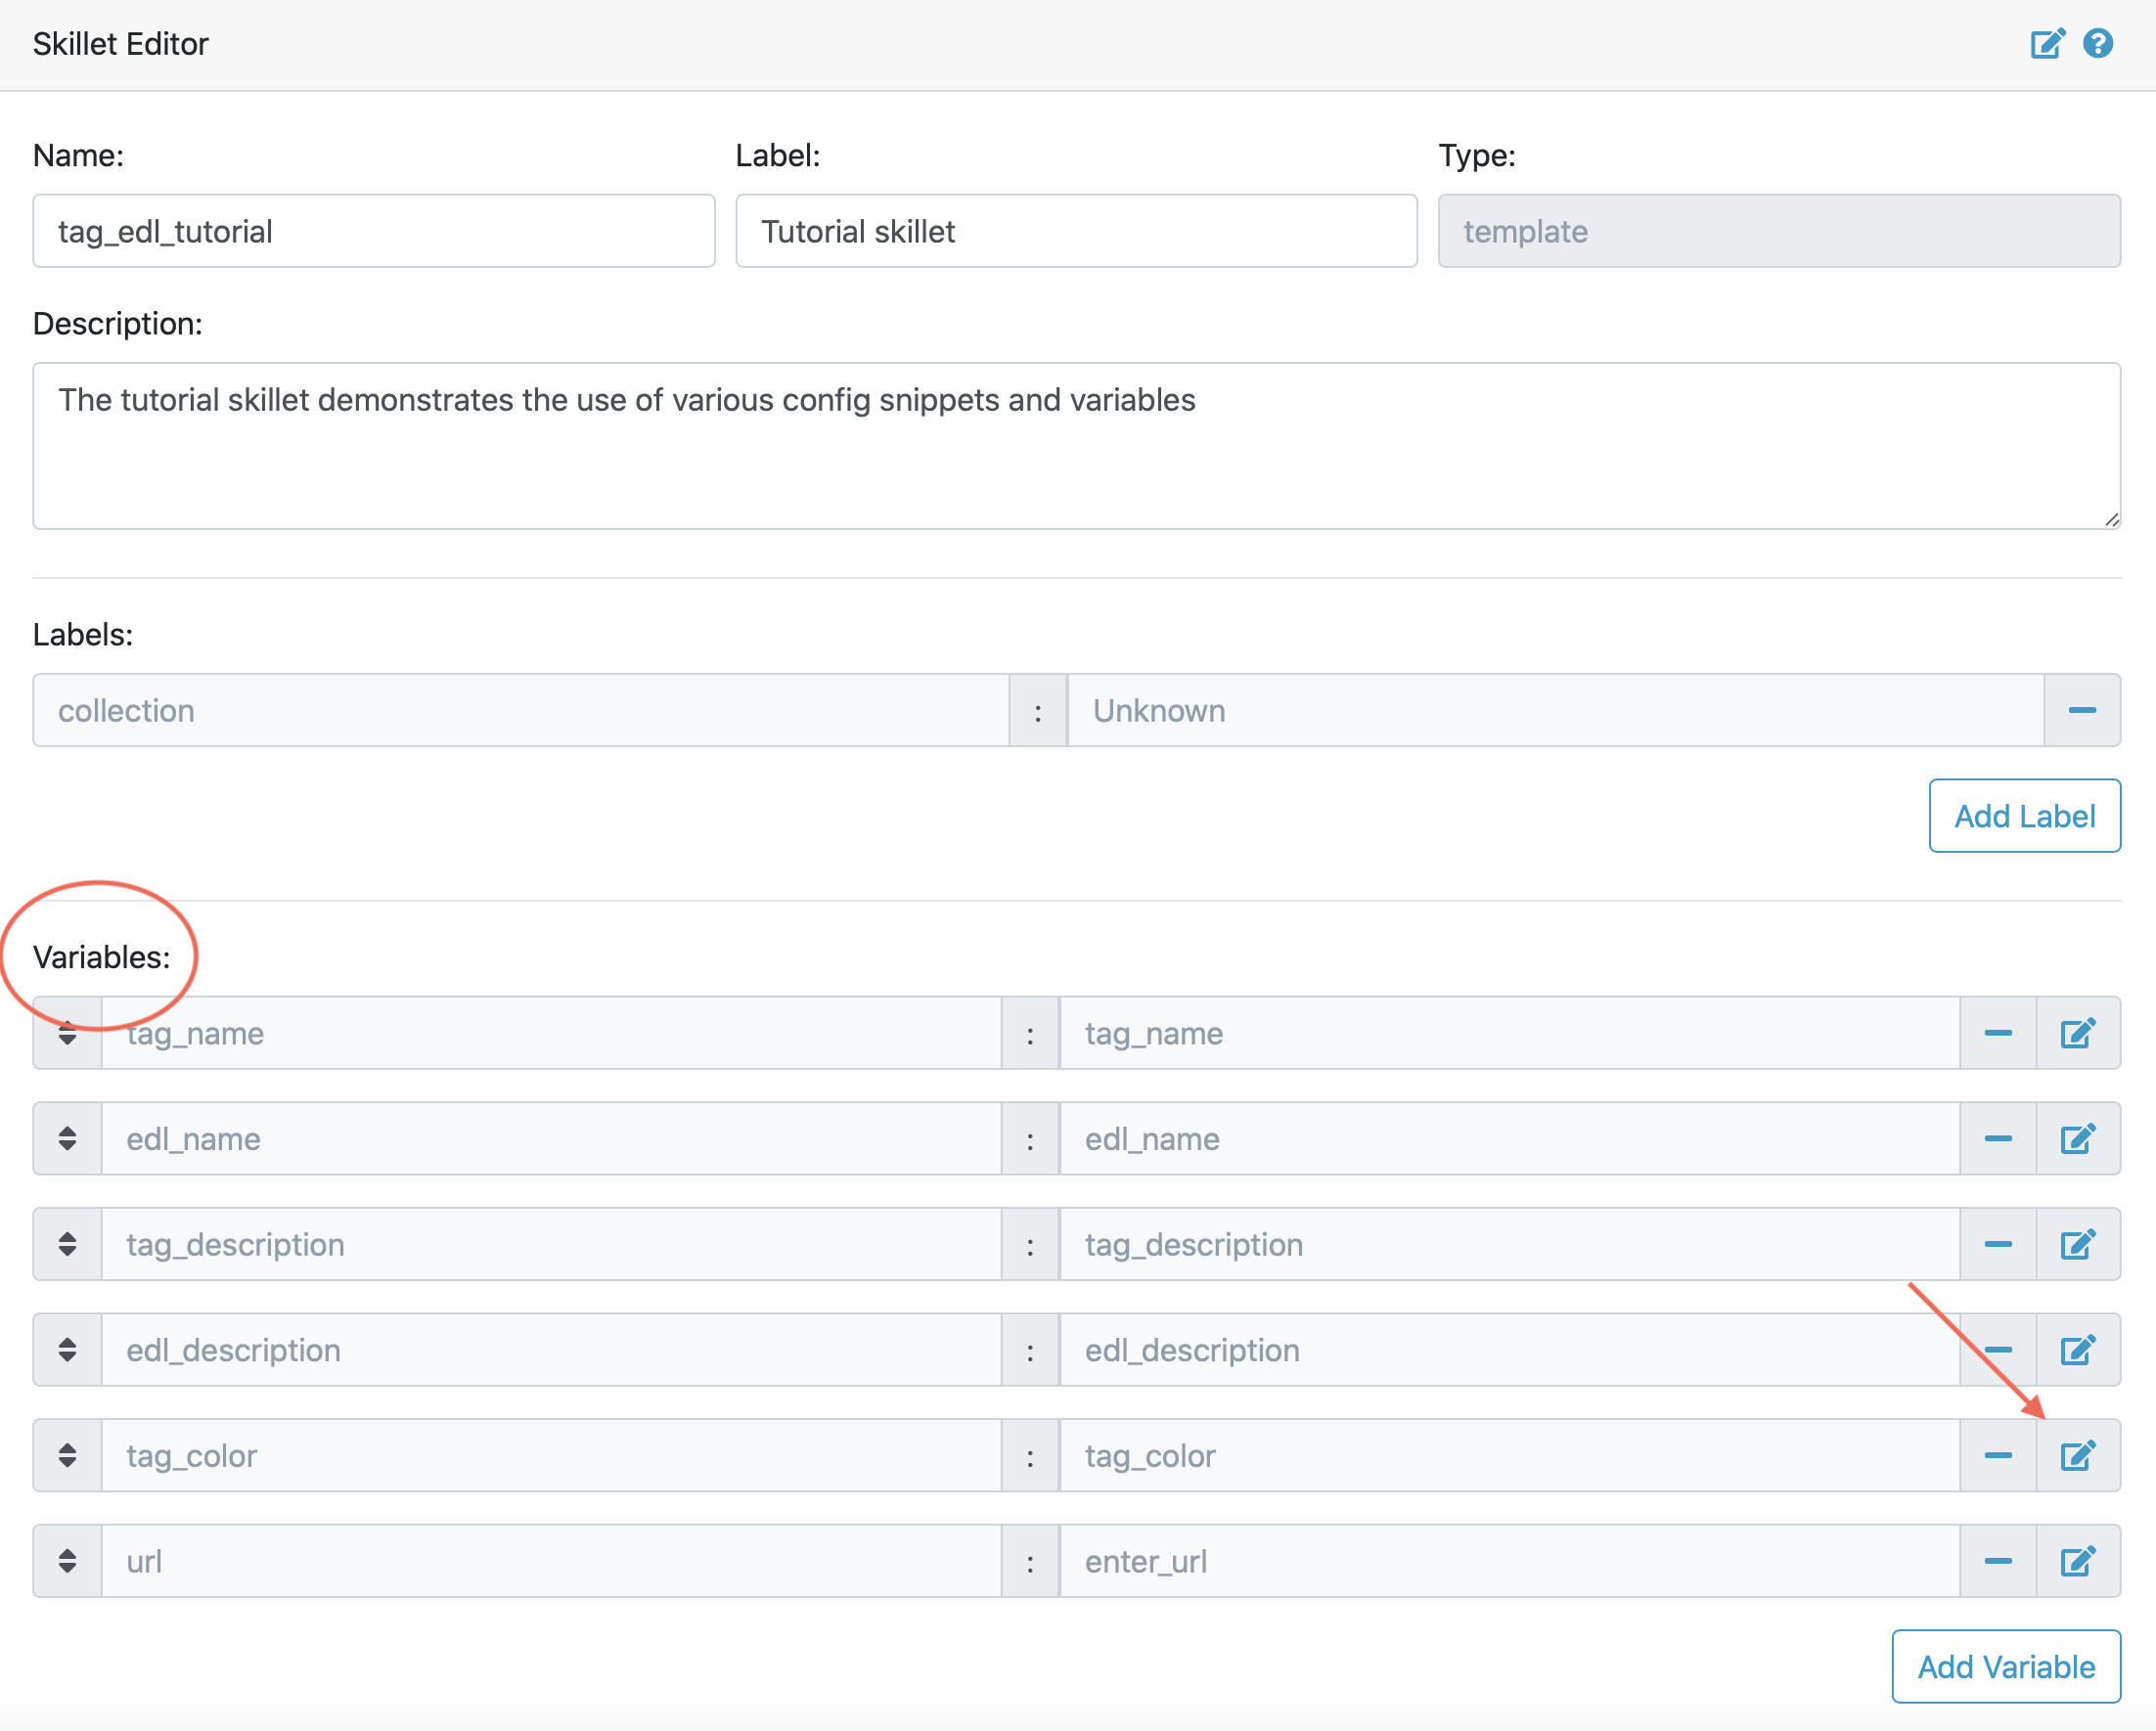
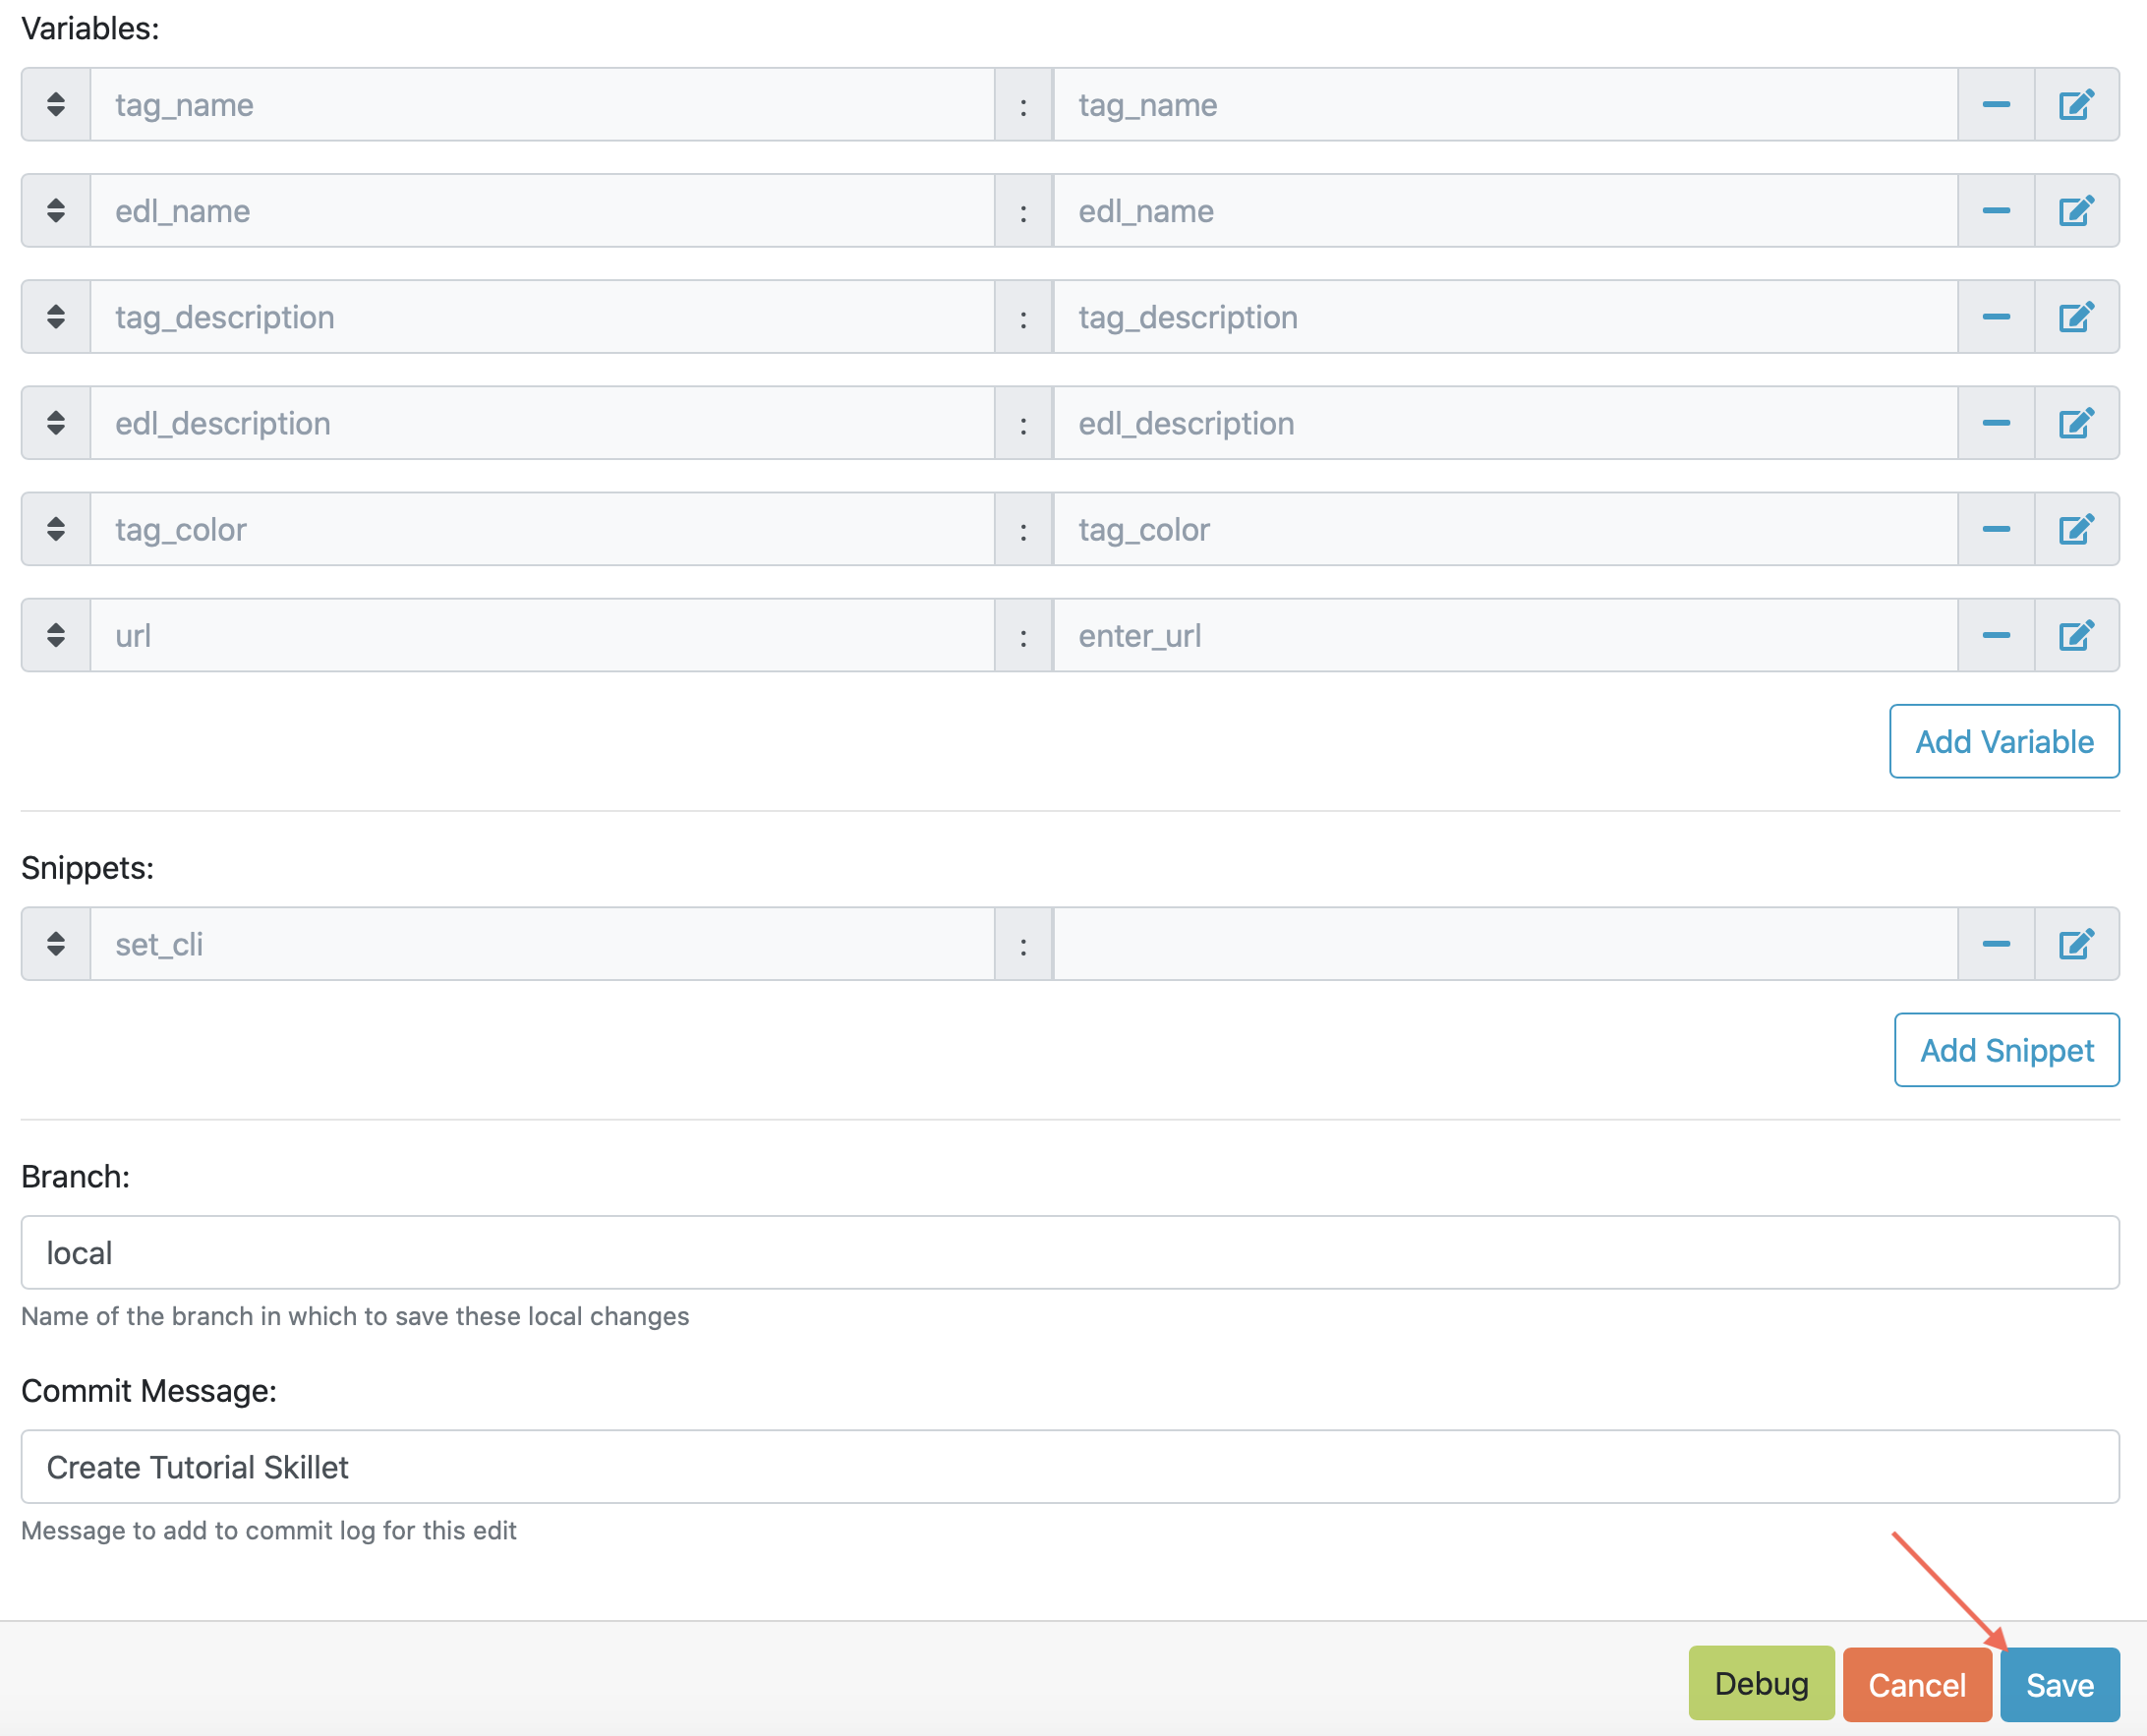
For the purpose of this Tutorial you should have 6 variables in the variables section of the Skillet Editor. Please refer to the SkilletBuilder variables documentation for a more in depth look at the different kinds of variables and their use cases.
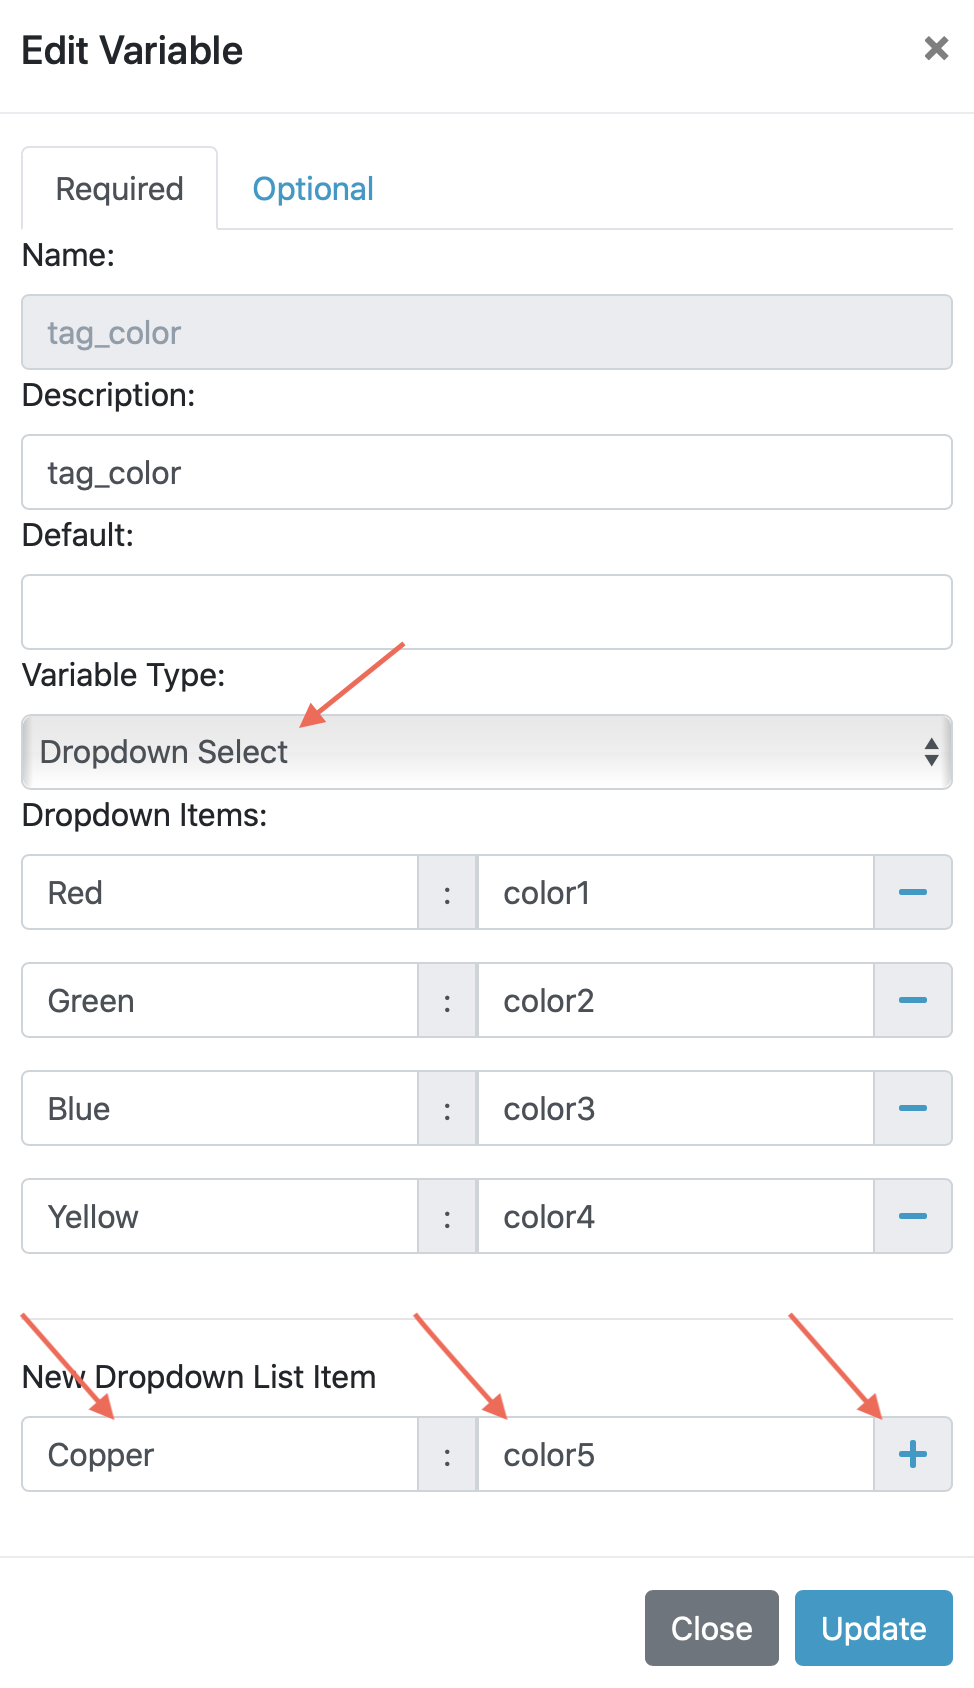
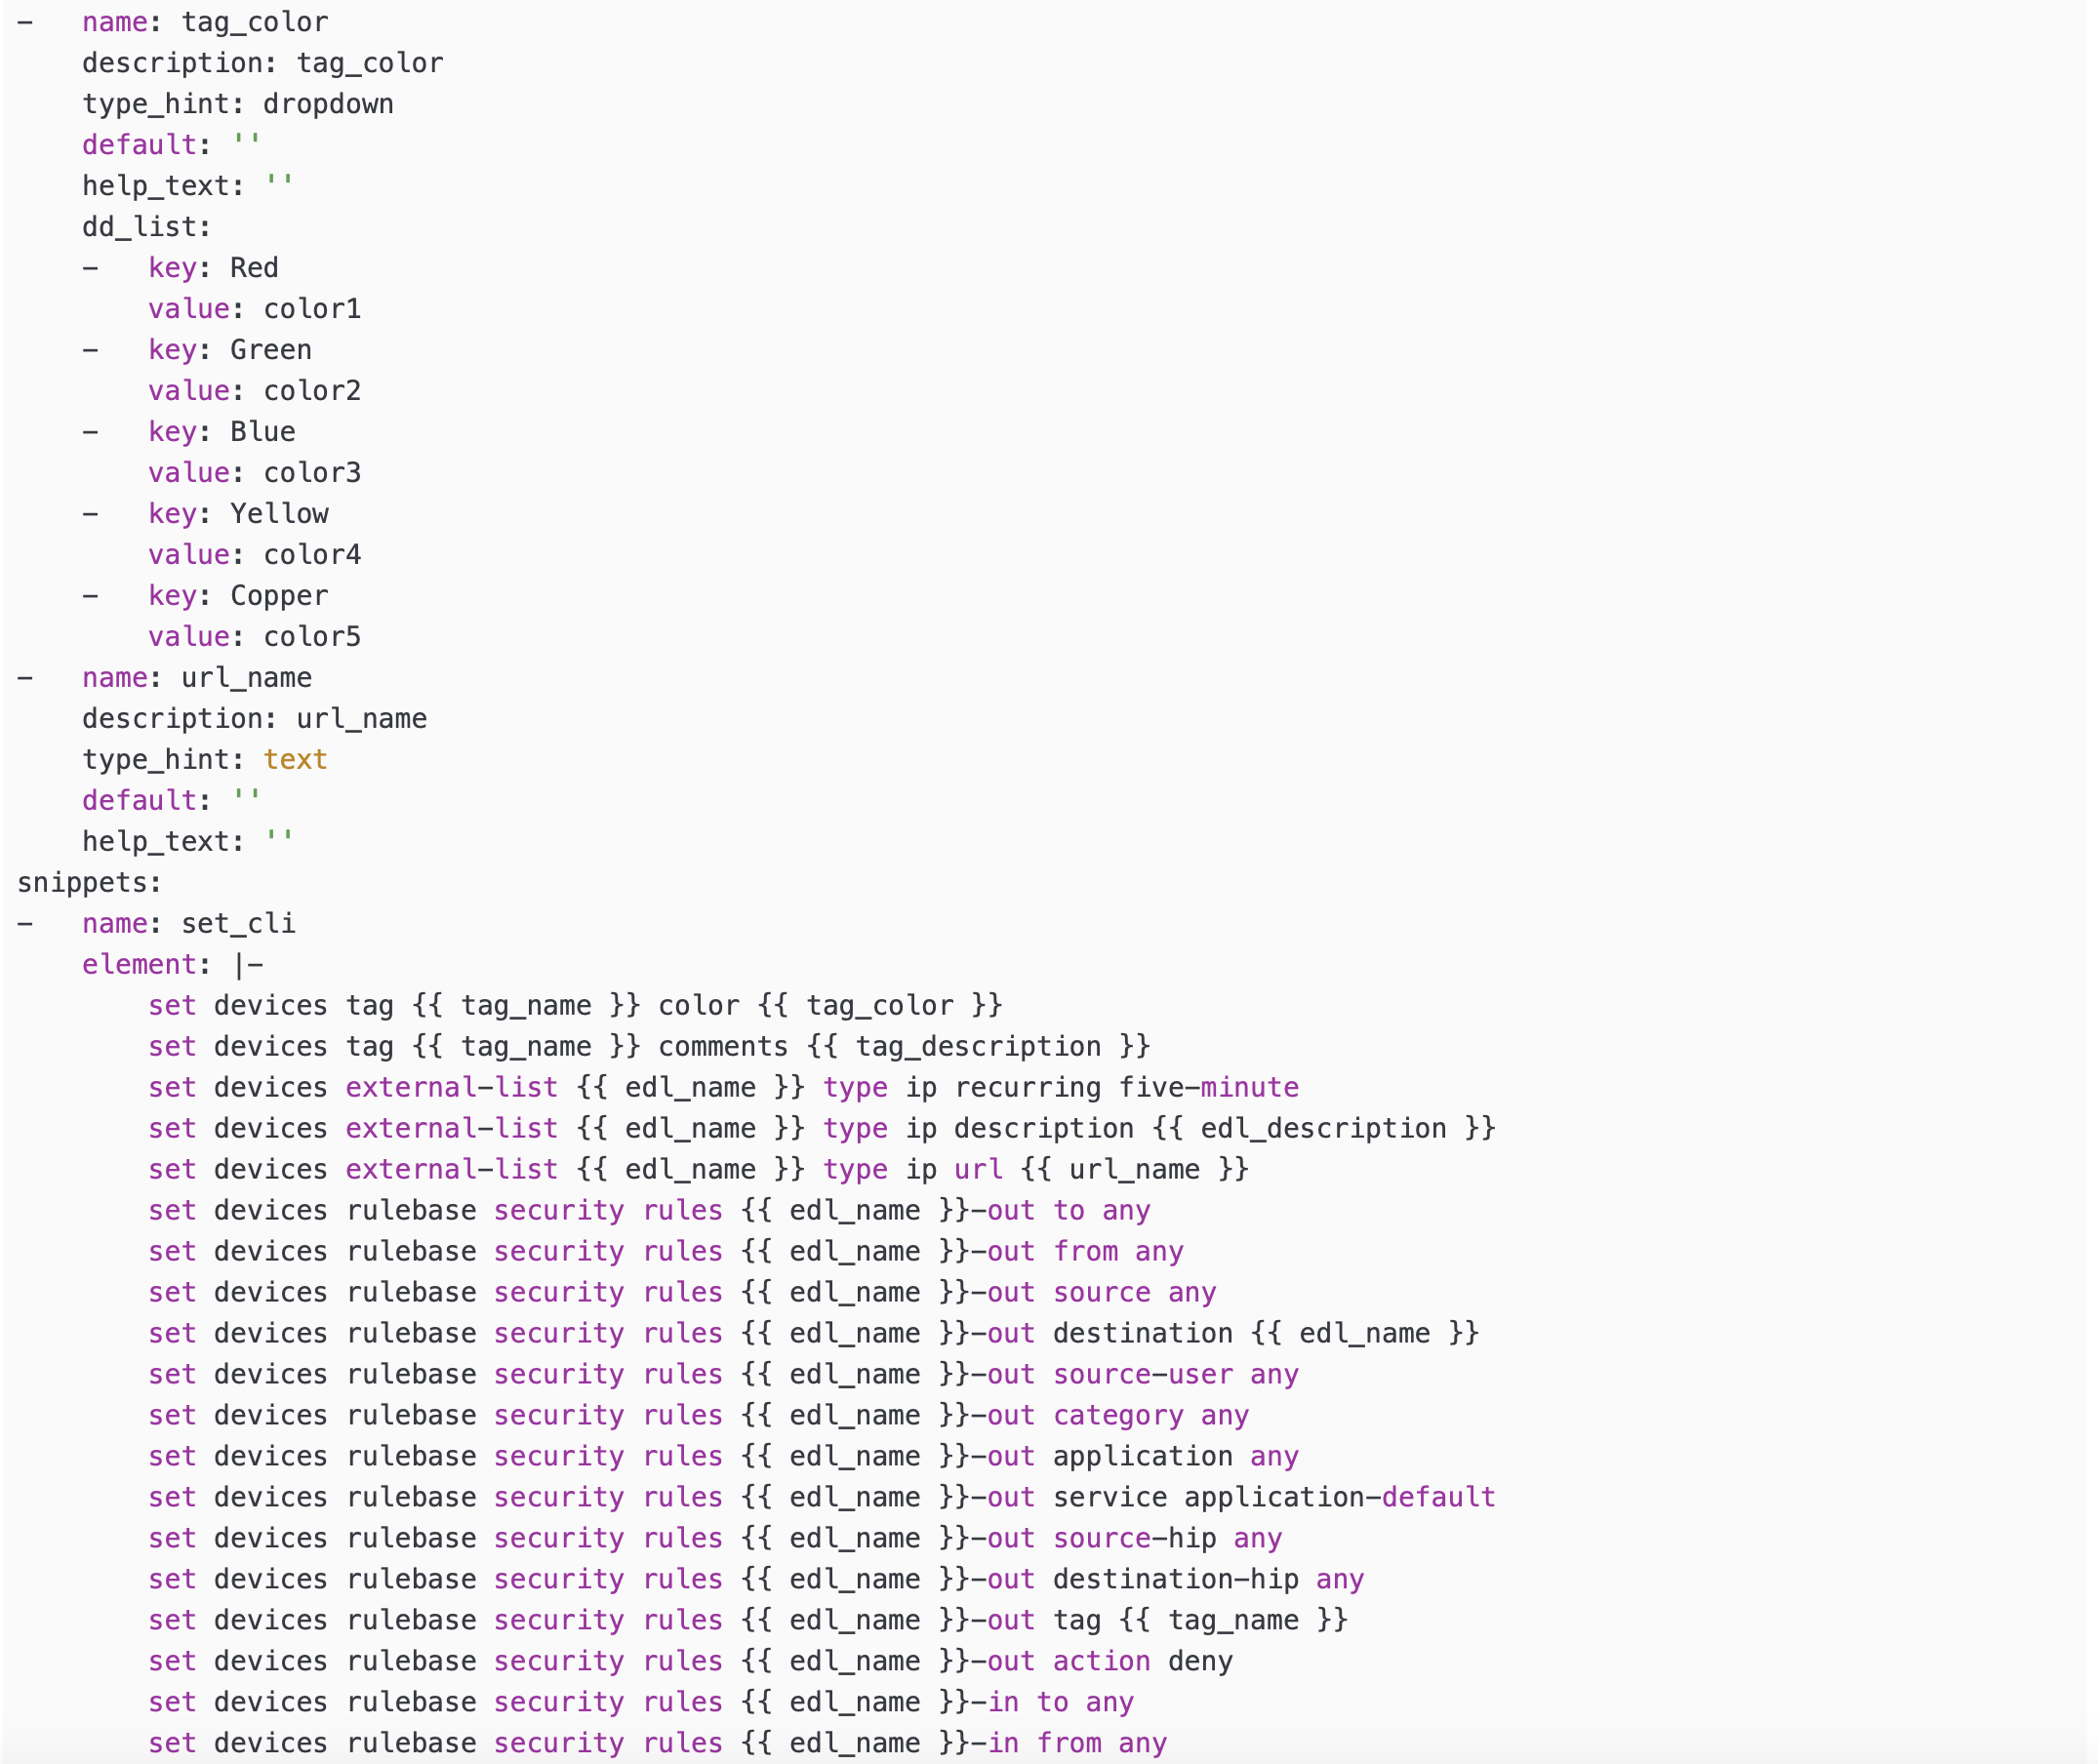
Once the Update button has been pushed and changes have been made you will be brought back to the Skillet Editor screen from before. Here you should see that the previously empty variables section has now been populated with your newly created variables. you can now click into the blue Edit buttons to the right of the variable names to edit their descriptions, names, etc. For example, let’s edit our tag_color variable to contain a dropdown menu option. For your convenience we have provided a handy table below to show what tag colors map to what values.
Tag Color Mappings
Red - color1
Green - color2
Blue - color3
Yellow - color4
Copper - color5
Orange - color6
Purple - color7
Gray - color8
On the Edit Variable page click on the Variable Type dropdown menu and choose the Dropdown Select option. From here you can type in key:value pairs similar to a dictionary and then click on the + sign on the right to add them as dropdown menu options for your variable color type. Add all the color options you would like and then hit Update at the bottom to save the changes in your variable.
Back on the Skillet Editor page, we can save all aspects of our generated skillet by clicking the blue Save button at the bottom right of the screen.
Now that the skillet has been saved in PanHandler it will show up as a skillet on the next page titled Repository Detail for Set_Commands_Tutorial.
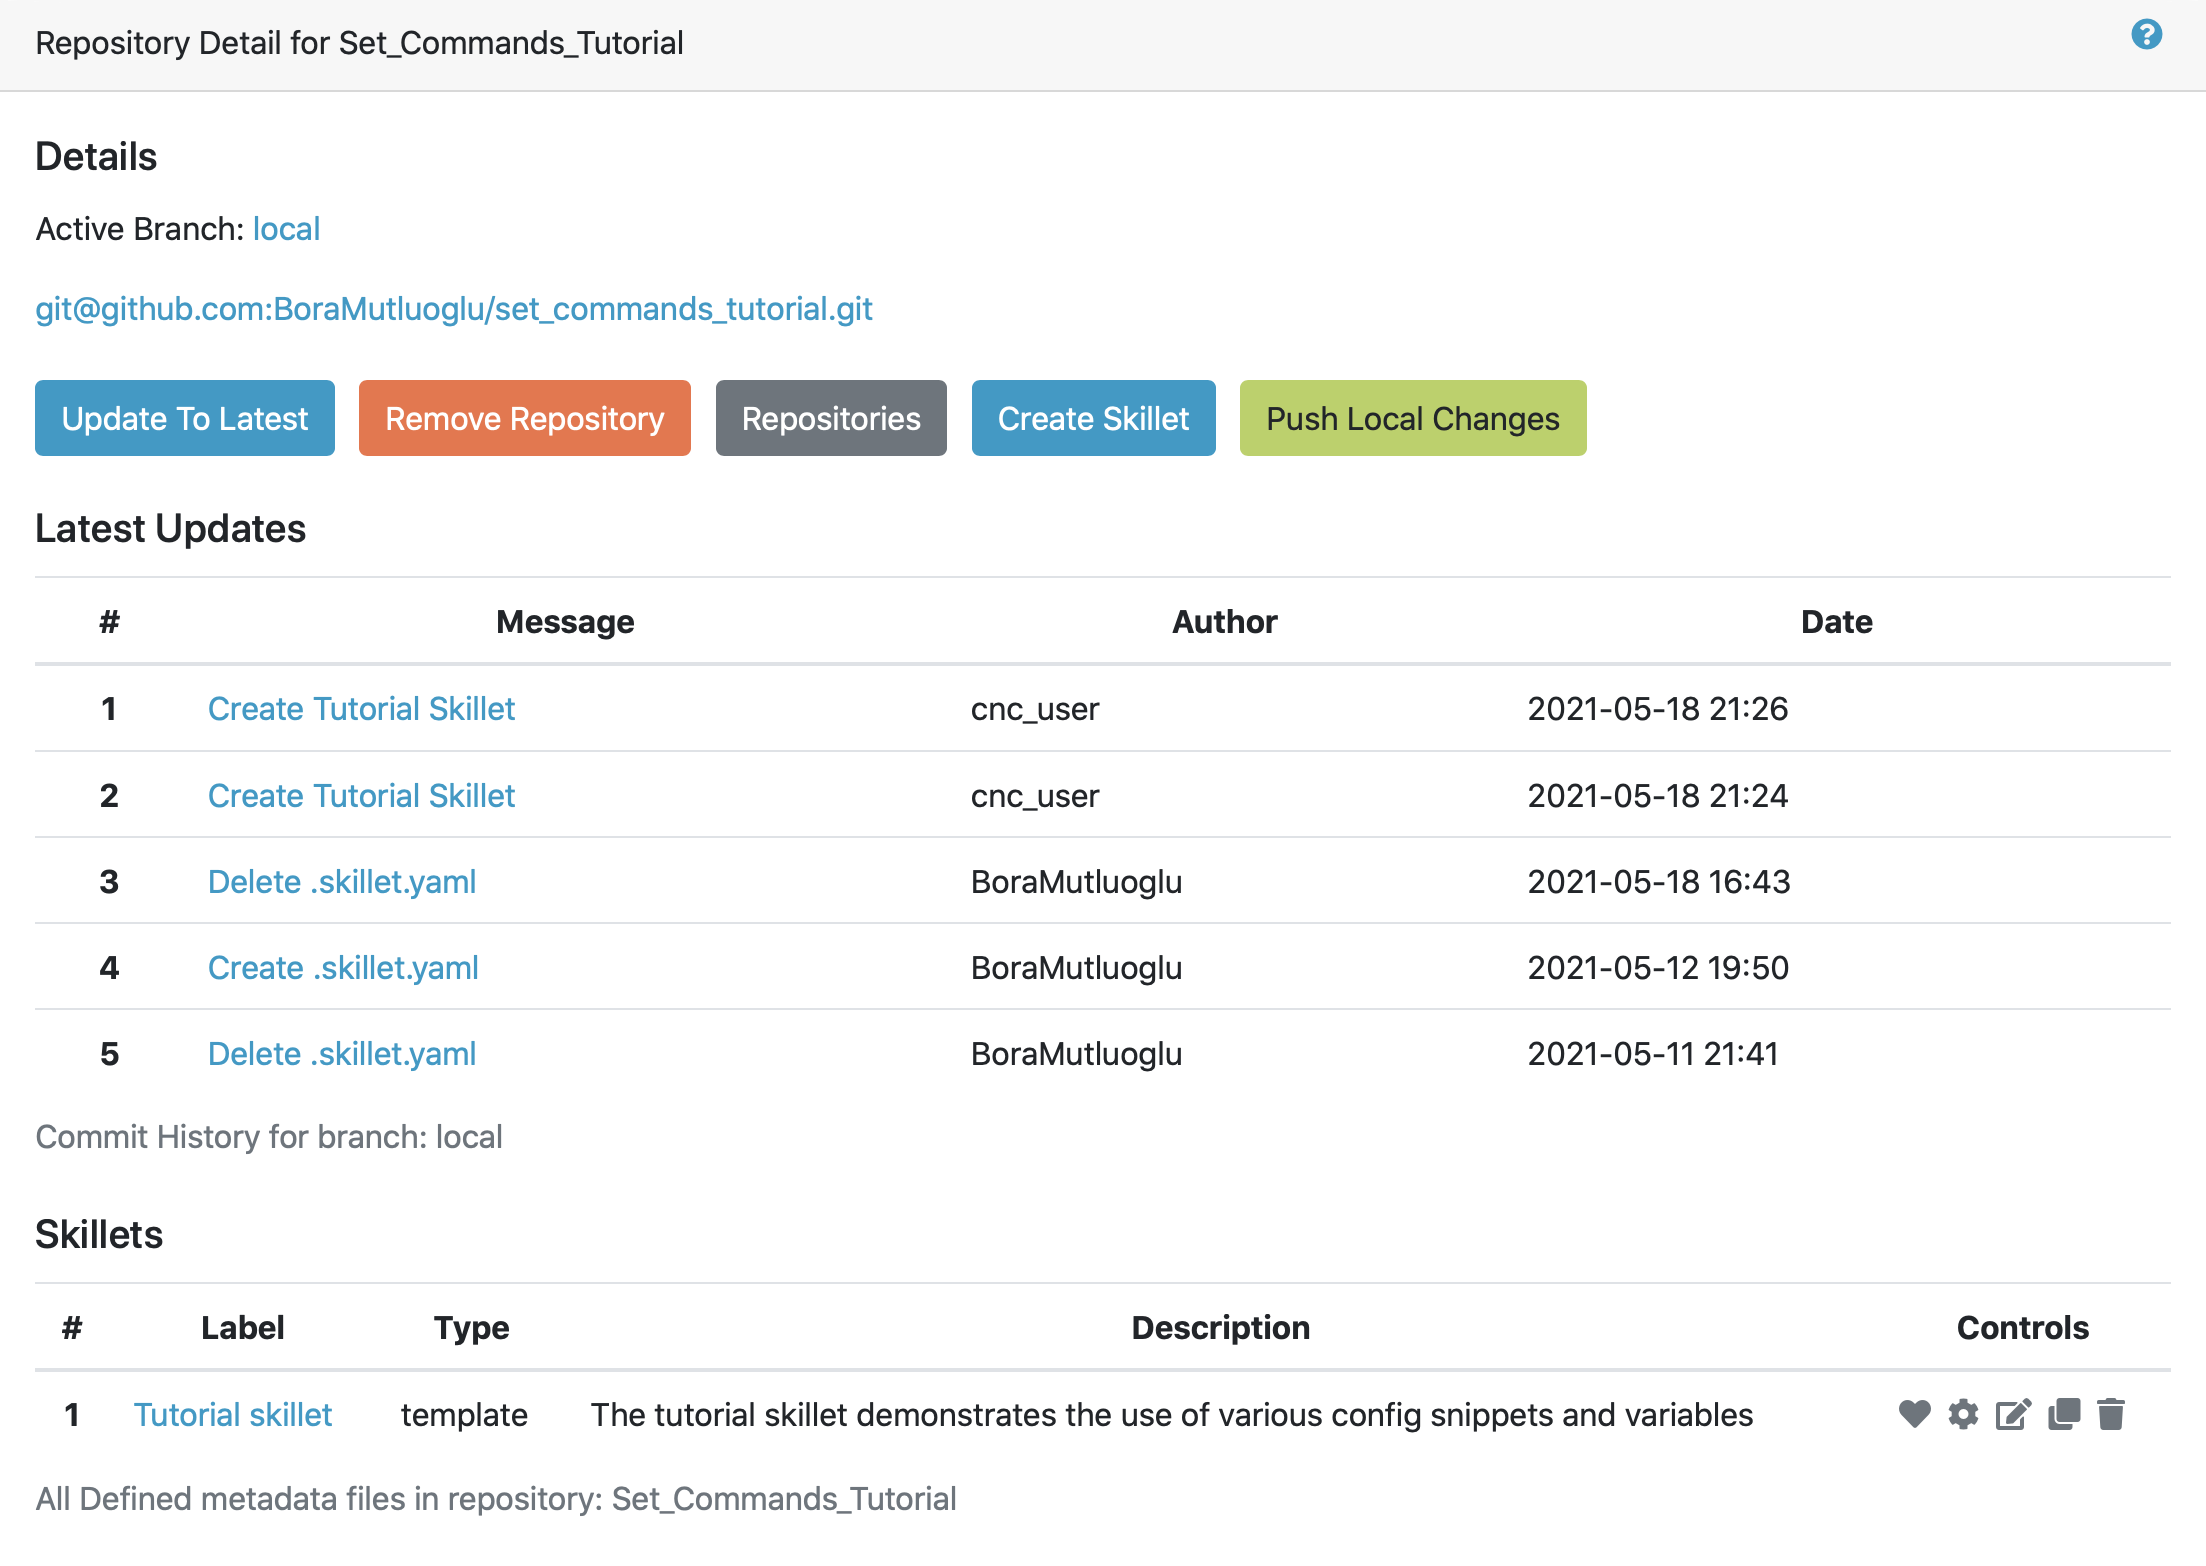
On this page simply scroll down until you find your saved skillet, in this case it should be called Tutorial Skillet. Locate the skillet and click on the Gear icon to inspect the skillets raw YAML data file. Choosing to click into the Gear should allow you to see the fully function skillets YAML file including all generated set commands within as well as the variables that were updated prior.

You can also click the Edit button on this page to access your skillet in edit mode and make changes.

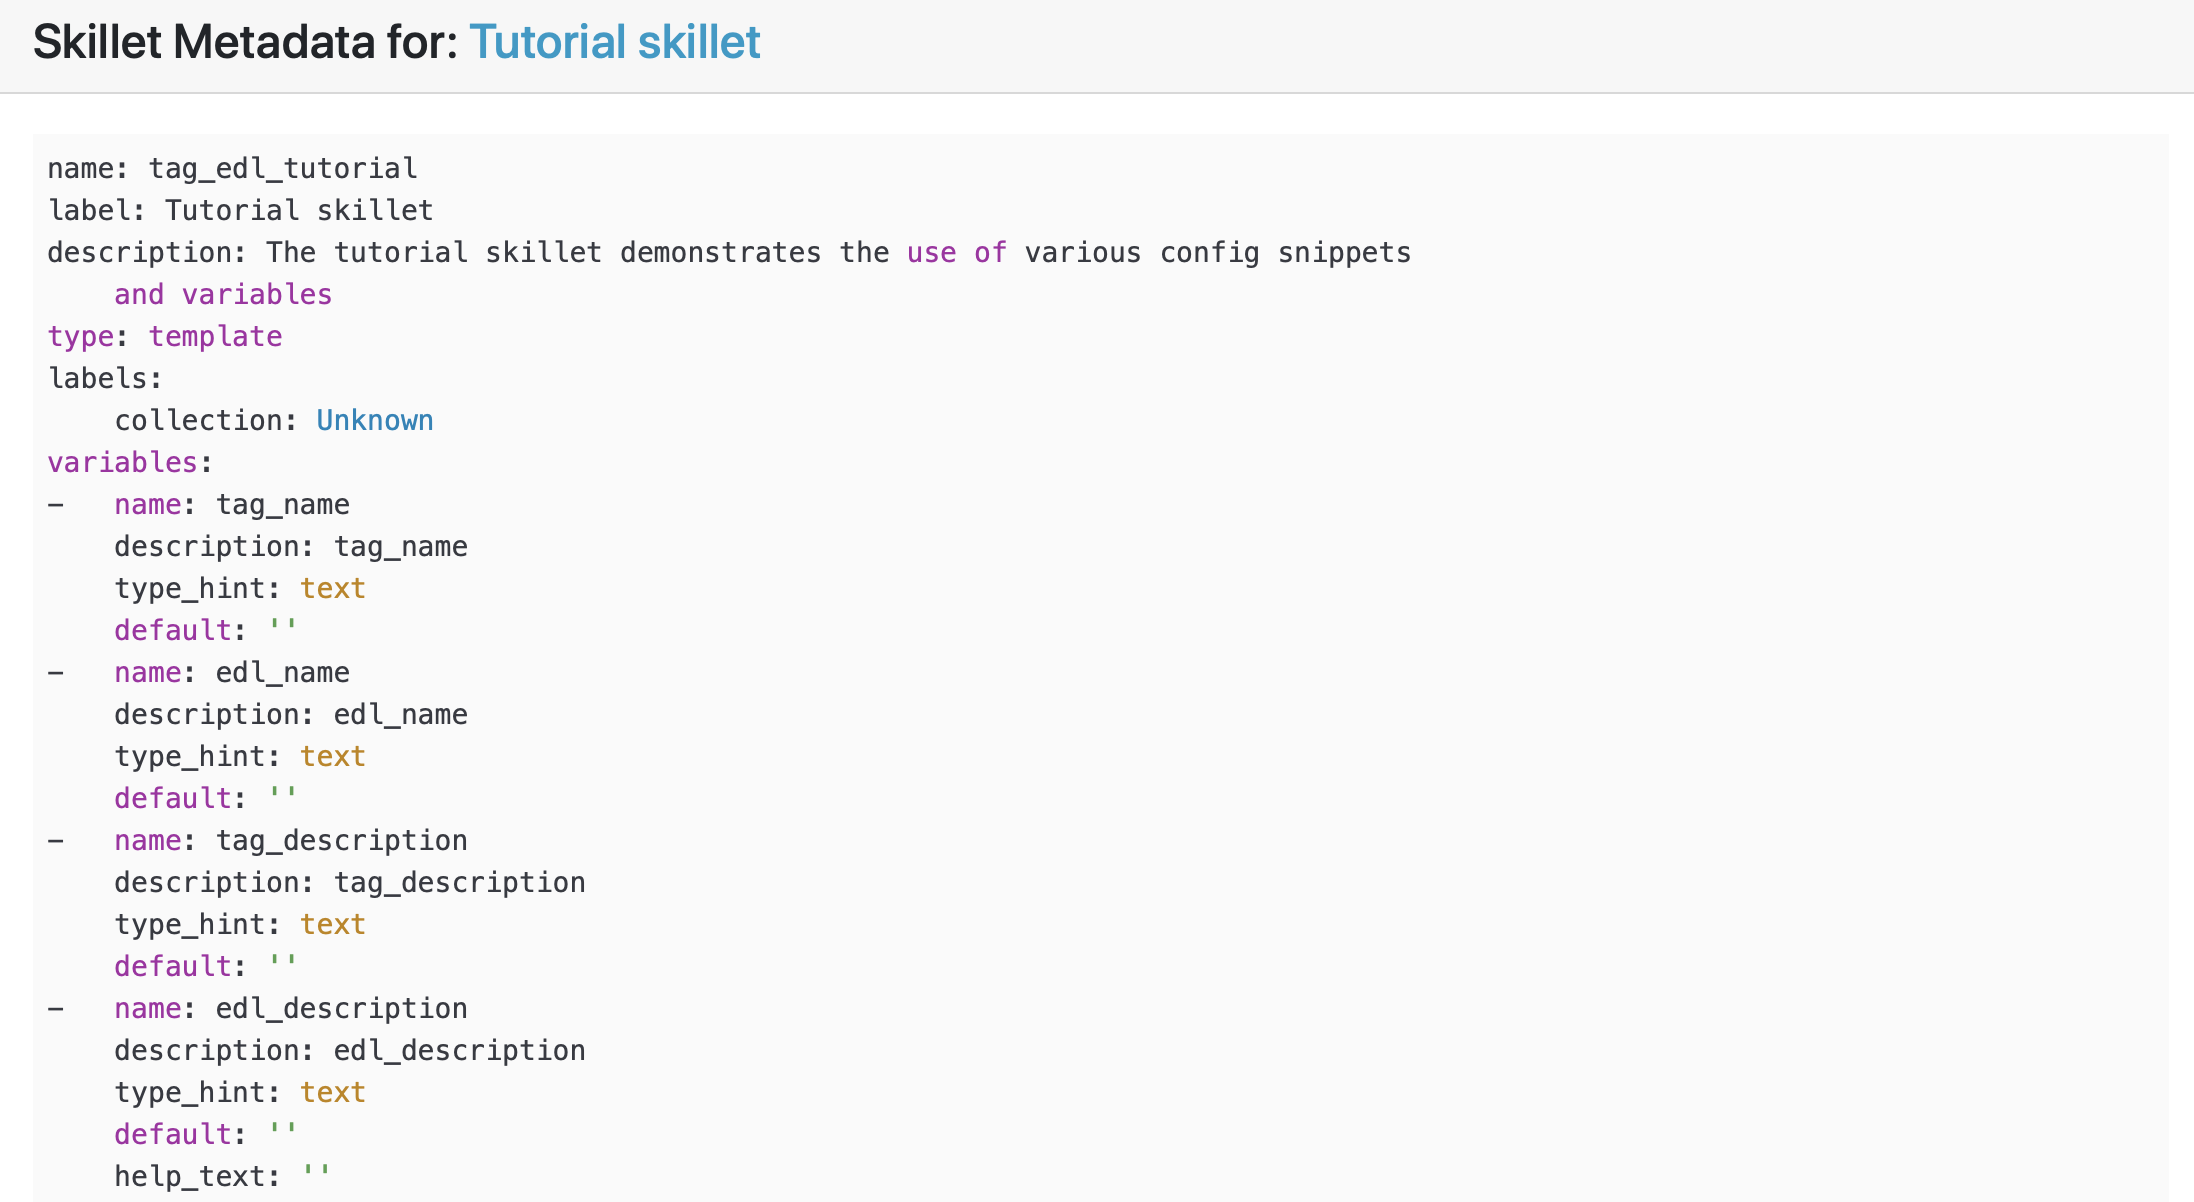
Your raw skillet YAML file should look something like the screenshots below.
Skillet Raw Yaml
At this point you should have a fully functioning set commands skillet! However we aren’t done yet, you always want to be sure to test your skillet for any possible issues before committing it back to your repository. Please refer to the Testing and Troubleshooting section in this tutorial for more guidance on testing methods.
Using SLI to Perform a Configuration Difference
In this section we will be going over how to use the SLI tool in the CLI to get a config diff. First head into the folder in which you cloned the SLI repository, activate the venv and perform the pip install command. For more in depth guidance please refer to SLI documentation.
> python3 -m venv ./venv
> source ./venv/bin/activate
> pip install sli
From here, run the following simple SLI command to get the config diff output in set commands form. accordingly.
> sli diff -of setNote
It should be noted that you can also get the config diff output in xml and skillet format by changing the keyword after the -of flag
After entering this command you will be prompted to enter your NGFW information, after entering the correct information you will receive all of the config differences output as set commands as can be seen below.
From here you can copy all of these set commands and paste them into a .txt file in the same directory as your SLI cloned repo.
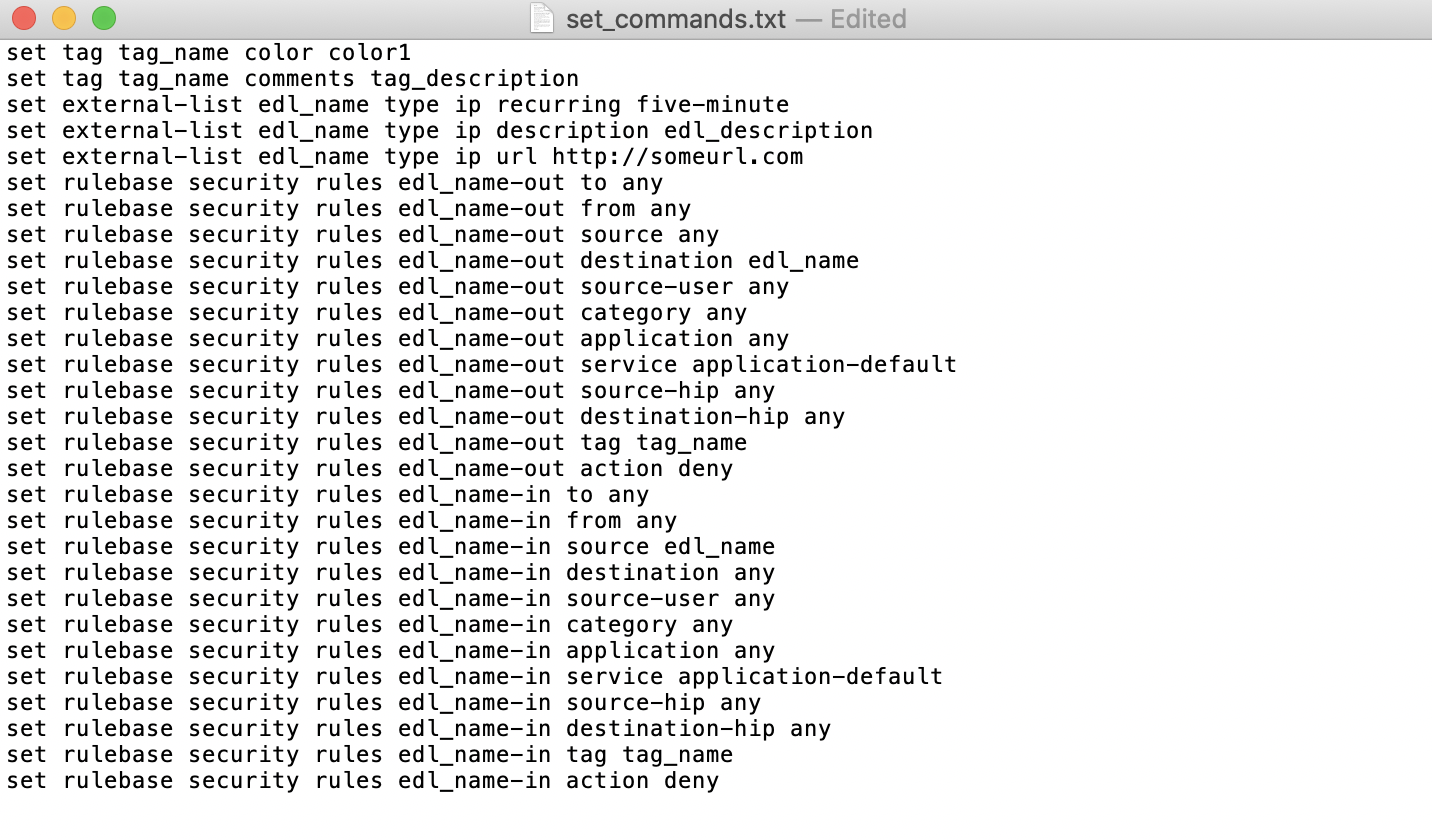
While in that directory you can run SLI and pass in the .txt file containing all of the set commands to automatically configure the NGFW with all provided set commands.
> sli load_set -uc set_commands.txt
Note
Another handy function that comes with SLI is its ability to locate errors in specific set commands. If any of the set commands entered in through SLI are faulty, SLI will error out and print the faulty set command line for your viewing pleasure!
Tip
You can also add a -v to the end of the above command to make it look like, sli load_set -uc {text_file} -v. This will output all the set commands being passed to the NGFW as they SLI is running in place of the black loading bar showcasing % complete.
At this point all configurations should have been made in your NGFW, simply log in to validate and commit the changes in your NGFW.
Test and Troubleshoot
Debug
Now that all the desired changes have been made to the Skillet, it is recommended to use the Debug tool to check for errors.
At the bottom of the Skillet Editor page, click the green Debug button.

This tool allows you to do some quick testing of the snippets to make sure they function as expected. In the context section, enter values based on your information:
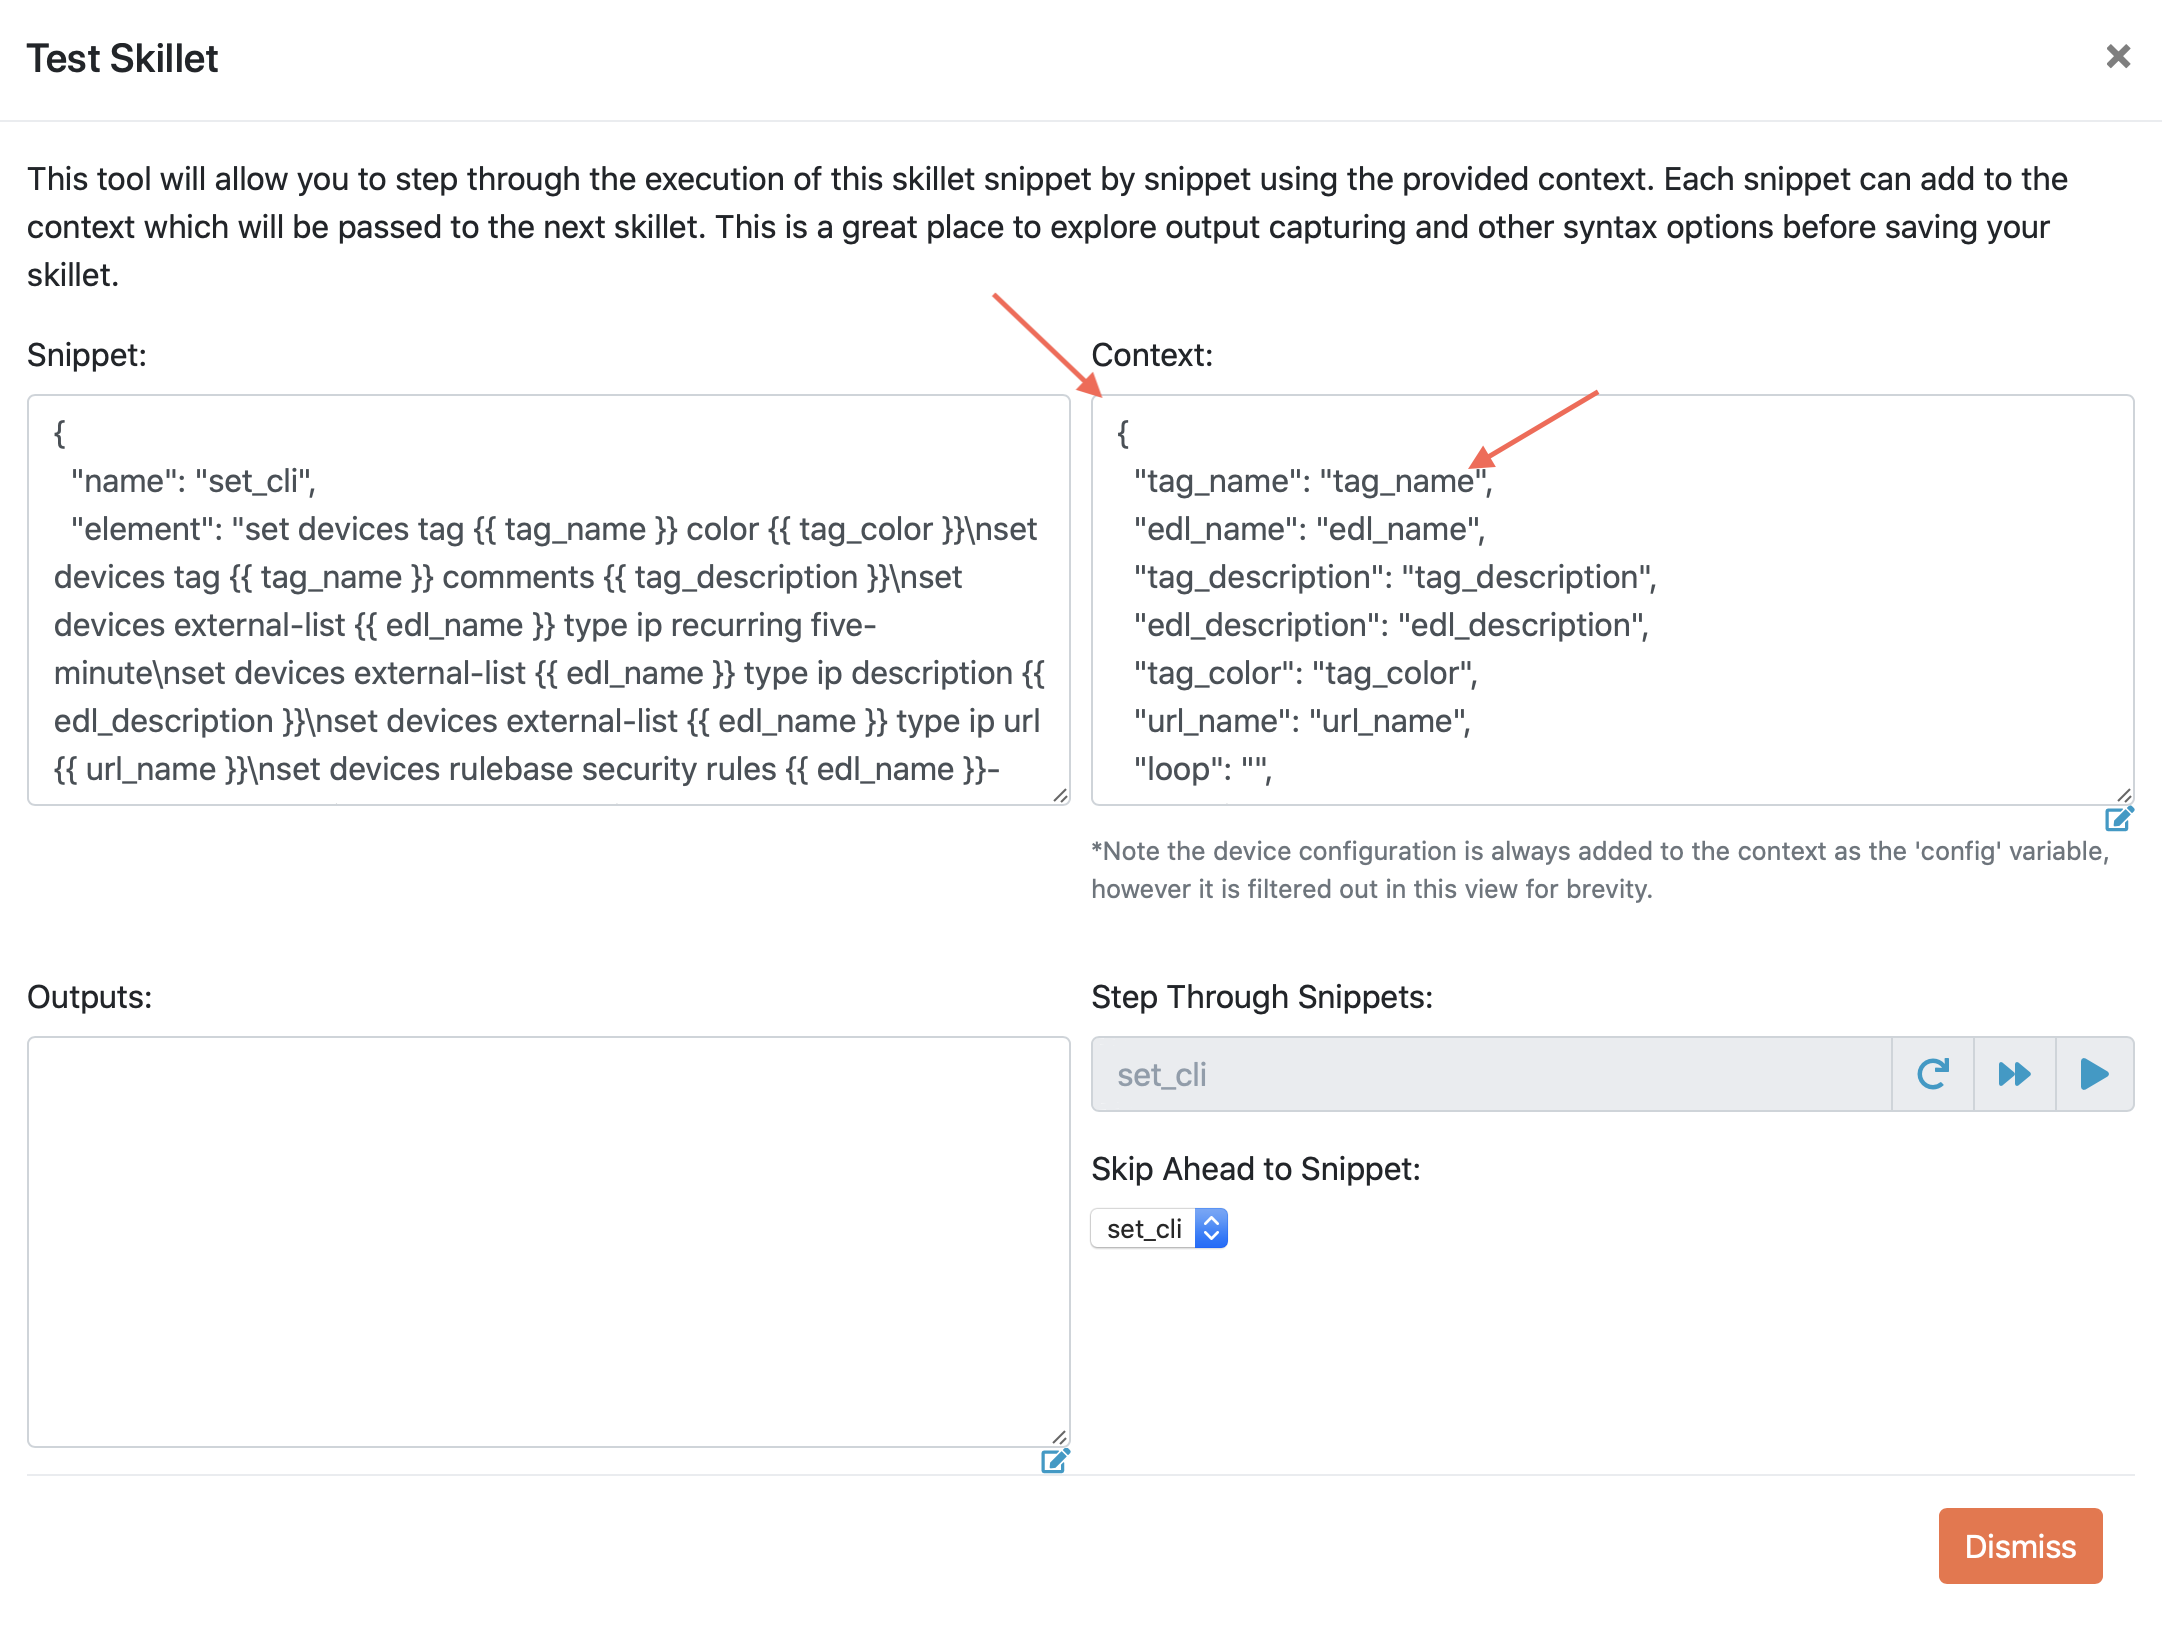
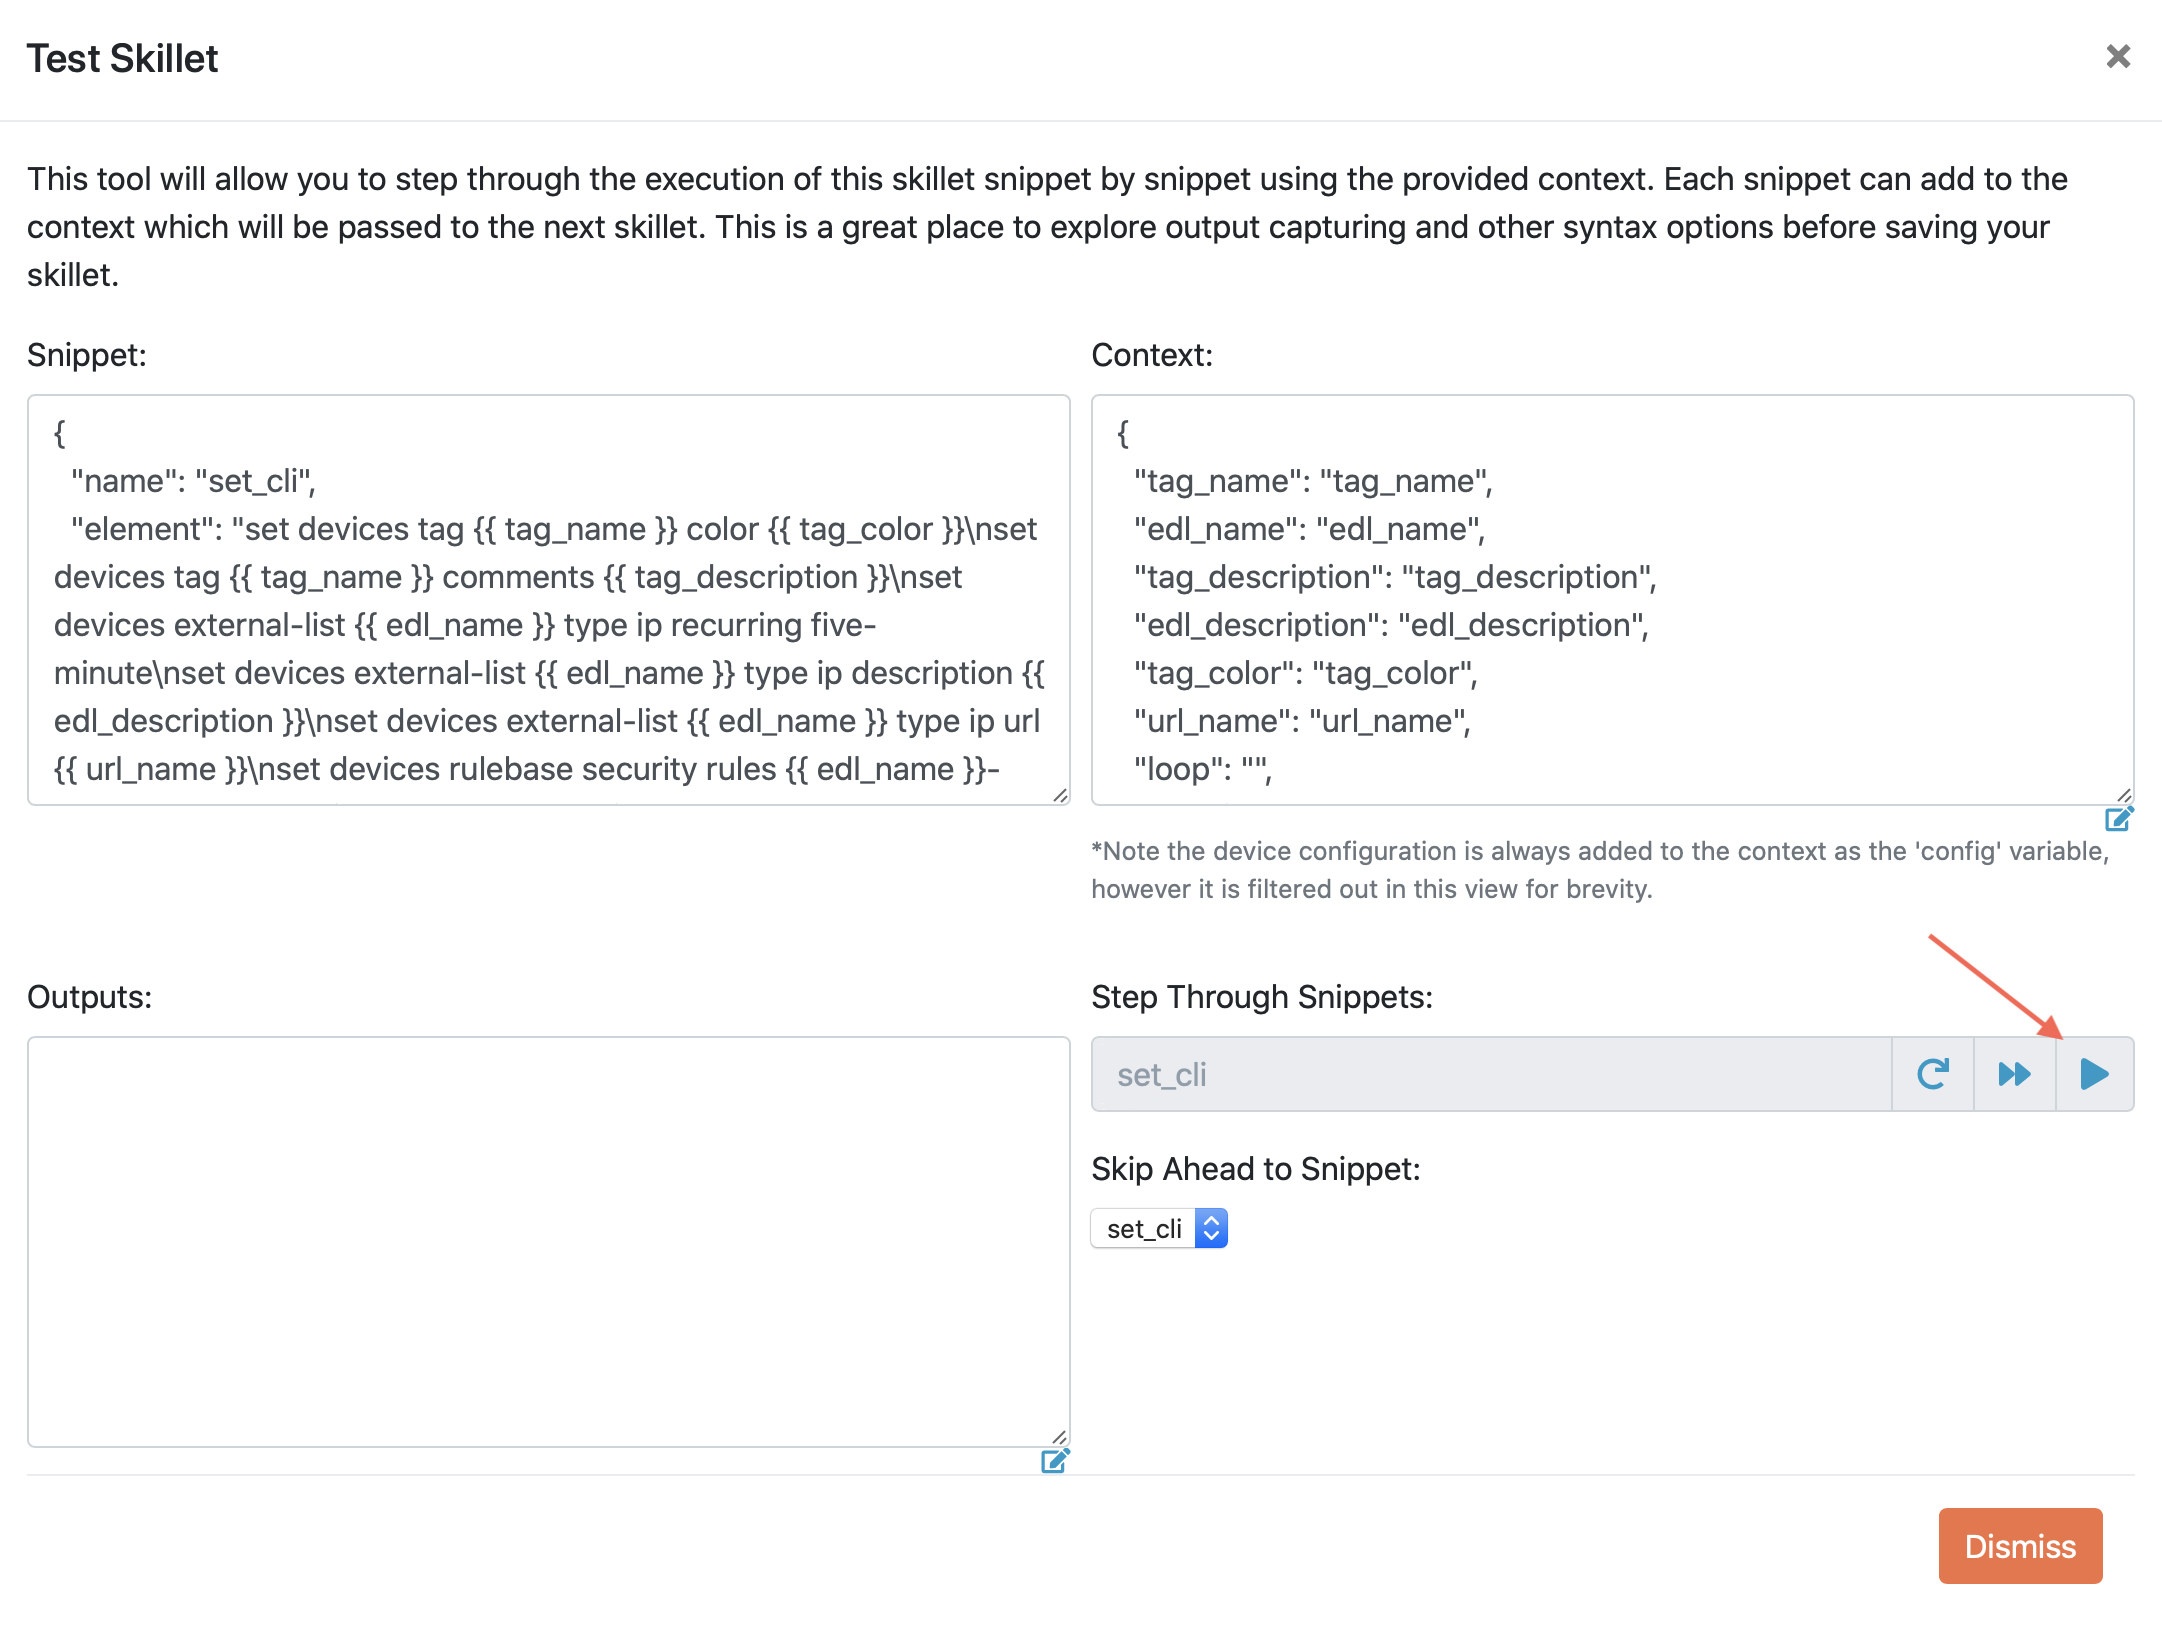
In the ‘Step Through Snippets’ section click the Play button to execute the snippet. Expected output may look something like the screenshot below:
Continue to step through the snippets. If you encounter an error, be sure to check the syntax in the ‘Context’ section. Look for missing quotes ‘”’, colons ‘:’, etc.
Once you have finished debugging, click the orange Dismiss button towards the bottom to close the page.
Play the Skillet
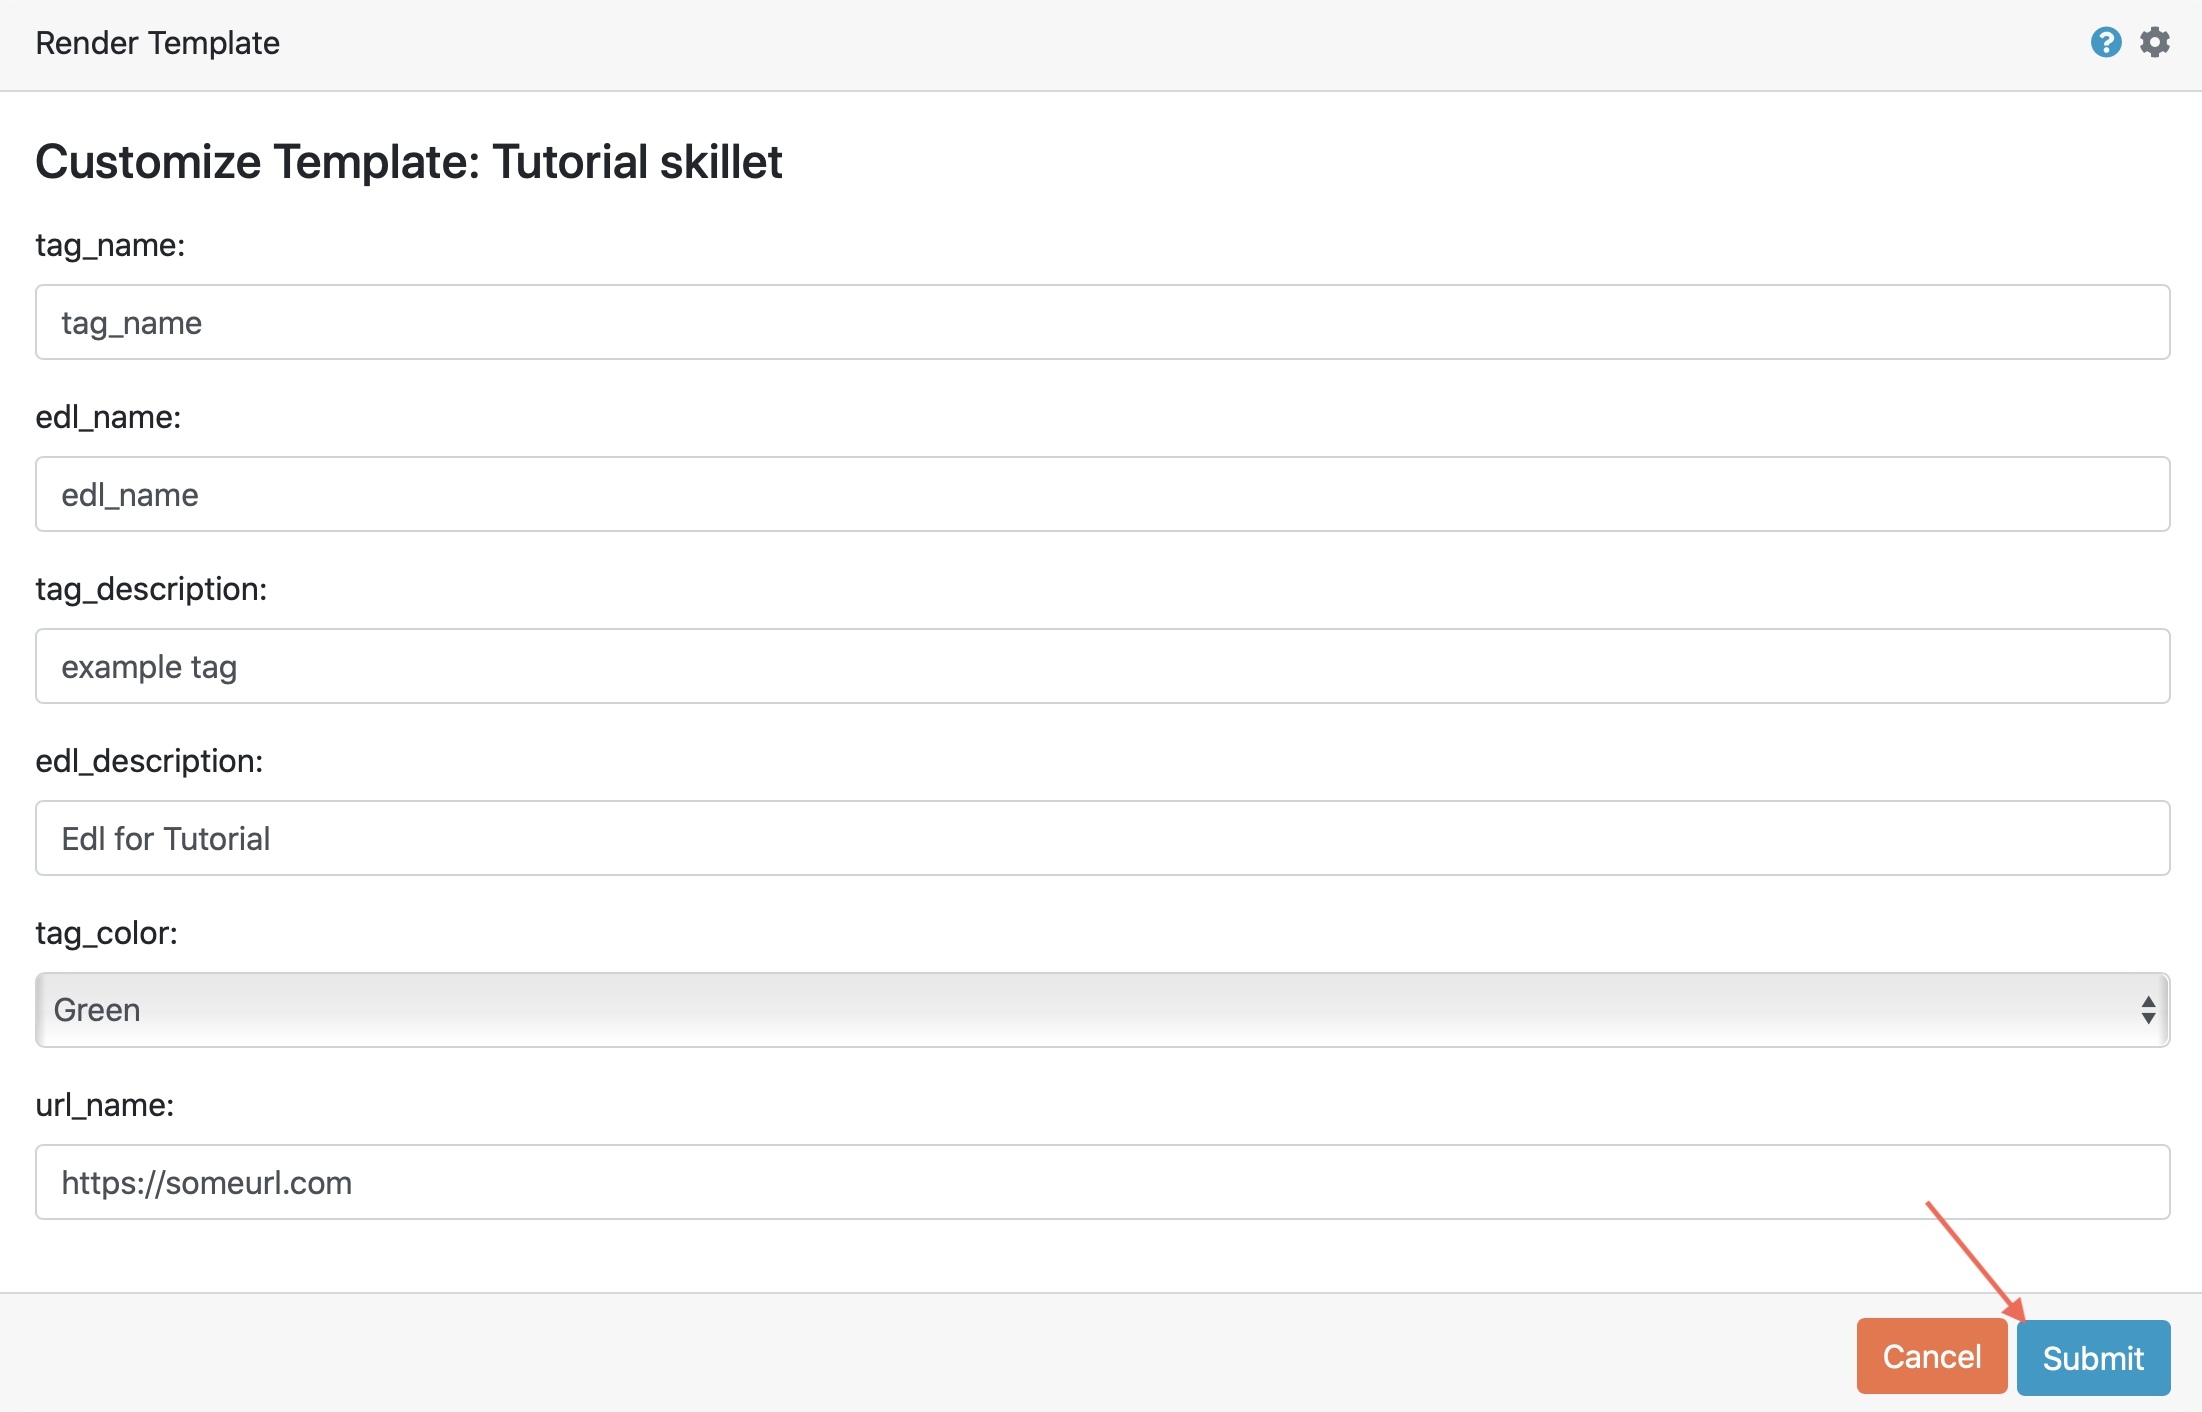
On the Repository Details page, click on the Skillet in the ‘Skillets’ section.

Now you should recognize all the variables that you added earlier on in the tutorial. Add your desired values for the variables. and click Submit.
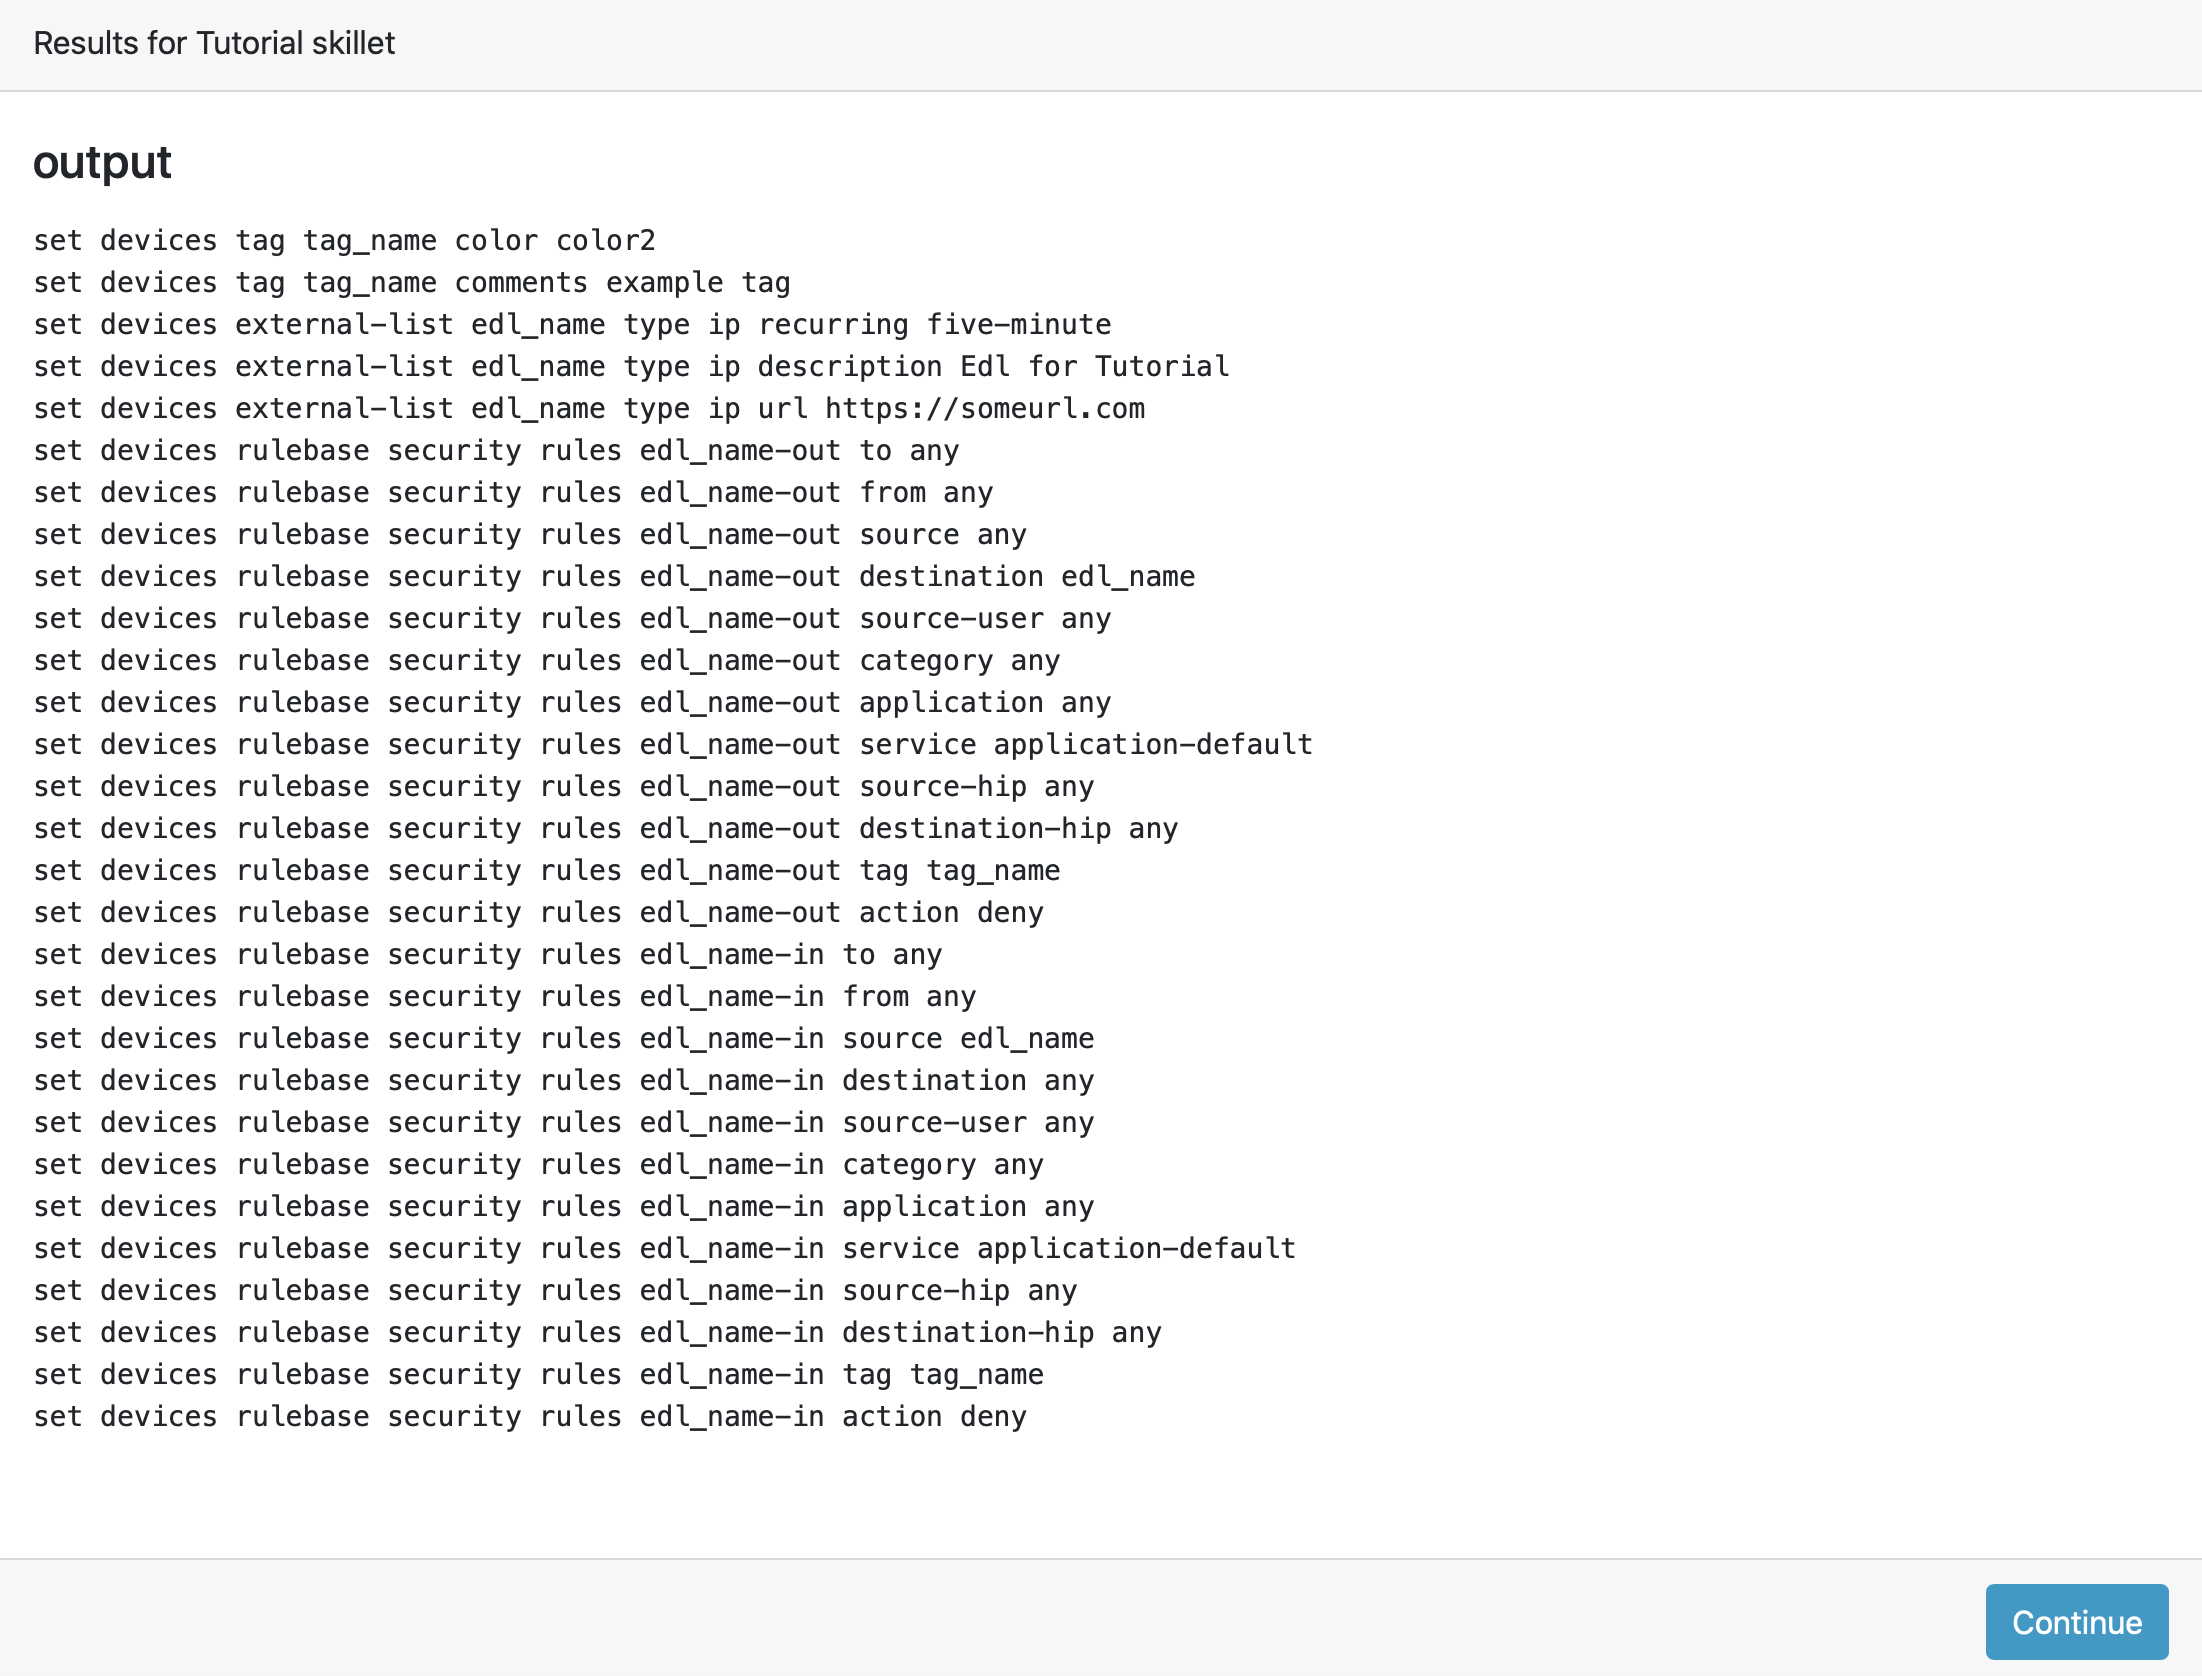
After submitting your customized variable names you will reach a page titled Output. Here you will be shown the output of your set command template skillet. You should see all the proper set commands with the respective variable names substituted where they should be.
If you receive errors messages, common issues may be:
Snippet load order
Set command load order, make sure set commands were loaded in the right order
Variable typos in the snippet section or not included in the variables section
YAML file invalidity
Tip
YAML is notoriously finicky about whitespace and formatting. While it’s a relatively simple structure and easy to learn, it can often also be frustrating to work with. A good reference to use to check that your YAML syntax is up to standard is the YAML Lint site. Test against a live device and fix/tune as needed.
Continue to edit, push, and test the skillet until it is free of errors and performs as expected.
Commit and Save
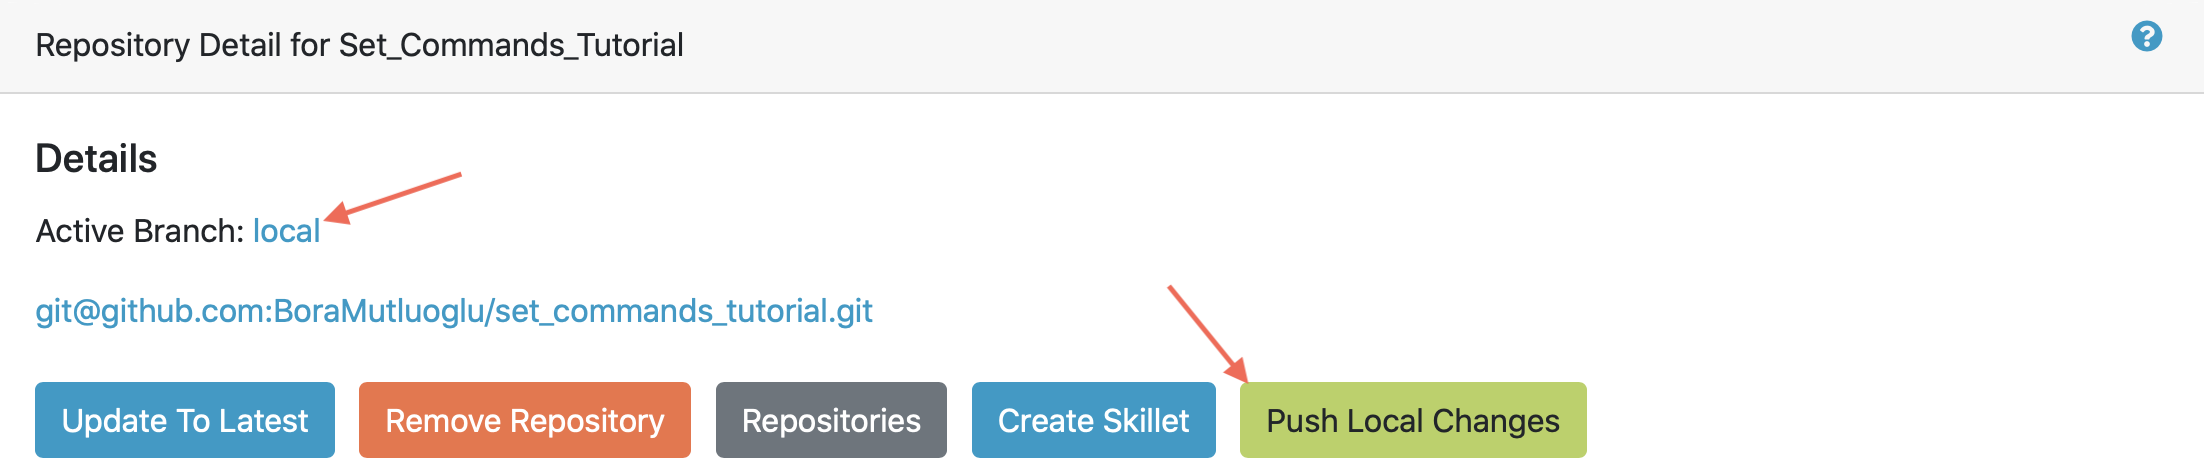
The skillet is now ready to be saved and committed to the GitHub repository. On the Repository Detail for Set_Commands_Tutorial click on the green Push Local Changes button to commit your changes back to your GitHub repository. Doing this will push the local changes you made to your skillet in PanHandler back to GitHub under the chosen branch, in this case the changes will be pushed under the Local branch.
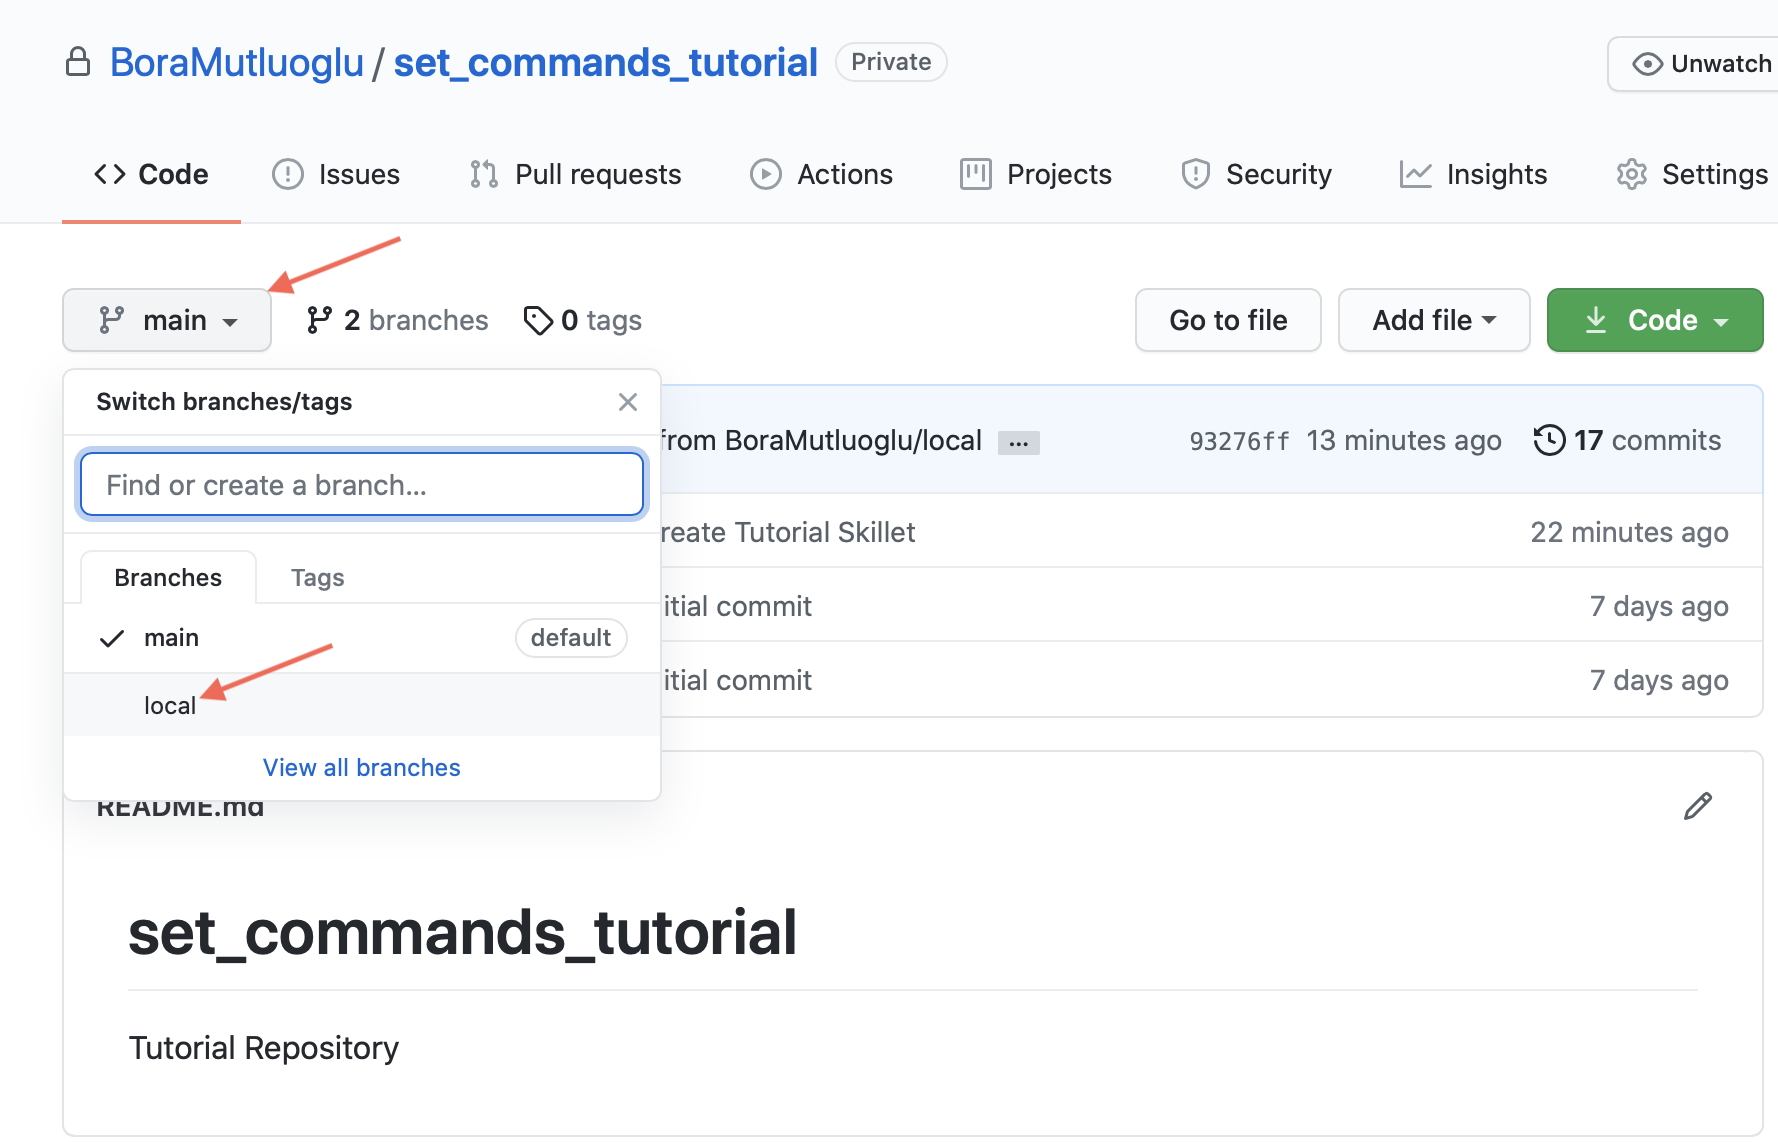
If the push was successful you should see a green message stating Changes Pushed Upstream! Now navigating back to your GitHub repository for this tutorial, you will want to locate the branches dropdown menu and click on it to expand your branch options. In this case click on Main branch and then navigate to the branch that your changes got pushed to, here it would be Local.
Once in the correct branch you will want to merge your changes into the main branch via a pull request. You will want to find the section shown below and then click on Pull Request in order to start merging the branches.

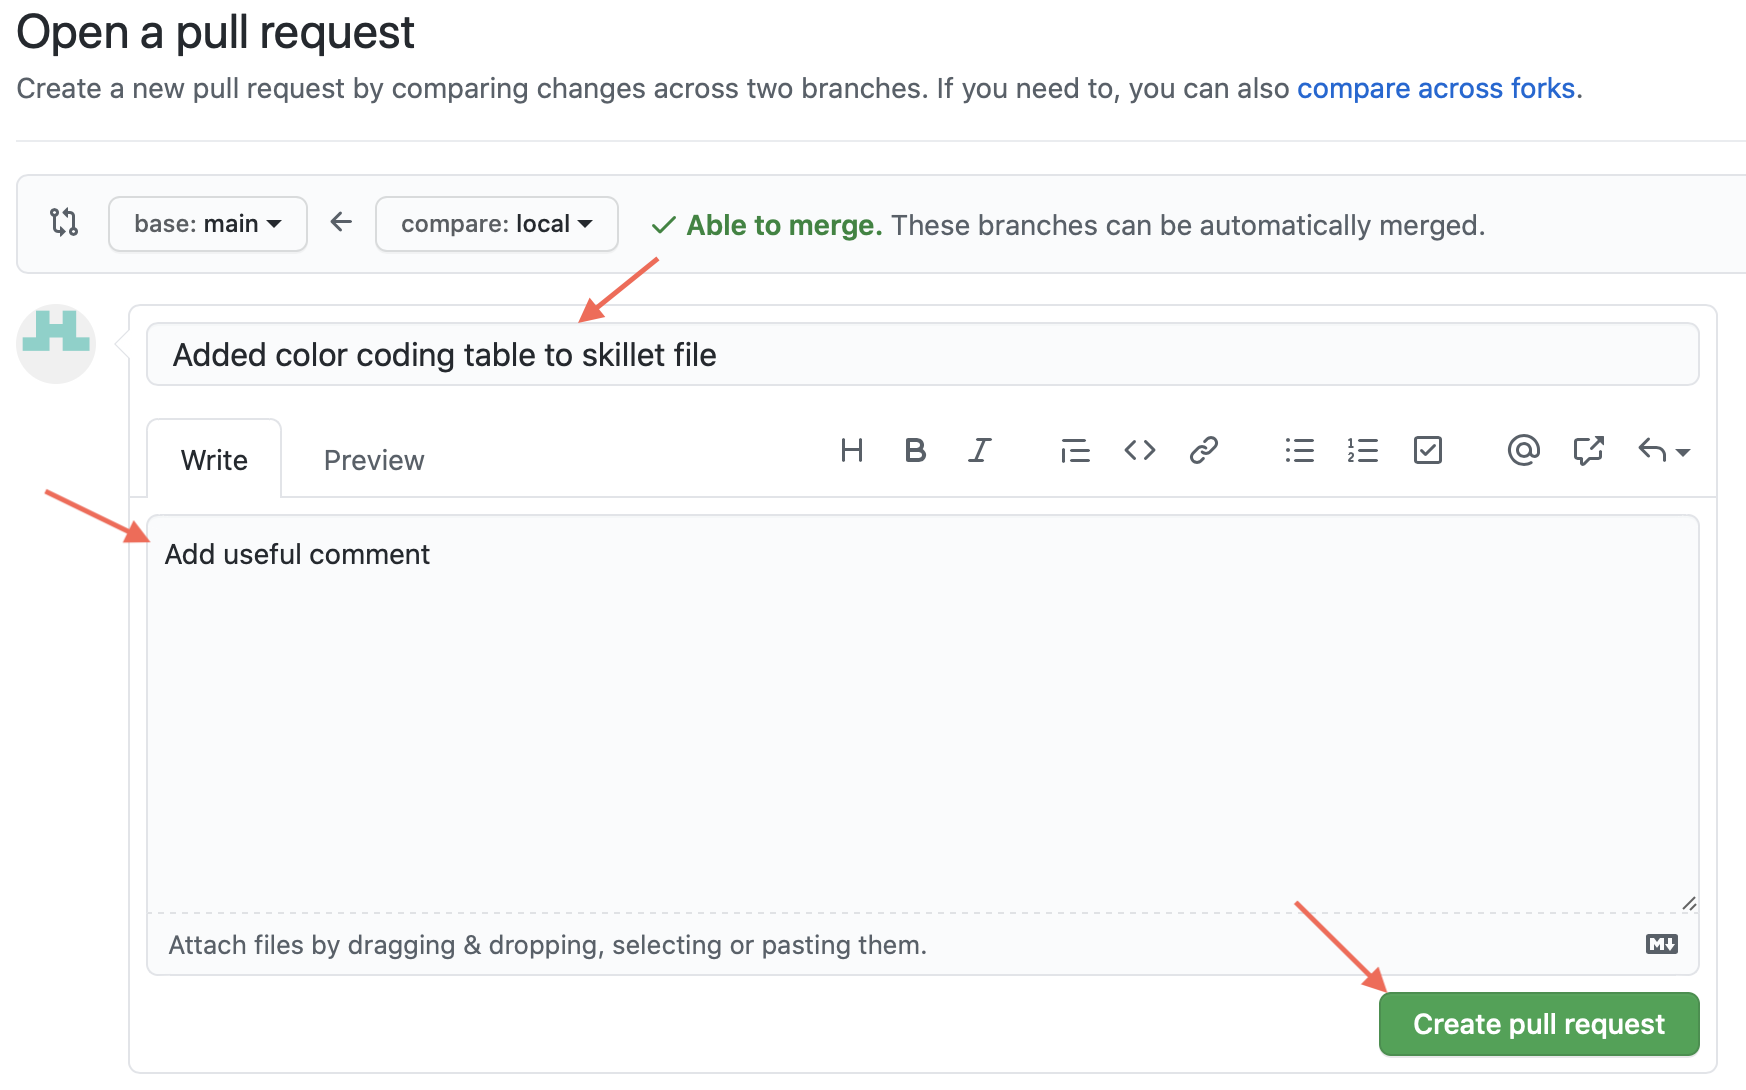
On the Open a Pull Request page you should give a descriptive title on what functionality the pull request will add to the repository. You can also go into more detail in the description portion of the pull request. Once everything has been filled in click the Create Pull Request button.
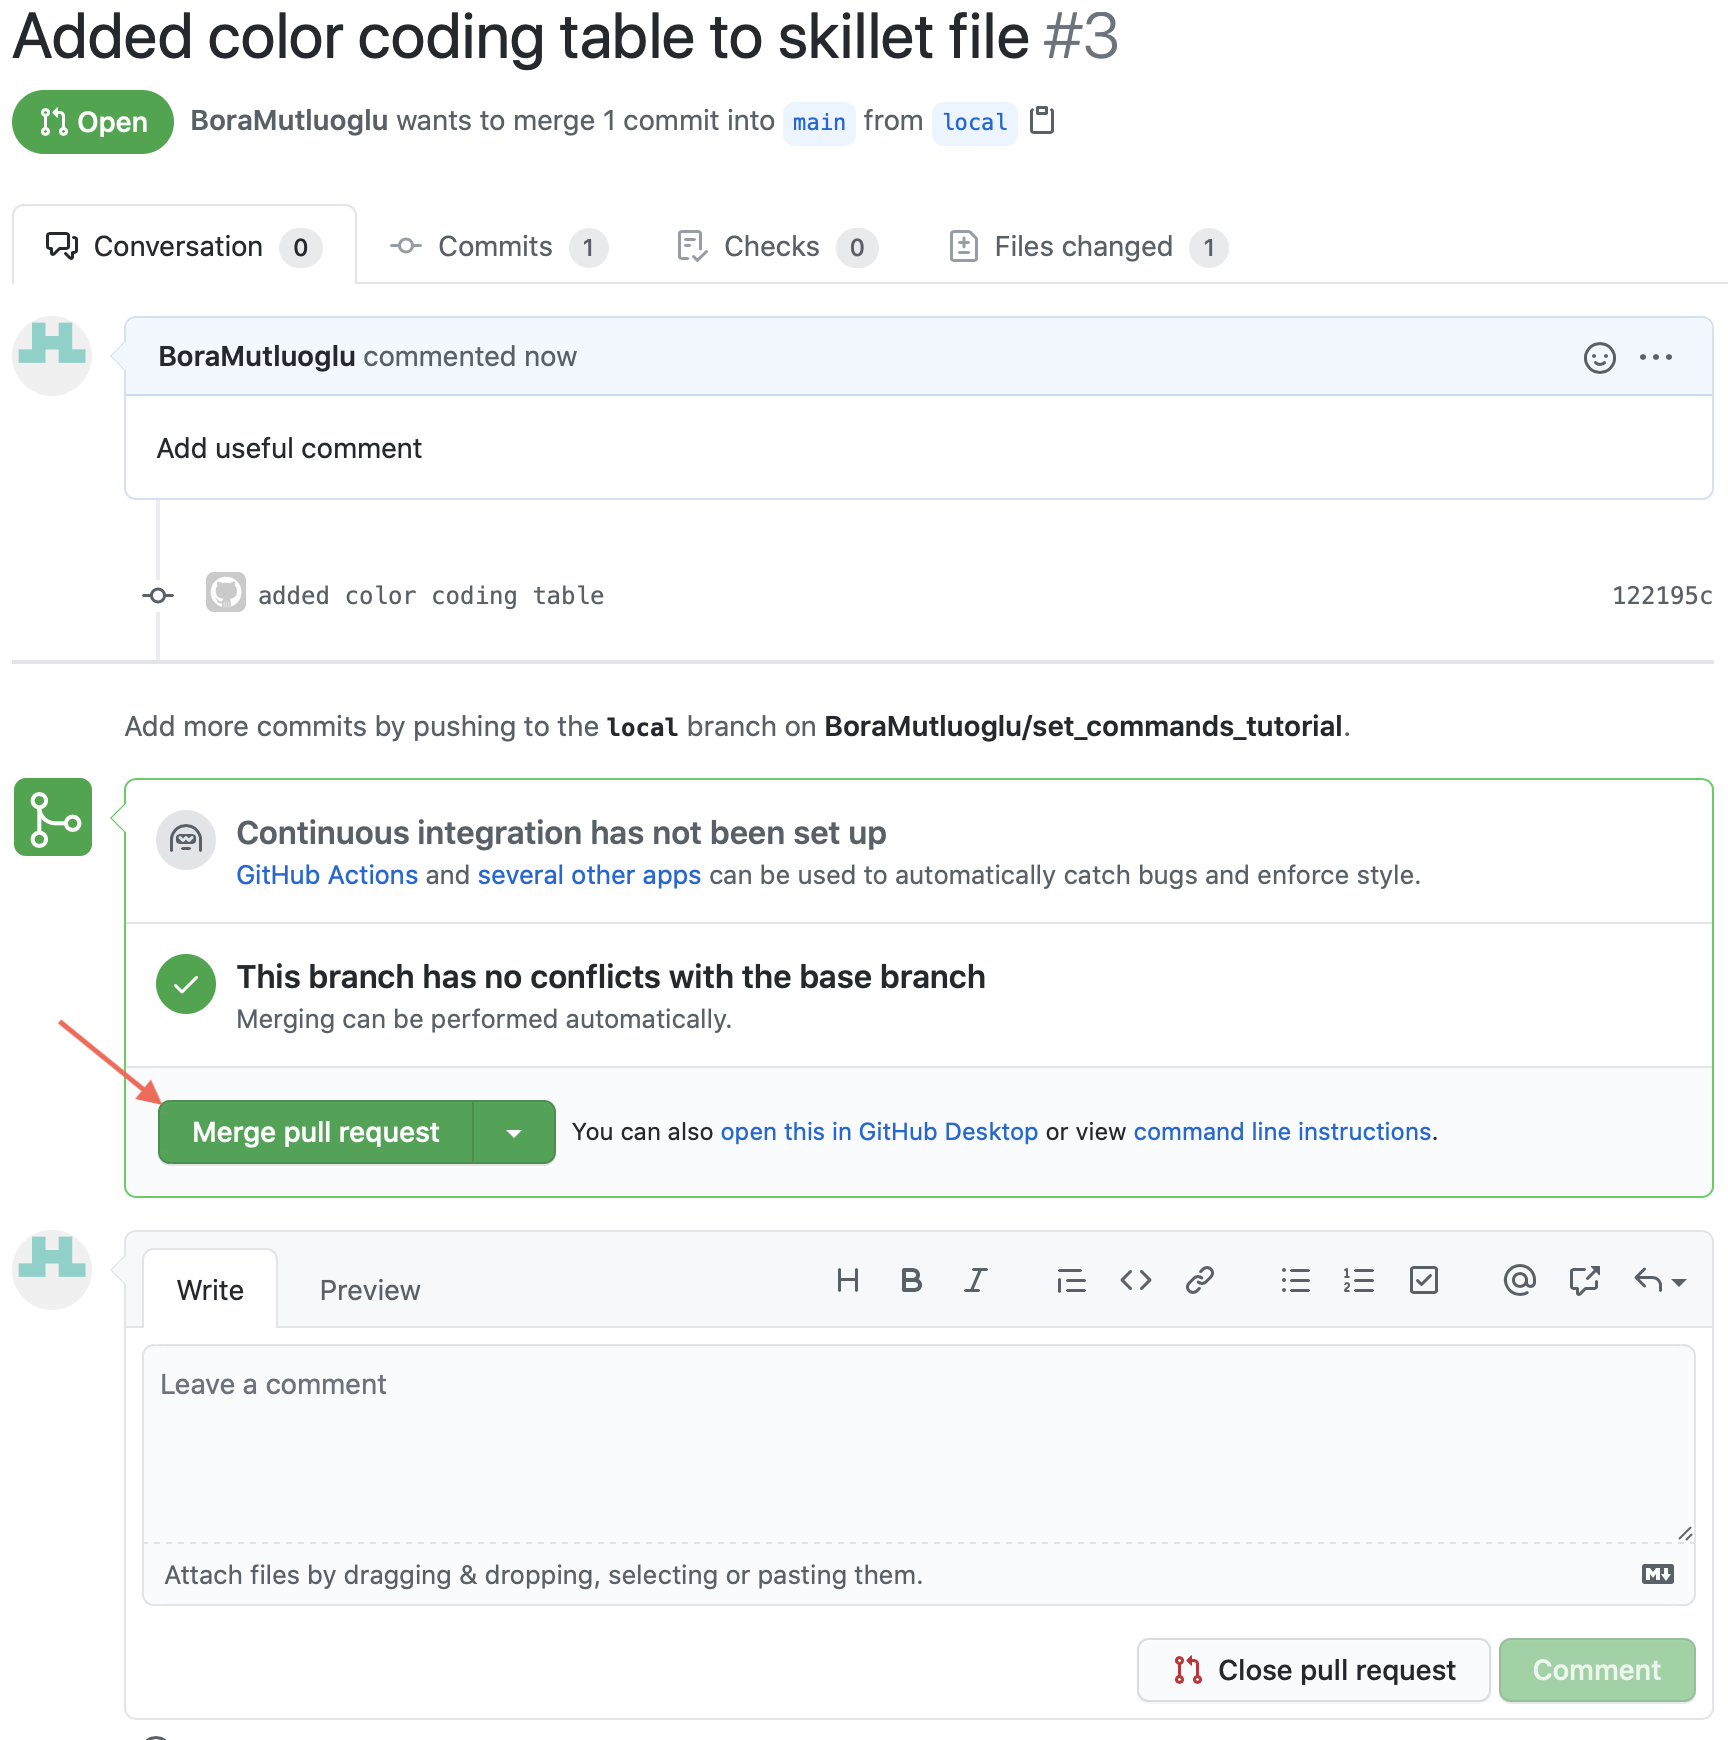
You will then find yourself on the final page of the pull request. Here you should make sure there are no merge conflicts and everything is cleared to merge. If everything checks out you should click the Merge Pull Request button and then the Confirm Merge button that replaces it once clicked.
You should see a message stating Pull request successfully merged and closed, upon seeing this message you can click the Delete branch button and navigate back to your main repository to see your changes all successfully merged!

Document
The final stage is to document key details about the skillet to provide contextual information to the user community.
The skillet repo created has a placeholder README.md and earlier in the tutorial we created a README.md within the skillet directory. The main README gives an overview of the repo for any user viewing the page. The skillet directory README should provide skillet-specific details such as what the skillet does, variable input descriptions, and caveats and requirements.
README.md uses the markdown format. Numerous examples can be found in the skillet files. There is also a wide array of markdown cheat sheets you can find using Google searches. Below are a few common markdown elements you can use in your documentation. Most EDIs can display the user view as you edit the markdown file.
Markdown syntax options
#, ##, ### for header text levels (H1, H2, H3, etc.)
**text** for bold text
*text* or _text_ to underline
1. text to create numbered lists
* text, + text, - text for bullet style lists
[text](url) for inline web links
`test` to highlight a text string
```text block - one or more lines``` to create a highlighted text block
Tip
To view markdown edits in existing GitHub repos, click on the README.md file, then use the
Rawoption to display the output as raw markdown text. From here you can copy-paste or review formatting.
Below is a sample README.md file for the tutorial skillet. Paste into the skillet README file and push to Github. View the skillet repo to see the updated page text.
# Sample Configuration Skillet

This is used in the training material as part of the tutorial.

The skillet has 3 set elements:

* tag: create a tag using inputs for name, description, and color
* external-list: create an edl using inputs for name, description, and url
* security policies: inbound and outbound security policies referencing the edl and tag names

## variables

* tag_name: name of a newly created tag and used in the security rules
* tag_description: text field to describe the tag
* tag_color: dropdown mapping color names to color numbers
* edl_name: name of the newly created external-list
* edl_description: text field used to describe the external-list
* edl_url: url used for the external-list

The 'recurring' value for the EDL is set to five-minutes. This could be added as a variable but for this example, the
value is considered a recommended practice so not configurable in the skillet.

The EDL type is set to IP since used in the security policy and is not configurable in the skillet.

## security policy referencing variables

The security policy does not have its own variables asking for rule name, zones, or actions. The rules are
hardcoded with 'any' for most attributes and action as deny to block traffic matching the EDL IP list.

The security rule names use the EDL name followed by '-in' and '-out' to create unique security policies for each
EDL. This is denoted in the yaml file with ```{{ edl_name }}``` included in the rule name.
Live Community
Skillets can be shared in the Live community as Community or Personal skillets. Community Skillets are expected to have a higher quality of testing, documentation, and ongoing support. Personal skillets can be shared as-is to create awareness and eventually become upgraded as Community Skillets.
Click here to view the Quickplay Solutions homepage.
SkilletBuilder Support Policy
The code and templates in the repo are released under an as-is, best effort, support policy. These scripts should be seen as community supported and Palo Alto Networks will contribute our expertise as and when possible. We do not provide technical support or help in using or troubleshooting the components of the project through our normal support options such as Palo Alto Networks support teams, or ASC (Authorized Support Centers) partners and backline support options. The underlying product used (the VM-Series firewall) by the scripts or templates are still supported, but the support is only for the product functionality and not for help in deploying or using the template or script itself. Unless explicitly tagged, all projects or work posted in our GitHub repository (at https://github.com/PaloAltoNetworks) or sites other than our official Downloads page on https://support.paloaltonetworks.com are provided under the best effort policy.