Building and Testing with SLI
Install SLI
In a terminal/bash shell enter the following to create a virtual python environment and install SLI.
> mkdir {directory name of your choice}
> cd {directory from step above}
> python3 -m venv ./venv (Create the venv)
> source ./venv/bin/activate (Activate the venv)
> pip install sli
Use SLI to Perform a Configuration Difference
SLI can extract the difference between two configuration files. See instructions above for installing SLI locally on your machine.
To get the difference between two configs in XML format, run the following command:
> sli diff -of xmlAfter entering this command, you will be prompted to enter your NGFW information. After entering the correct information you will receive the configuration differences between the candidate and running configs output as XML (seen below).

Refer to the GitHub page in order to create a new repository and clone it to your local machine. Start with a blank .skillet.yaml file in your text editor/IDE.
Use this basic template to begin populating the file with skillet content:
name: New_Skillet
label: Tutorial Skillet
description: Skillet template for use with SLI
type: panos
labels:
    collection: Unknown
variables:
-   name:
    description:
    type_hint:
    default: ''
snippets:
-   name:
    xpath:
    element:
For this basic example we will use the edl snippet from the instructions and screenshot above. Add the content for the name, xpath, and element of the snippet.
- name: external-list-820753
  xpath: /config/devices/entry[@name="localhost.localdomain"]/vsys/entry[@name="vsys1"]
  element: |-
      <external-list>
                  <entry name="edl_name">
                    <type>
                      <ip>
                        <recurring>
                          <five-minute/>
                        </recurring>
                        <url>http://someurl.com</url>
                        <description>edl_description</description>
                      </ip>
                    </type>
                  </entry>
                </external-list>
  cmd: set
  file: ''
  template_title: ''
For more customization, you can also add variables. For this example we will add a variable to change the name of the edl. Enter the following into the variables section:
variables:
-   name: edl_name
    description: name of edl
    type_hint: text
    default: ''
Next, modify the snippet to use Jinja variable formatting and replace the current edl_name with the variable. It is important to keep the spacing between the curly brackets and the variable name.
- name: external-list-820753
  xpath: /config/devices/entry[@name="localhost.localdomain"]/vsys/entry[@name="vsys1"]
  element: |-
      <external-list>
                  <entry name="{{ edl_name }}">
                    <type>
                      <ip>
                        <recurring>
                          <five-minute/>
                        </recurring>
                        <url>http://someurl.com</url>
                        <description>edl_description</description>
                      </ip>
                    </type>
                  </entry>
                </external-list>
  cmd: set
  file: ''
  template_title: ''
Here you can add other desired variables and snippets. You can create a variable for the url and description.
- name: external-list-820753
  xpath: /config/devices/entry[@name="localhost.localdomain"]/vsys/entry[@name="vsys1"]
  element: |-
      <external-list>
                  <entry name="{{ edl_name }}">
                    <type>
                      <ip>
                        <recurring>
                          <five-minute/>
                        </recurring>
                        <url>{{ edl_url }}</url>
                        <description>{{ edl_description }}</description>
                      </ip>
                    </type>
                  </entry>
                </external-list>
  cmd: set
  file: ''
  template_title: ''
Don’t forget to add the variables in the variables section.
variables:
-   name: edl_description
    description: edl_description
    type_hint: text
    default: ''
-   name: edl_url
    description: edl_url
    type_hint: text
    default: ''
-   name: edl_name
    description: edl_name
    type_hint: text
    default: ''
Play a Skillet with SLI
Clone your skillet in the SLI directory you are currently working in.
> git clone {skillet repo}To load and view the skillets available in the current working directory, type the following:
> sli loadYou can also specify a skillet directory by:
> sli load -sd {skillet directory}To play the skillet, type the following:
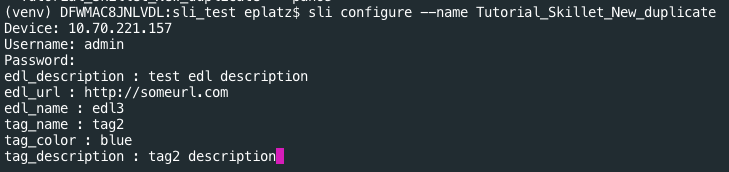
> sli configure --name {name of skillet}To specify a directory when playing the skillet enter:
> sli configure -sd {skillet directory} --name {name of skillet}After entering this command, you will be prompted to enter your NGFW information and the values to the variables in the skillet.
Note
If tag_color is a variable in the skillet, you must enter the color number (color1, color2, etc.) and NOT the actual color, otherwise the skillet will not work. Please refer to the color mappings table in the configuration tutorial.
Store User Context in SLI
SLI has a built-in context manager that allows data to be stored between commands.
As you play a skillet for the first time, use ‘-uc’ in the command to store the context from the skillet.
> sli configure --name {name of skillet} -ucTo view the context stored in SLI type:
> sli show_contextTo clear the context stored in SLI type:
> sli clear_context
For more in depth instructions on the context manager refer to the SLI Documentation.
Help with SLI
In a terminal/bash shell type the following to list all available actions for SLI:
> sli --help
